

JournTech
Production Coordinator Guide
This guide was made from the help pages on 9 November 2026. The help centre has the latest version.
Help Press Ctrl+P to print it or save it as a PDF.
Role
Production Coordinator
Runs the copy-editing, typesetting, proofs and release of accepted works and prepares the ISBN requests.
The production coordinator prepares accepted works for publication on the Production screen. The production coordinator can edit catalogue records but cannot publish or retract them. This role also prepares the ISBN requests and the legal deposit records.
In the panel you see the Production and ISBN & legal deposit screens, and the Publications, People & institutions and File library screens under Catalogue.
Permissions of this role
- See production jobs
- Manage production jobs and tasks
- Release accepted works to the catalogue
- See unpublished catalogue records
- Create and edit publications, issues and files
- Upload, replace and archive files in the file library
- Create and edit persons and institutions
- See ISBN requests, printings and the legal deposit
- Prepare ISBN requests and record the Ministry steps, printings and the legal deposit
Screens and settings
Panel Search
Searching submissions, publications, people, users, pages and help topics at once with the search box in the panel's top bar.
The search box in the top bar searches many parts of the panel at once. When you type in the box and press Enter, the
Search screen opens and the results are grouped into sections. Turkish characters and upper and
lower case make no difference. For example, typing ışık also finds the title Işık Kirliliği.
The box appears for all roles other than Registered researcher and Reviewer. Which sections you see depends on your permissions.
Result sections
| Section | Permission needed to see it | Screen that opens all results |
|---|---|---|
| Submissions | See the submissions in scope (editor queue) | Editor queue |
| Publications | See unpublished catalogue records | Publications |
| People | Create and edit persons and institutions | People & institutions |
| Users | See user accounts | Users & roles |
| Pages | Edit pages, menus, banners, news, events and documents | Pages & policies |
| Help | No permission needed | The help centre's search |
Each section shows at most six results. If there are more, the See all link at the top of the section opens the search in that screen's list. Submission and publication results also show the type and the status.
When you press a help result, the topic opens in the help panel next to the screen, and you do not leave the screen you are working on.
When there are no results
Check the spelling or try a shorter phrase. If you are searching by submission number, type the whole number, for example JT-2026-00012.
Feature
Production
Running the copy-editing, typesetting and proof work for an accepted work and releasing it to the catalogue.
When an editor accepts a submission, a job for the work opens automatically on the Editorial → Production screen. The job's checklist has these tasks: copy-editing, typesetting, cover, proof and author approval, metadata check, identifiers, licence and access, and final approval. The Production coordinator assigns the tasks, uploads the proofs and the final files and shares the proof with the author.
When the checklist is complete, the work is released to the catalogue with its publication settings. The record is published at once or stays a draft for the catalogue editors' final check. Because the release is an editorial decision, the catalogue's editor approval rule does not cover this step.
Editors and the Unit manager role can only view jobs. A job's statuses are described in Job Statuses.
Screens and settings
Production Board
The cards, filters and Open job button of the board that lists production jobs in columns by status.
The Editorial → Production screen shows the production jobs of accepted works as a board. If your role was granted for one journal, you see only the jobs of that journal.
Columns
Jobs are listed in four columns by status. Each column shows its number of jobs at the top, and the numbers follow the filters you choose. The Released column shows the jobs released last. The button at the bottom of the column brings the earlier ones too.
| Column | Jobs |
|---|---|
| Open | Jobs where work has not started yet |
| In progress | Jobs where work has started |
| Ready to release | Jobs with all required tasks done |
| Released | Jobs released to the catalogue |
The statuses are described in Job Statuses.
Cards
Each card shows the submission number and the type, title and journal of the work. The progress bar of the card counts the completed tasks. Below it you see the number of open required tasks, or Required tasks done. The bottom line of the card gives the production lead and the planned release date. An overdue job carries the Overdue badge.
Filters
- The Search box searches submission numbers and titles.
- Assigned to me shows the jobs where you are the production lead or have an open task assigned to you.
- Overdue shows the jobs that have a task past its due date, or that are not released by their planned release date.
- Show cancelled jobs lists cancelled jobs in a separate section at the bottom of the board. The ones cancelled last come first.
Opening a job
Jobs open automatically with the editor's acceptance decision. If an accepted submission has no job, use the Open job button. The button appears to people with the permission to manage production. The steps are in Planning a Job.
How-to
Planning a Job
Opening a production job by hand, assigning the production lead, and entering the planned release date and notes for the team.
As soon as an editor accepts a submission, a job with the default checklist opens for the work. The production team and the author are notified.
Opening a job by hand
If no job opened automatically for an accepted submission, you open it yourself.
- On the Editorial → Production screen, press Open job.
- Select the submission in the Accepted submission list.
- Press Open job in the dialog.
The dialog lists the accepted submissions in your scope that have no job, with their number, journal or type, and title. If the submission already has a job, the dialog says so and shows the Open the existing job link.
Job details
- Open the job from the board.
- On the Job details card, select the lead in the Production lead list.
- In Planned release date, enter when the work is planned to be released.
- Optionally write a note for the team in Notes.
- Press Save.
The assigned lead gets a notification. The list holds the users who can see production jobs for the journal of the job. A job that is not released by its planned date counts as overdue on the board.
Assigning the tasks is described in Managing Tasks.
Screens and settings
Production Job Page
The checklist, tasks, files, front matter, comments, job details and release settings cards on the page of a production job.
When you open a job from the board, the header shows the title, submission number, type and journal of the work, the production lead, the planned release date and the acceptance date. Without the production permission, you can only view the page, and a note says so. When the production lead's account was closed, the Account closed label appears next to the name, and the production coordinators receive the notifications meant for the lead.
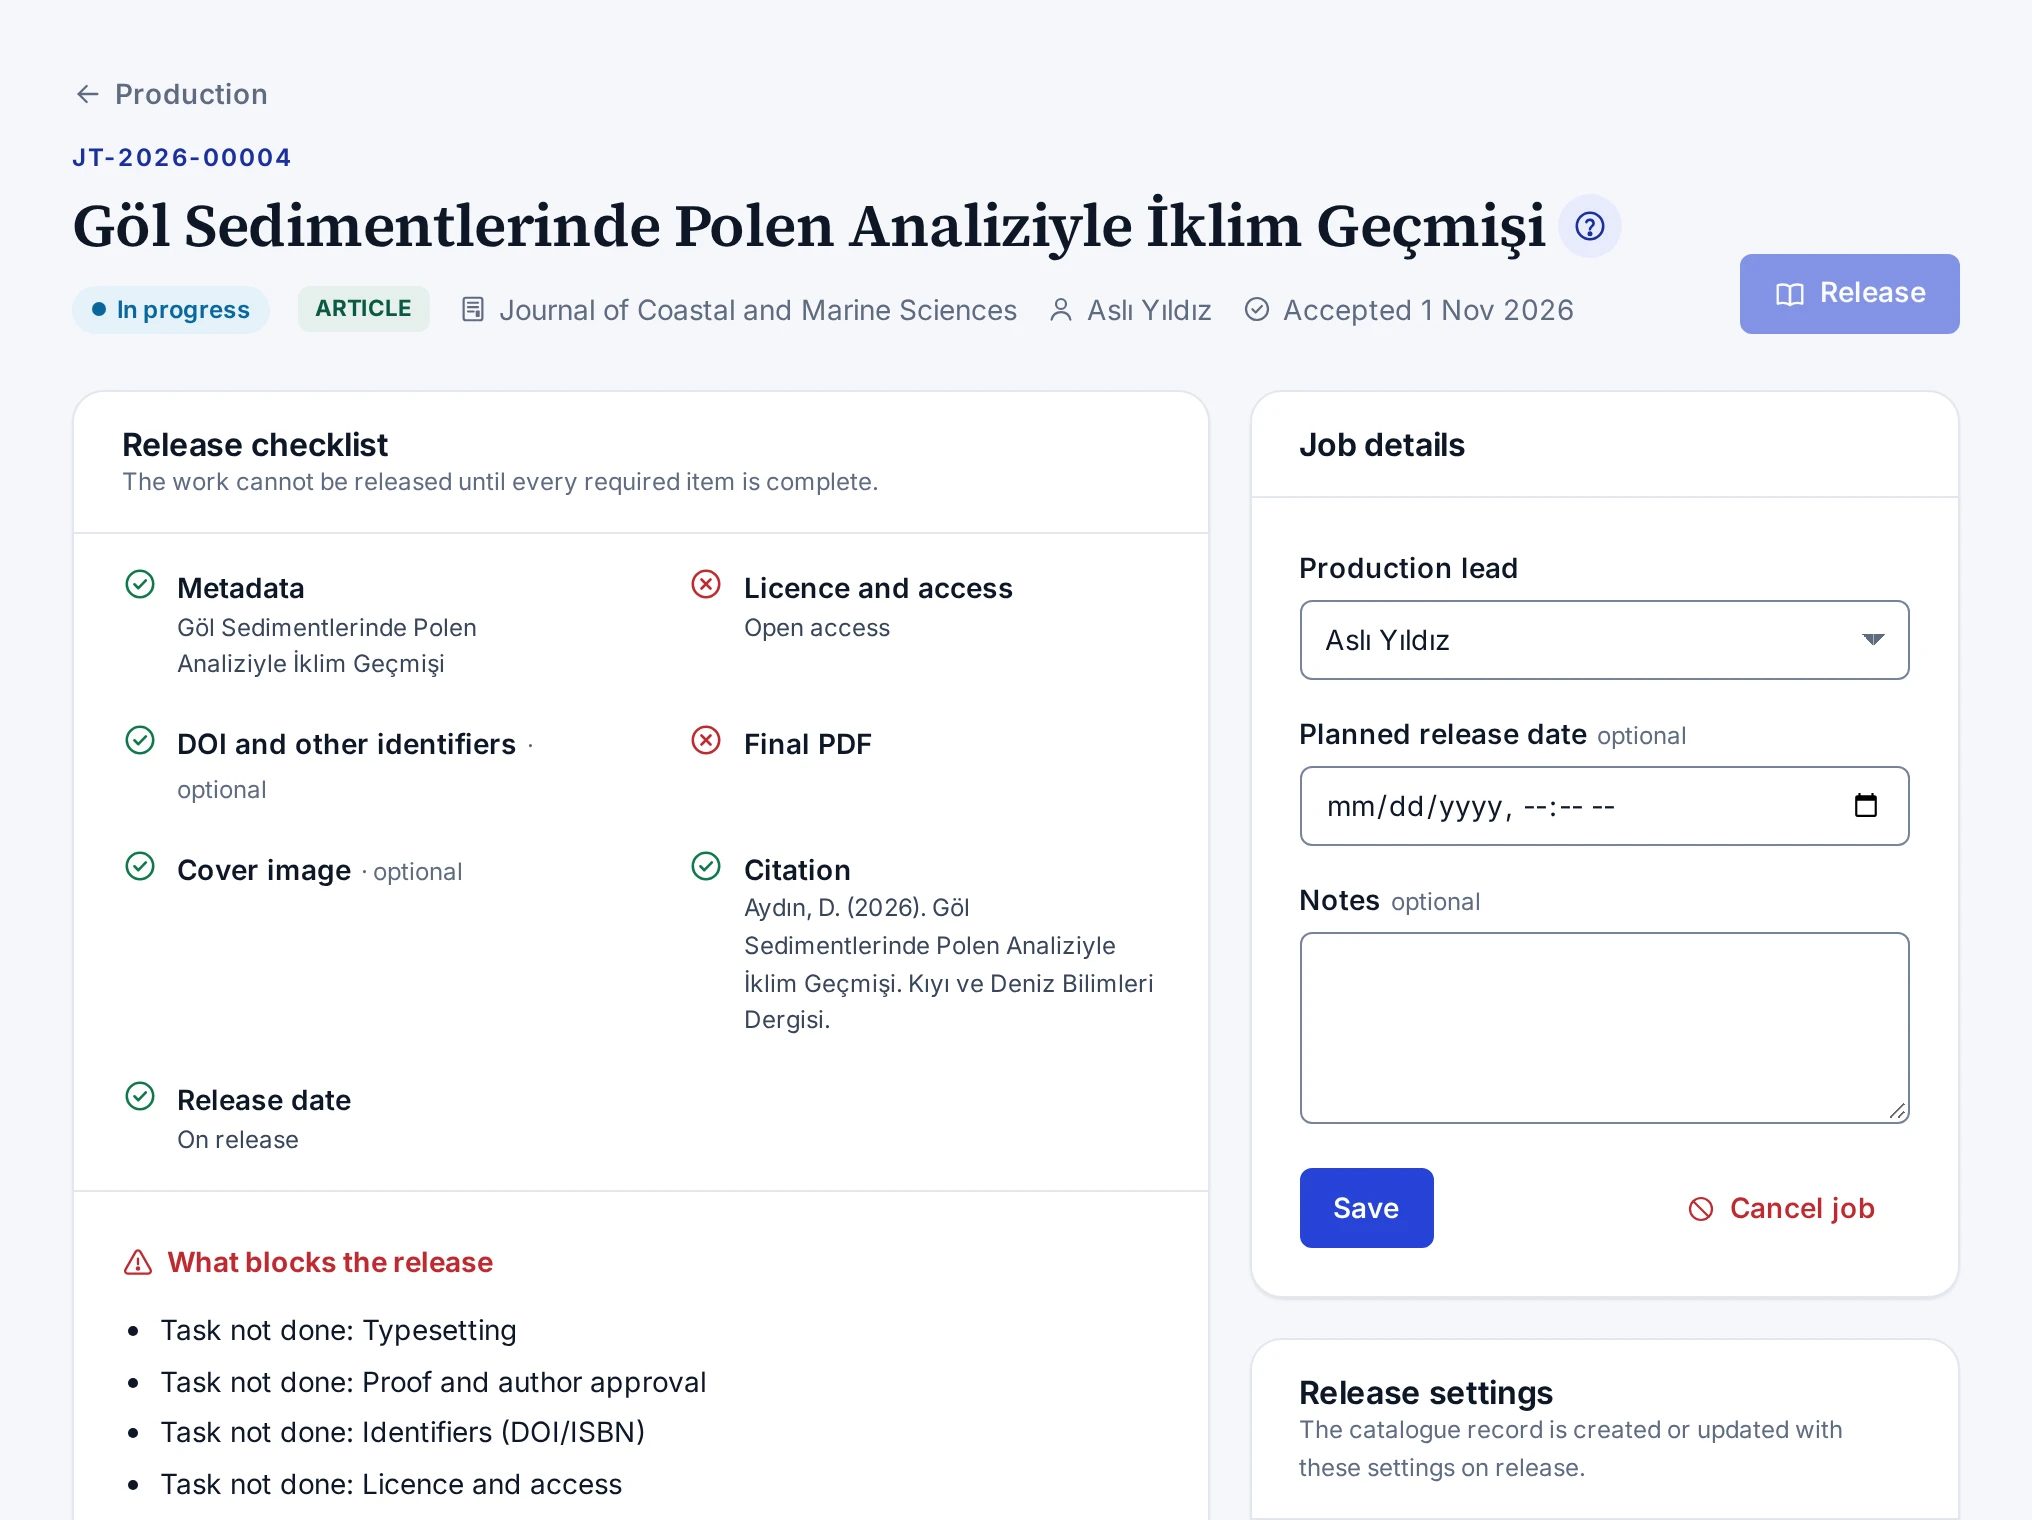
Top buttons
- Open the submission opens the editor page of the submission and appears to people who can see the editor queue.
- Open the catalogue record opens the catalogue record once the job is released.
- Release opens the release dialog. While an item blocks the release, the button cannot be pressed.
Cards
| Card | What it shows |
|---|---|
| Release checklist | The metadata, licence, identifier, final PDF, cover, citation and release date items, and what blocks the release |
| Tasks | The tasks of the checklist with their statuses, assignees and due dates |
| Files and proofs | The versions of the proof, final PDF, EPUB, cover and other files |
| Front matter | The front matter for the first page of the article. Shown for articles only. |
| Comments | The comments of the team and the author |
| Job details | The production lead, planned release date, notes, cancelling and reopening |
| Release settings | The access, licence, identifier, placement and address settings of the catalogue record |
Rules of the screen
- On a released or cancelled job, tasks and settings cannot be changed. Reopen the job to change them.
- You cannot upload files to a cancelled job.
- The assignee of a task can change the status and the note of their own task, even without the production permission.
- While a file is being scanned for viruses, the page refreshes itself every few seconds.
The steps are in Planning a Job, Managing Tasks, Uploading Files and Sharing Proofs, Filling in the Release Settings and Releasing a Work.
How-to
Managing Tasks
Changing the status of the tasks of a production job, giving tasks an assignee and a due date, adding new tasks and setting the reminders.
Every job opens with a default checklist. The tasks are on the Tasks card of the job page.
| Task | Required |
|---|---|
| Copy-editing | Yes |
| Typesetting | Yes |
| Cover | Yes for books and children's books, no for other types |
| Proof and author approval | Yes |
| Metadata check | Yes |
| Identifiers (DOI/ISBN) | Yes |
| Licence and access | Always |
| Final approval | Always |
The "Licence and access" and "Final approval" tasks are always required. For the other tasks, you can change the Required task box in the edit dialog.
Changing the status
- Open the job and scroll down to the Tasks card.
- In the list on the row of the task, select To do, In progress, Done or Skipped.
A status you pick with the mouse is saved at once. With the keyboard, the arrow keys move between the statuses and save nothing. Save the status you chose with Enter. If you leave the list without pressing Enter, or press Escape, the saved status comes back.
A required task cannot be skipped. The status of the job changes automatically with its tasks. When all required tasks are done, the job becomes Ready to release. The row of a completed task shows who completed it and when.
Assignee and due date
- Press the Edit button with the pencil icon on the row of the task.
- Select the person in the Assignee list.
- Enter the due date in Due.
- Optionally enter a Note.
- Press Save.
The assignee gets a notification. Even without the production permission, they can update the status and the note of their own task.
New task
- Press Add task.
- In Task, enter a name of at least 2 characters.
- If the task must be done before release, tick Required task.
- Optionally enter an assignee, a due date and a note.
- Press Add task in the dialog.
Only tasks added later can be renamed.
Reminders
For an unfinished task with a due date, the assignee gets one e-mail and one panel notification before the due date. How many days before is set by the Production task reminder (days before the due date) setting on the Site settings → Workflow tab. The default is 3 days, and 0 switches the reminder off. If the due date is moved later, a new reminder goes out for the new date.
No reminder goes out for a task whose due date has passed. The task is marked Overdue on its row, and the job counts as overdue on the board.
When the assignee's account was closed, the task's row shows the Account closed label and the assignee gets no reminder. Assign the task to someone else. The reminder e-mail names the task in the recipient's language.
How-to
Uploading Files and Sharing Proofs
Uploading proof, final PDF, EPUB and cover files in versions, sharing a proof with the author and exchanging comments with the author on the proof.
The files of the work are kept in versions on the Files and proofs card of the job. Each upload is a new version (v1, v2…), and earlier versions are kept.
Uploading a file
- In the Upload a new version section at the bottom of the Files and proofs card, select the type in the File type list.
- Optionally enter a Version note.
- Drag the file onto the field, or select it with the choose from your computer link.
| Type | Format |
|---|---|
| Proof | |
| Final PDF | |
| EPUB | EPUB |
| Cover image | JPG, PNG or WebP |
| Other file | PDF, EPUB, image, ZIP, DOCX or ODT |
An uploaded file goes through a virus scan and cannot be used before the scan finishes. On release, the final PDF, the EPUB and the cover image are added to the catalogue record.
Sending the proof to the author
- Press Share with the author on the row of the proof.
- Confirm the dialog.
The author is informed by e-mail, opens the proof on the page of their submission and writes comments. The author's steps are in Checking Proofs. Sharing is separate for each version, so you share a new proof version separately too. You withdraw sharing with Withdraw sharing. A proof whose scan has not finished cannot be shared.
Comments
- On the Comments card, write your comment in Comment.
- Select the file in the Related file list, or leave it at General.
- To send the comment to the author too, tick Visible to the author.
- Press Add comment.
The author sees only the comments written with this box ticked on a proof shared with them. The author's comments appear with the Author label. A comment from the author is notified to the production lead, or to the production team if no lead is assigned. After the job is released or cancelled, the author can no longer comment on proofs.
How-to
Filling in the Release Settings
Preparing the access status, licence, identifiers, journal issue, parent book, categories and catalogue address for the catalogue record of the work.
The details on the Release settings card are used when the catalogue record is created or updated on release. You can fill in the card at any stage of the job and save it with Save.
Access and licence
- The Access status list offers Open access, Metadata only, Embargoed and Restricted. For an article Open access is preselected, and for other types Metadata only.
- Select the licence in the Licence list. An open-access release needs a licence, and it must be an open licence. Licences that are not suitable for open access are marked in the list.
- For an embargoed release, enter a future date in Embargo end date.
Identifiers and year
- If Publication year is empty, the year of the issue is used, or the year of the publication date when there is no issue.
- The DOI starts with
10. - The ISBN field appears for books, theses, proceedings papers and children's books.
If a DOI, ISBN or catalogue address is used by another record, the release is blocked.
Placing an article in an issue
- Select the issue of the article in the Journal issue list. An article can be placed only in an issue of its own journal.
- The Section and Position in the issue fields are optional.
- If you select no issue, you can tick Publish as early view. The article is released without an issue and appears in the early view section of the journal page. The catalog editors add it to an issue later.
- The Page range (for example 12-34) and Article number fields are optional.
If you do not have the permission to manage journals, the list shows only published issues. The details are in The issue I am looking for is not in the journal issue list.
Parent book and pages
For a book chapter or a proceedings paper, find and select the book with the Search books box in the Parent book section. Enter the pages of the chapter in Page range. For a book, this field is called Number of pages.
Categories and address
- Categories are the subject and genre categories of the catalogue record. A book that is to be published at once needs at least one category.
- If Catalogue address (slug) is left empty, it is generated from the title.
Publishing at once
If Publish immediately on release is on, the record is published on the public site at the moment of release. If it is off, the record is created in the catalogue as a draft and waits for the final check of the catalog editors. The Citation preview at the bottom of the card shows how the citation will look.
On a released or cancelled job, the settings cannot be changed. The release steps are in Releasing a Work.
How-to
Copying the Article Front Matter
Copying the dates, authors, citation line, article type and declarations for the first page of an article in Turkish and English, and passing them to typesetting.
For articles, the job page has a Front matter card. The card prepares the details to be printed on the first page of the article, in Turkish and in English. It holds the following.
- The title, the authors, their institutions and ORCID iDs, and the corresponding author
- The article type
- The received, revised and accepted dates
- The citation line and the DOI, for example
Abbreviation. 2026;12(1):15-22 - The licence
- The declarations on ethics committee approval, conflicts of interest, funding, author contributions and the use of artificial intelligence
Copying the front matter
- Open the job and scroll down to the Front matter card.
- Check the Missing for the front matter list and complete what is missing.
- Select the Türkçe (Turkish) or English tab.
- Press Copy and paste the text into the typesetting.
The card is refreshed every time the release settings are saved.
Missing items list
The Missing for the front matter list follows the first-page criteria of TR Dizin (the national citation index run by TÜBİTAK ULAKBİM) and does not block the release. It can include the journal abbreviation, the issue, the page range or article number, the DOI, the ORCID iDs and institutions of the authors, the English title and the ethics committee statement.
The issue, page range, article number and DOI are entered on the Release settings card. The journal abbreviation is in the catalogue record of the journal. On release, the declarations and the revision date are also written to the catalogue record.
How-to
Releasing a Work
Checking the release checklist, clearing what blocks the release, and releasing the work as a catalogue record that is published at once or kept as a draft.
A work whose checklist is complete goes into the catalogue with Release. Releasing needs a separate permission (Release accepted works to the catalogue), which the Production coordinator role has.
Checklist
The Release checklist card shows these items.
| Item | What is checked |
|---|---|
| Metadata | The title and the authors of the accepted manuscript |
| Licence and access | The access status, the licence and the embargo date |
| DOI and other identifiers | Whether the DOI and the other identifiers entered are valid. This item is optional. |
| Final PDF | The final PDF is uploaded and scanned |
| Cover image | The cover image. If the cover task is required, this item is required too. |
| Citation | The citation preview |
| Release date | The planned release date, or the moment of release |
The What blocks the release list at the bottom of the card names each missing item.
Release steps
- Press Check. The check also tries the catalogue rules without saving anything, and shows the result on the card.
- If nothing blocks the release, press Release.
- In the Release the work dialog, select Publish immediately on release or Draft.
- When you publish at once, you can fill in Publication date. If you leave it empty, the current time is used.
- Press Release in the dialog.
The job becomes Released, the catalogue record is created and the author is informed. The final PDF, the EPUB and the cover image are added to the catalogue record. You go to the record with the Open the catalogue record button at the top of the page.
Conditions that block a release
- Not all required tasks are done.
- The final PDF is not uploaded, or its scan has not finished. If the cover task is required, a cover image is needed too.
- An open-access work has no licence selected, or the end date of an embargoed work is not in the future.
- The DOI, ISBN or catalogue address is used by another record.
While Publish immediately on release is on, the place of the record in the catalogue is checked too.
- An article must be in a published issue of a public journal, or be marked as early view. Its publication year must match the year of the issue.
- For a book chapter, the book must be selected and published.
- A book must have at least one category.
If the issue is not published yet, have it published first, or switch off immediate publication and release the work as a catalogue draft. A catalog editor or the journal's editor-in-chief publishes issues.
Because releasing is an editorial decision, the editor approval rule of the catalogue does not cover this step. The rule is described in Four-Eyes Principle.
Releasing again
If a released work needs a change, reopen the job, make the change and release the work again. The catalogue record is not written anew then. Only the fields production changed since the last release go to the record. Details the catalogue editors corrected in the record, such as an author's name, an English abstract or the page range, stay as they are. The new final PDF replaces the previous file, which is archived.
How-to
Cancelling and Reopening a Job
Cancelling a production job with a reason, continuing a cancelled job and preparing a corrected version of a released work.
You cancel and reopen a job with the buttons on its Job details card.
Cancelling
- On the Job details card of the job, press Cancel job.
- In Reason for cancelling, enter a reason of at least 3 characters and confirm.
The job closes. Its tasks, files and comments are kept, and the reason for cancelling shows on the job page. A released job cannot be cancelled.
Reopening
- On a cancelled or released job, press Reopen job.
- Confirm the dialog.
The job continues from where it stopped, according to its checklist. The job of a released work is reopened to prepare a corrected version, and the catalogue record stays published. When you finish the correction and release the work again, the catalogue record is updated.
Cancelled jobs appear on the board with the Show cancelled jobs button.
Concept
Job Statuses
The Open, In progress, Ready to release, Released and Cancelled statuses of a production job, and how the status follows the checklist.
You do not choose the status of a job by hand. The status changes automatically with the tasks on the checklist. Only releasing, cancelling and reopening change the status directly. This way each column on the board shows where a job really stands.
| Status | When |
|---|---|
| Open | The job is open and no task has started |
| In progress | A task has started or is done. Uploading a file to the job also moves it to this status. |
| Ready to release | All required tasks are done |
| Released | The work has been released to the catalogue |
| Cancelled | The job was cancelled with a reason |
Overdue jobs
A job counts as overdue while a task past its due date is still open. Done and skipped tasks do not count. A job that is not released by its planned release date counts as overdue too. Overdue jobs are marked on the board and listed by the Overdue filter.
Who changes a job
The Production coordinator changes all settings of a job and releases the work. Editors and the Unit manager can only view the job. The assignee of a task can change the status and the note of their own task.
The release steps are in Releasing a Work, and cancelling and reopening in Cancelling and Reopening a Job.
Troubleshooting
The licence list is missing in the release settings
What to do when the Release settings card shows a warning instead of the licence list, or the selected licence counts as invalid.
When the panel cannot load the licence list, the Release settings card shows the warning The licence list could not be loaded; reload the page and try again. instead of the list. If a licence was selected for the job before, its code is shown next to the warning.
- Reload the page.
- If the warning stays, tell your system administrator.
An open-access work cannot be released without a licence.
The selected licence counts as invalid
The list shows only the licences in use. If a licence that was selected for the job earlier has since been withdrawn from use, it stays in the list but counts as invalid on release, and the What blocks the release list says that the selected licence was not found. Select another licence from the list and save.
Troubleshooting
A missing category blocks the release of a book
Choosing a category, or releasing the work as a draft, when a missing category blocks the release of a book with immediate publication.
A book needs at least one category in the catalogue. If no category is selected while Publish immediately on release is on, the What blocks the release list says that the book needs at least one category. You fix this in one of two ways.
Choosing a category
- On the Release settings card, select at least one category in Categories.
- Press Save.
- Check again with the Check button.
Releasing as a draft
Switch off Publish immediately on release, or select Draft in the release dialog. The record is created in the catalogue as a draft. A catalog editor adds the category and publishes the record.
Category trees are described in Managing Categories.
Troubleshooting
The issue I am looking for is not in the journal issue list
Causes and fixes when the issue you expect does not appear in the Journal issue list of the release settings.
The Journal issue list shows the issues of the article's own journal. Check the causes below.
The issue is not published yet
If you do not have the permission to manage journals, the list shows only published issues. The journal's editor-in-chief or a catalog editor creates and publishes a new issue. The steps are in Creating an Issue and Publishing an Issue.
A draft issue that was selected for the job earlier stays in the list with the draft badge.
The issue belongs to another journal
An article can be placed only in an issue of its own journal. The issues of other journals do not appear in the list.
Releasing without waiting for the issue
If the issue is not ready yet, tick Publish as early view. The article is published in the early view section of the journal page, and the catalog editors add it to an issue later. The details are in Publishing an Article as Early View.
Troubleshooting
The Open job button is missing on the board
Causes when the Open job button does not appear on the production board, or the dialog lists no accepted submission.
Jobs open automatically with the editor's acceptance decision. The Open job button is only for jobs that did not open automatically, and it appears to people with the permission to manage production. The Production coordinator and System administrator roles have this permission.
You do not have the permission
Editors and the Unit manager can only view the board. If an accepted work has no job on the board, tell a person with the Production coordinator role or your system administrator.
The dialog lists no submission
The dialog lists only accepted submissions in your scope that have no job. If there is none, the dialog says No accepted submissions found. A submission whose job was cancelled does not appear either, because the submission has a job. Find the cancelled job with the Show cancelled jobs button on the board and reopen it.
Troubleshooting
The author cannot comment on the proof
Checking the sharing, the proof version and the status of the job when the author cannot see the proof or cannot comment on it.
The author sees the proof only after you share it, and can comment only while the job is open. Check the causes below.
The proof is not shared
If the row of the proof has no Shared with the author label, press Share with the author. A proof whose scan has not finished cannot be shared.
The new version is not shared
Sharing is separate for each proof version. If you uploaded a new proof version, share that version too.
The job is closed
After the job is released or cancelled, the author can no longer comment on proofs. If a correction is needed, reopen the job. The steps are in Cancelling and Reopening a Job.
The author does not see the team's comments
The author sees a comment from the team only if it was written on a shared proof with Visible to the author ticked.
Troubleshooting
The Release button is disabled or missing
Causes and fixes when you cannot press the Release button of a production job, or the button does not appear at all.
The Release button depends on the status of the job, its checklist and your permissions. Check the causes below in order.
An item blocks the release
If the button is disabled, look at the What blocks the release list on the Release checklist card and complete each item. The details are in Releasing a Work.
The job is released or cancelled
On a released or cancelled job, the button is hidden. Reopen the job to make a correction.
You do not have the permission
Releasing needs a separate permission (Release accepted works to the catalogue). Editors and the Unit manager can only view the job.
The check passes but the release fails
The Check button also tries the catalogue rules and lists any problems on the card. If an error comes up in the release dialog, the dialog lists the blockers one by one.
Feature
Catalogue
Creating, publishing and correcting records of books, chapters, journals, articles, proceedings papers, theses and children's books.
Every publication on the public site is a catalogue record. Records of books, book chapters, journals, articles, proceedings papers, theses and children's books are created and edited on the Catalogue → Publications screen. The type of a record sets the required fields of the form and cannot be changed later.
A record starts as a draft, is sent to review and is published. A published record appears on the public site, in search, in the sitemap and in OAI-PMH. For a mistake in a published record, a correction note is added or the record is retracted. If the editor approval rule is on in your installation, the person who sent a record to review cannot publish it. The details of the rule are in Four-Eyes Principle.
The Data quality screen shows records with missing details, and the DOAB readiness screen shows whether books are ready for DOAB (the Directory of Open Access Books). For your first record, start with Creating a Catalogue Record.
How-to
Creating a Catalogue Record
Opening a new catalogue record for a book, chapter, journal, article, proceedings paper, thesis or children's book and filling in its details.
You open a new catalogue record with the New publication button on the Catalogue → Publications screen. You choose the record's type first, because the type sets the required fields of the form and cannot be changed later.
Creating the draft
- On the Catalogue → Publications screen, press New publication.
- Select the record's type from the list that opens.
- In the Title and abstract section, type the record's title on the Türkçe (Turkish) tab.
- Fill in the other details you know. Fields marked with an asterisk are required.
- Press Create draft.
The record is created as a draft and its own page opens. The page has the Details, Files, Relations and Versions tabs. Save later changes with the Save changes button in the bar at the bottom. The Ctrl+S shortcut (Cmd+S on a Mac) also saves. If you try to leave the page without saving, the panel asks you to confirm first.
Works that the production team released as drafts also arrive in the Publications list with the Draft status. You complete and publish them in the same form.
Sections of the Details tab
| Section | Contents |
|---|---|
| Title and abstract | Title, subtitle, abstract, keywords and translation status in each language |
| Authors and contributors | Authors, editors and other contributors |
| Type-specific information | Fields that depend on the type, and for articles, chapters and proceedings papers also the record's placement |
| Declarations | The article's ethics, conflict of interest and other declarations |
| Basic information | Language of the work, publication year, publisher, publication date, slug and external address |
| Categories | The categories the record belongs to |
| Persistent identifiers | ISBN, ISSN, DOI, Handle and other persistent identifiers |
| Access and licence | Access status, licence, embargo end, licence expiry and rights holder |
| Source and stewardship | Bibliographic source, data steward and, for an imported record, the source system |
Title, abstract and keywords
You write the title and the abstract on the Türkçe and English tabs. The Turkish title is required. If the English title is missing, the tab shows Translation missing and the public site shows the Turkish content. An abstract can have at most 5000 characters. Type the keywords one at a time and press Enter after each one. You can enter at most 20 keywords in each language.
Books, children's books and proceedings papers also have a Table of contents field on the same tab. Write one chapter on each line. The Translation status field of each language is explained in Translation Status.
Type-specific information
| Type | Fields in the section |
|---|---|
| Book | Edition, pages, volume, place of publication, series, series number, textbook, peer review process, Thema subject codes |
| Book chapter | Chapter number, page range, peer review process, Thema subject codes |
| Journal | Abbreviation, first year of publication and a separate journal profile card |
| Article | Article type, article number, page range, received, revised and accepted dates, funding, references |
| Proceedings paper | Event name, year and place, start and end dates, session, page range, video address |
| Thesis | Level (master's, doctoral, proficiency in art, medical specialty or other), institution, graduate school or faculty, department, advisor, degree year, thesis number, pages |
| Children's book | Minimum and maximum age, content kind, illustrator, pages, pedagogical note, suggested activities |
In the references, write one reference on each line. If Series is filled in for a book, series links appear at the top of the book list on the public site. Write the series name the same way in every book, because a difference in upper and lower case creates two separate series. The Content kind field of children's books works as a filter on the children's publications list in the same way.
Placement of the record
For an article, you select the journal and the issue in the Placement section. When you select an issue, the Section heading and Order fields appear. An article is published only while it is in a published issue. To publish it before the issue, see Publishing an Article as Early View.
A book chapter or proceedings paper is linked to a book with the Parent book field. A chapter can be published only when its parent book is published.
Declarations
For articles, the Declarations card holds ethics committee approval, conflict of interest, AI use, informed consent, permissions, data availability and acknowledgements. The declarations are shown on the article page. For articles released from production, the declarations come from the author's declarations in the submission and can be completed in the catalogue.
Basic information, identifiers and access
If you leave the Slug (URL) field empty, the slug is made from the title. Cyrillic, Greek and Georgian
letters are written in Latin letters in the slug. If the title is written in an alphabet that cannot be turned into
Latin letters, such as Arabic, the slug is made from the record's title in another language. If the record has no
title in another language, the slug starts with kayit, so fill in the field yourself. Another record's slug, or an
old address that redirects to another record, cannot be the new slug. A slug made from the title then gets a number at
the end. If you change the slug of a record that was published once, the old address redirects to the new one. The
redirect is set up even when the record is unpublished at the time.
Published records with Feature on the home page ticked are shown among the featured items on the home page. A higher Featured order value comes first. Journal records do not go into this list.
You add persistent identifiers in the Persistent identifiers section with the Add identifier button. ISBN, ISSN and DOI go through format and duplicate checks. These checks are described in Catalogue Rules. Access status, licence and embargo are explained in Access Statuses and Embargo.
Next steps
The Metadata quality card on the right lists what you must complete before publishing. Add the authors as in Adding Authors and Contributors and the files as in Files and Access. When the record is ready, go on to Record Statuses and Publishing.
How-to
Adding Authors and Contributors
Adding authors, editors, translators and other contributors to a catalogue record, ordering them and choosing their institutions and CRediT roles.
You add authors and other contributors in the Authors and contributors section of the record's Details tab. You select the person from the existing person records. If the person is not in the list, you add them as a new person.
Selecting the person
- Type the person's name or ORCID iD in the Add person field.
- Select the right person from the list. A person found by ORCID iD is marked ORCID match.
- If the person is not in the list, select the new person option in the last row.
- When you have added all contributors, press Save changes.
If the warning "Similar people are registered. If it is the same person, pick them from the list; do not create a duplicate profile." appears below the new person option, select the person from the list. Do not create a duplicate person record. The new person record is created when you save the catalogue record. If the ORCID iD you entered already belongs to another person, or there is a person without an ORCID iD with the same name, the system does not create a new record and uses the existing person.
When you select an existing person, the person's current institutions come in as the contributor's institutions. The person's earlier institutions appear in the edit area as options you can add with one click.
Contributor details
The pencil button on a contributor's row opens the edit area:
- In the Role list, select the Author, Editor, Translator, Illustrator, Advisor or Contributor role.
- For a new person, you can fill in the New person's ORCID iD (optional) field.
- Mark the person responsible for correspondence as Corresponding author.
- In the Affiliations (at publication) section, keep or remove the institutions at the date of publication.
- In the CRediT contributor roles section, tick the person's contribution types.
Order and removal
Contributors appear on the public site in the order of the list. Drag the rows to change the order. Remove a contributor with the cross button on the row. The changes are saved when you press Save changes.
Permission needed
Searching for people needs the person management permission. Without this permission, the note "Searching people needs the person management permission." appears below the field. The Catalogue editor and Production coordinator roles have this permission.
Requirements for publishing
A book needs at least one author or editor. An article, a thesis and a children's book need at least one author, and a book chapter and a proceedings paper need at least one contributor. Managing person records is explained in Managing People and Institutions.
How-to
Files and Access
Adding full text, cover and supplementary files to a catalogue record, setting a file's access, embargo and licence, and uploading a new version.
You add a record's full text, cover and supplementary files on the record's Files tab. You choose the file's settings first and then upload the file.
Adding a file
- On the record's page, open the Files tab.
- In the Add file section, select the type of the file from the File type list.
- Set the File language and Access fields.
- If needed, fill in the Display name, Rights holder, Permission reference and File licence fields.
- Drag the file onto the upload area or select it from your computer.
The panel checks the settings before the upload. If the embargo date is missing, an open access file has no licence, the file does not fit the kind or a current file of that kind exists, the upload does not start and the field is marked. Correct the setting and press Try again in the upload area. If the server refuses the file after the upload, the same button attaches the uploaded file without sending it again. Changing the settings during an upload does not change that file's settings.
After the upload the file goes through a virus scan. While the scan runs, the row says Scanning and the page refreshes by itself. The file is not served to anyone before the scan finishes. If the upload stops halfway, the Try again button in the upload area sends the file again. You do not need to select it again.
File types
| Type | Accepted file |
|---|---|
| Full text (PDF) | |
| EPUB | EPUB |
| Cover image | JPG, PNG or WEBP, at most 10 MB |
| Table of contents | |
| Supplementary file | PDF, EPUB, DOCX, ODT, ZIP or an image |
| Other | PDF, EPUB, DOCX, ODT, ZIP or an image |
For the full text, EPUB, cover and table of contents there is one current file in each language. Instead of adding a second file of the same type, upload a new version of the existing file.
Access and licence
In the Access field you select Same as the publication, Open, Embargoed or Restricted. For an embargoed file, Embargo ends is required.
A file's access cannot be more open than the publication's access. The effective access label on the row and the Public or Not public label show the result. The cover image and the table of contents appear on the record page unless their own access is restricted.
File licence stays The publication's licence by default. For a file under a different licence, such as a supplementary file, select the file's own licence. An open-access file needs its own licence or the publication's licence. The rules are explained in Access Statuses and Embargo.
Changing settings, new version and removal
- File settings changes the file's language, display name, access, embargo, rights holder, permission document and licence.
- Upload a new version uploads a new file. The earlier file is not deleted. It is archived and stays in the Earlier versions list.
- Remove (archive) removes the file from the public page. The file stays in the record's history.
A change to access, licence or embargo takes effect on the file links at once. The SHA-256 value of the file at the moment it became public is stored and appears on the row as SHA-256 when published. Changes to file access are written to the audit log.
Display on the public site
An open-access full-text PDF is shown on the publication page in a built-in PDF preview. The reader turns pages, zooms and uses the Fit width button. The preview also works on a phone. If the viewer cannot open, the page shows the browser's own PDF view and an Open PDF link.
If a file does not appear on the site, see A file does not appear on the public page.
How-to
Adding a Related Publication
Linking a catalogue record to another record as book and chapter, translation, supplement, new edition, correction or retraction.
You link a record to another record on the record's Relations tab. The number in the tab's title shows how many relations the record has.
- On the record's page, open the Relations tab.
- Press Add relation.
- In the Other publication field, search for the other record by its title or slug and select it.
- Select the type of the relation from the Relation type list.
- Select the direction of the relation from the Direction list.
- Press Add relation at the bottom of the window.
The relation is saved at once and shown on the tab as a short sentence. The Remove button on the row removes the relation after you confirm.
Relation types
- Part of (book–chapter)
- Translation of
- Supplement to
- Related
- Correction of
- Retraction notice for
- New edition of
Direction of the relation
With This record → the selected record, the record you select becomes a chapter, translation, supplement or new edition of this record. For example, on a book's page you add its chapter with this option. With The selected record → this record, the relation goes the other way. For example, on a chapter's page you select its book with this option.
Rules
- Only book chapters and proceedings papers can be linked to a book.
- A chapter or proceedings paper can belong to only one book.
- A record cannot be linked to itself.
- Chapter, supplement and new edition relations cannot form a loop.
The Parent book field of a book chapter or proceedings paper record creates the same relation with the book. A chapter can be published only when its parent book is published.
How-to
Record Statuses and Publishing
Sending a catalogue record for review, publishing it or returning it to draft, and which actions are open in each status.
Every catalogue record starts as a draft, is sent for review and is published. The status buttons are on the Status card on the right of the record's page and change with the record's status.
Statuses and actions
| Status | Actions open on the card |
|---|---|
| Draft | Submit for review, Delete |
| In review | Publish, Return to draft, Delete |
| Published | Archive, Unpublish, Add a correction notice, Retract |
| Archived | Add a correction notice, Retract |
| Retracted | None, because a retracted record cannot be changed |
While there is an unsaved change, these buttons are disabled.
Sending for review and publishing
- Save the changes on the record's page with the Save changes button.
- On the Status card, press Submit for review and confirm.
- Check that the Metadata quality card says Ready to publish.
- Press Publish.
- Type a reason if you want to, and confirm.
A published record appears on the public site, in search, in the sitemap and in OAI-PMH. The Public page link at the top of the card opens the record's public page. Publishing is written to the audit log.
If the Publish button is disabled or missing, see The Publish button is disabled or missing. The list of required fields is in Catalogue Rules.
Editor approval rule
If the system administrator switched on Catalogue records are published after an editor's approval on the Site settings → Workflow tab, the person who sent a record for review cannot publish it. In that case the card says that you sent the record and that another catalogue editor will publish it.
For a record sent by another editor, the card shows who sent it and when. You review the record and publish it, or you type a reason and send it back with Return to draft. The audit log records the person who publishes as the approver. The rule is explained in Four-Eyes Principle.
Returning to draft
You return a record in review to draft with the Return to draft button. The record leaves review and the editor who prepared it can edit it again. The reason is optional and is written to the audit log.
Permissions needed
Sending a record for review and deleting it need the catalogue edit permission. Publishing, returning to draft, unpublishing and archiving need the catalogue publish permission. Adding a correction notice and retracting are a separate permission.
The Production coordinator role edits records and sends them for review, but cannot publish them. In that case the note "An editor with the publish permission can publish this record." appears on the card.
Actions on a published record
- To take a record off the site or out of the lists, see Unpublishing and Archiving.
- For an error in a published record, see Versions, Corrections and Retractions.
- To change the status of several records at once, see Bulk Actions.
How-to
Bulk Actions
Selecting several records in the Publications list and sending them for review, publishing, returning to draft, unpublishing or archiving them.
You apply the same status action to several records from the Publications list. The system first shows a preview that changes nothing. After you confirm, the action is applied record by record.
- On the Catalogue → Publications screen, find the records with the filters.
- Select the rows with the boxes on the left. The box in the header row selects all rows on the page.
- In the bar that opens above the list, press the button of the action.
- Type the reason. Unpublish and Archive need a reason of at least 5 characters. For the other actions the reason is optional.
- Press Preview.
- In the preview, read the result for each record.
- Press Apply. The button shows the number of records the action will be applied to.
The results are listed in the same window. Successful records change, and records that do not qualify are skipped with their reasons.
Contents of the preview
For each record, the preview says on the row that the action will be applied or why the record will be skipped. An action that will be applied is shown as a status change, for example "In review → Published". The reasons for skipping are these:
- The record's status does not allow the action.
- Fields required for publishing are missing in the record.
- Someone else changed the record after you opened the list.
- The editor approval rule is on, and the record is in draft or you sent it for review yourself.
The preview tries the real action in the same order and then rolls it back. Because of this, its result is the same as the real action's. For example, if a book earlier in the list will be published, that book's chapter also passes in the preview.
Selection and permissions
The selection covers only the rows of the page that is open. When you change the page or the filters, the selection is cleared. Submit for review needs the catalogue edit permission, and the other actions need the catalogue publish permission. Only the buttons of the actions you have permission for appear.
How-to
Deleting a Catalogue Record
Deleting a catalogue record in draft or in review, restoring it from the trash, and the records that cannot be deleted.
Only records in draft and in review can be deleted. A deleted record goes to the trash, does not appear on the public site and can be restored with the Show deleted filter.
- On the record's page, press Delete on the Status card. The row menu in the Publications list has the same action.
- Type a reason of at least 5 characters in the Reason (written to the audit log) field.
- Confirm.
The deletion and its reason are written to the audit log.
Restoring a deleted record
- On the Catalogue → Publications screen, tick the Show deleted box.
- In the record's row menu, select Undo delete.
The Undo delete button on the record's own page does the same. A deleted record cannot be edited until it is restored.
Records that cannot be deleted
- A published record cannot be deleted. Unpublish the record first.
- Archived and retracted records remain part of the scholarly record and cannot be deleted.
- Deleting a record that was published before also needs the catalogue publish permission.
- A journal record with issues cannot be deleted. Delete the journal's issues first.
To delete a journal issue together with its articles, see Deleting a Journal Issue.
How-to
Versions, Corrections and Retractions
Viewing a record's version history, comparing two versions, going back to an earlier version, adding a correction notice and retracting the record.
Every change to a record is kept as a version that cannot be altered. You view an earlier version on the record's Versions tab and go back to it if needed. For an error in a published record, you add a public correction notice. For a serious problem, you retract the record.
Version history
The Version history table on the Versions tab shows each version's number, date, the person who made the change, the note and the status at that moment. The top row is the current version.
- The eye button on a row (View content) shows all filled fields of that version.
- The Compare with the current record button on a row shows what has changed since that version.
Comparing two versions
- Tick the boxes on the rows of the two versions you want to compare.
- Press Compare.
Each changed field appears in the Before and After columns. In the contributor, category, identifier and keyword lists, removed items are struck through and added items are shown in green. A later change to the name of a person or a category does not count as a change to the record.
Going back to an earlier version
- If the Details tab has unsaved changes, press Save changes or Discard changes.
- Press the Restore button on the version's row.
- Confirm in the Restore this version window that opens.
The titles, contributors, identifiers and other details return to their state in that version. The record's status, address and files do not change. Going back also creates a new version.
Going back puts the version's details in place of those in the form. An unsaved change is not in the version history. So while there are unsaved changes, the Restore buttons are disabled and a note at the top of the tab says what to do.
A category or person merged since that version comes back as the record it was merged into. A category, person or institution deleted since, a peer-review process removed from the settings, a licence no longer in use and an identifier another record holds now are not brought back. The restore still happens, and the notification lists what was not brought back. An article in an issue keeps its issue's journal.
Correction notice
A correction notice is used on a published or archived record and is shown to everyone on the publication page.
- On the Status card, press Add a correction notice.
- In the Public notice (Turkish) field, type the text readers will see.
- If you want, fill in the Public notice (English) field too.
- If you want, type the internal reason in the Internal reason (audit log only) field.
- Press Add a correction notice.
The public notice must have at least 10 characters in at least one language. If the record already has a correction notice, the window loads it, and the text you save replaces the earlier notice.
Retraction
A retracted record stays public, and its page shows a retraction notice. Access to its files is closed. A retraction cannot be undone, and a retracted record can no longer be changed.
- On the Status card, press Retract.
- Type the retraction notice in the Public notice (Turkish) field.
- If you want, type the English notice and the internal reason.
- Press Retract at the bottom of the window.
Permissions needed
Everyone who can see the record can see its version history. Going back to an earlier version needs the catalogue edit permission. Adding a correction notice and retracting are a separate permission, which the Catalogue editor role has.
How copyright and correction reports from the public site are resolved is explained in Copyright and Correction Reports.
How-to
Downloading Crossref XML
Downloading the Crossref XML file of a catalogue record or a journal issue for DOI registration, and the conditions the file needs.
To upload to Crossref by hand, you download the Crossref XML file of a record or of a journal issue. The file is made only for public records that have a DOI. If your institution's automatic DOI registration is on, records go to Crossref by themselves and you do not need this file.
The file of a record
- On the record's page, find the Record information card on the right.
- Press Download Crossref XML.
The button appears on article, book, book chapter and proceedings paper records. An article's file also carries the details of its journal and its published issue. An article in early view has no issue yet, and its file is made with the details of its journal only. The file of an article whose issue went back to draft carries no issue details.
A book's file carries all the book's ISBNs. A number obtained through an ISBN request is written as print or electronic, depending on the form of the request. A number typed into the catalogue by hand counts as print.
The file of an issue
- Open the issue's page.
- Press the Crossref XML button at the top of the page.
The issue's file contains every public article of the issue that has a valid DOI. Articles without a DOI are left out of the file. The file needs a published journal record and a published issue.
Conditions for the file
- The record must be published, archived or retracted.
- The record must have a DOI.
- If a DOI prefix is entered in the site settings, the DOI must start with that prefix.
- A thesis must have an author and the institution where it was written.
If a thesis's institution is not typed in but only linked to an institution record, the institution's name and ROR ID come from that record. Imported theses may be like this. If the institution record was deleted, the thesis's file is not made.
Crossref accepts only two-letter ISO 639-1 codes as languages. Ottoman Turkish has no such code. The file does not state the language of a record or a title in that language.
An article's file also contains its reference list. References that mention a DOI in their text are written with their DOIs. If the system administrator switches off the Crossref XML export feature, the file cannot be downloaded.
Sending records to Crossref automatically is explained in Automatic DOI Registration.
How-to
Preparing a Book for DOAB
Completing an open-access book to meet DOAB's requirements and downloading the ready books in DOAB's Excel template.
DOAB (Directory of Open Access Books) accepts only books that passed independent external review before publication, carry an open licence and have their own ISBN. The Catalogue → DOAB readiness screen shows whether each book and chapter is ready for DOAB and what it lacks.
Completing the book
- If the press's peer review processes are not defined, ask the system administrator to define them on the Site settings → Peer review tab.
- In the book's record, select the process the book went through in the Peer review process field of the Type-specific information section.
- Enter at least one Thema code in the Thema subject codes field. Separate several codes with semicolons.
- On the English tab, write the abstract and the keywords.
- In the Access and licence section, set the access to Open access and select an open licence.
- Add an ISBN to the book.
- On the Files tab, upload the public full-text PDF.
- Save the changes and publish the book.
The selected process must include external review before publication. DOAB requires this review. The steps for getting an ISBN are in ISBN Process.
Downloading the template
- On the DOAB readiness screen, check that the book's row says Ready.
- Press Download DOAB template.
The file contains DOAB's template sheet, a PRISM sheet that shows the books' peer review processes and a check sheet that lists what every book lacks. By default only ready books go into the template sheet. If you tick the Also published books that are not ready box, published books that are not ready go in as well.
DOAB takes books by hand or through this template and does not harvest the press's OAI-PMH. Send the file to the DOAB team after DOAB has accepted the press. The parts of the screen are described in DOAB Readiness.
Screens and settings
Publications
The list of catalogue records with its search box, filters, columns, row menu and bulk action bar.
The Catalogue → Publications screen lists all draft, in-review and published records in the catalogue. Opening a new record, finding a record and applying the same action to several records all start here.
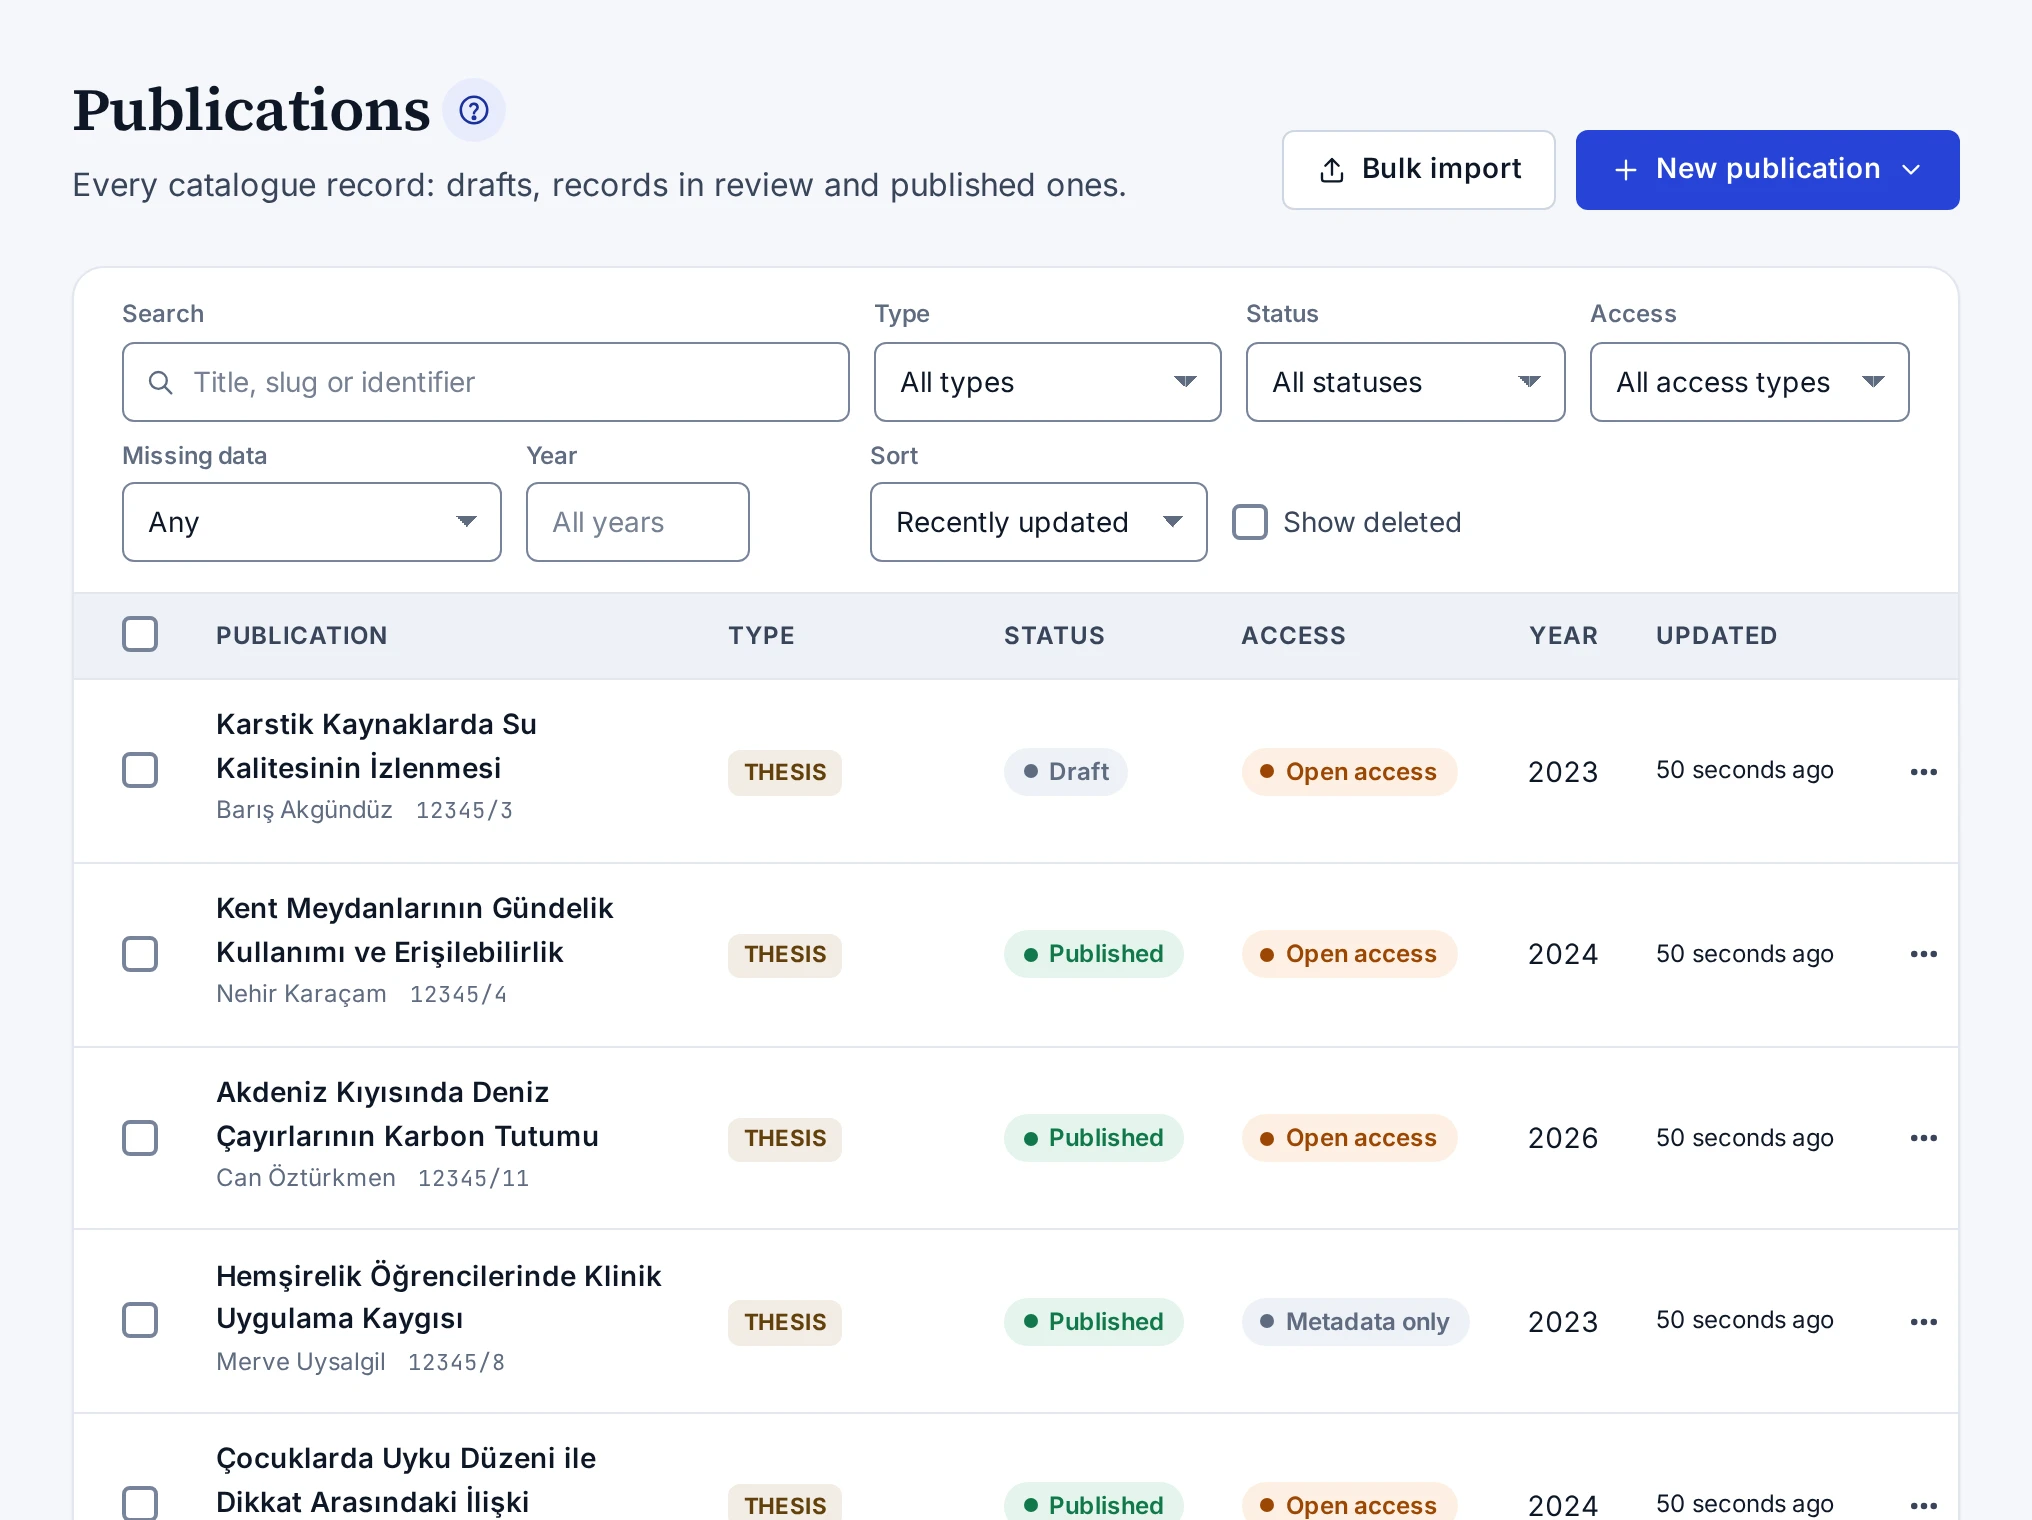
Buttons at the top
- New publication opens a new record of the type you select and needs the catalogue edit permission.
- Bulk import opens the bulk import screen and needs the bulk import permission.
Search and filters
The search box searches the record's titles and subtitles in every language and its slug. Turkish letters do not matter, and a search for "isik" also finds a draft titled "Işık". The characters % and _ are searched as they are typed, so a search for "50%" finds only titles that contain "50%". The filters are these:
| Filter | Options |
|---|---|
| Type | The seven record types |
| Status | Draft, In review, Published, Archived, Retracted |
| Access | Open access, Metadata only, Embargoed, Restricted |
| Missing data | No licence, No category, No abstract, No English translation |
| Year | A four-digit publication year |
| Sort | Recently updated, Recently added, By slug (A–Z), Year (newest first), Year (oldest first) |
| Show deleted | Records in the trash |
The filters stay in the address bar. If you share the link, the same list opens. If you come from a category's menu on the Categories screen, the list is filtered by that category.
Columns
| Column | What it shows |
|---|---|
| Publication | Title, authors and the first identifier. A missing translation, a deleted record and a record you sent for review are marked with a label |
| Type | The record's type |
| Status | The record's status |
| Access | Access status |
| Year | Publication year |
| Updated | Time of the last change |
Row menu
The menu at the end of a row shows the actions that suit the record's status:
- Edit opens the record's page.
- In draft, Submit for review and Delete appear.
- In review, Publish, Return to draft and Delete appear.
- When published, Archive and Unpublish appear.
- For public records, Open the public page opens the record's page on the public site.
- For a deleted record, only Undo delete appears.
If the editor approval rule is on in your installation and you sent the record for review, the Publish (another editor publishes it) item in the menu is disabled.
Bulk action bar
When you select rows with the boxes on the left, the bulk action bar opens above the list. The bar has the Submit for review, Publish, Return to draft, Unpublish and Archive buttons. The steps are in Bulk Actions. When you change the page or the filters, the selection is cleared.
Related topics
Screens and settings
New Publication
The screen where you choose the type of a new catalogue record, fill in its first details and create the draft.
The New publication screen asks for the type of a new catalogue record and opens the form where you fill in the record's first details. You reach the screen with the New publication button in the Publications list.
Choosing the type
The screen asks "What kind of record are you creating?" and lists the seven types with their descriptions:
| Type | Description |
|---|---|
| Book | Printed or digital book; needs an author or editor, a year and a category. |
| Book chapter | A chapter of a book; needs the parent book and its order. |
| Journal | Journal profile: scope, ISSN, submission and review settings. |
| Article | Journal article; needs an abstract, keywords and an issue. |
| Proceedings paper | Conference paper; needs the event name and year. |
| Thesis | Master's, doctoral, proficiency in art or medical specialty thesis; needs the institution and level. |
| Children's book | Science title for children; needs the target age and content kind. |
If you select a type from the drop-down list of the New publication button, this step is skipped and the form opens directly.
The form
When the type is chosen, the record's form opens. The form has all the sections of the Details tab of the record page. The sections are described in Creating a Catalogue Record. Files, relations and versions open on their own tabs after the record is created.
The bar at the bottom reminds you that fields marked with an asterisk are required. The Create draft button creates the record and opens its page.
Rules of the screen
- The type cannot be changed later.
- The record is always created as a draft.
- The Turkish title is required, and the title in each language must have at least 2 characters.
- If the access status is open access, a licence is required. If it is embargoed, an embargo end date is required.
- For a journal managed on DergiPark (Türkiye's national journal platform), the DergiPark address is required.
- Opening a journal record also needs the journal management permission.
Fields that cannot be saved are listed by name in the notification at the bottom right, and the page scrolls to the first field with an error.
Screens and settings
Catalogue Record
The page of a catalogue record, its tabs, the status, quality and record information cards on the right, and the save bar.
The page of a catalogue record shows all of the record's details, files, relations and versions together. You open the page by pressing the record's title in the Publications list. Next to the title you see the record's type, status, slug and any missing translation.
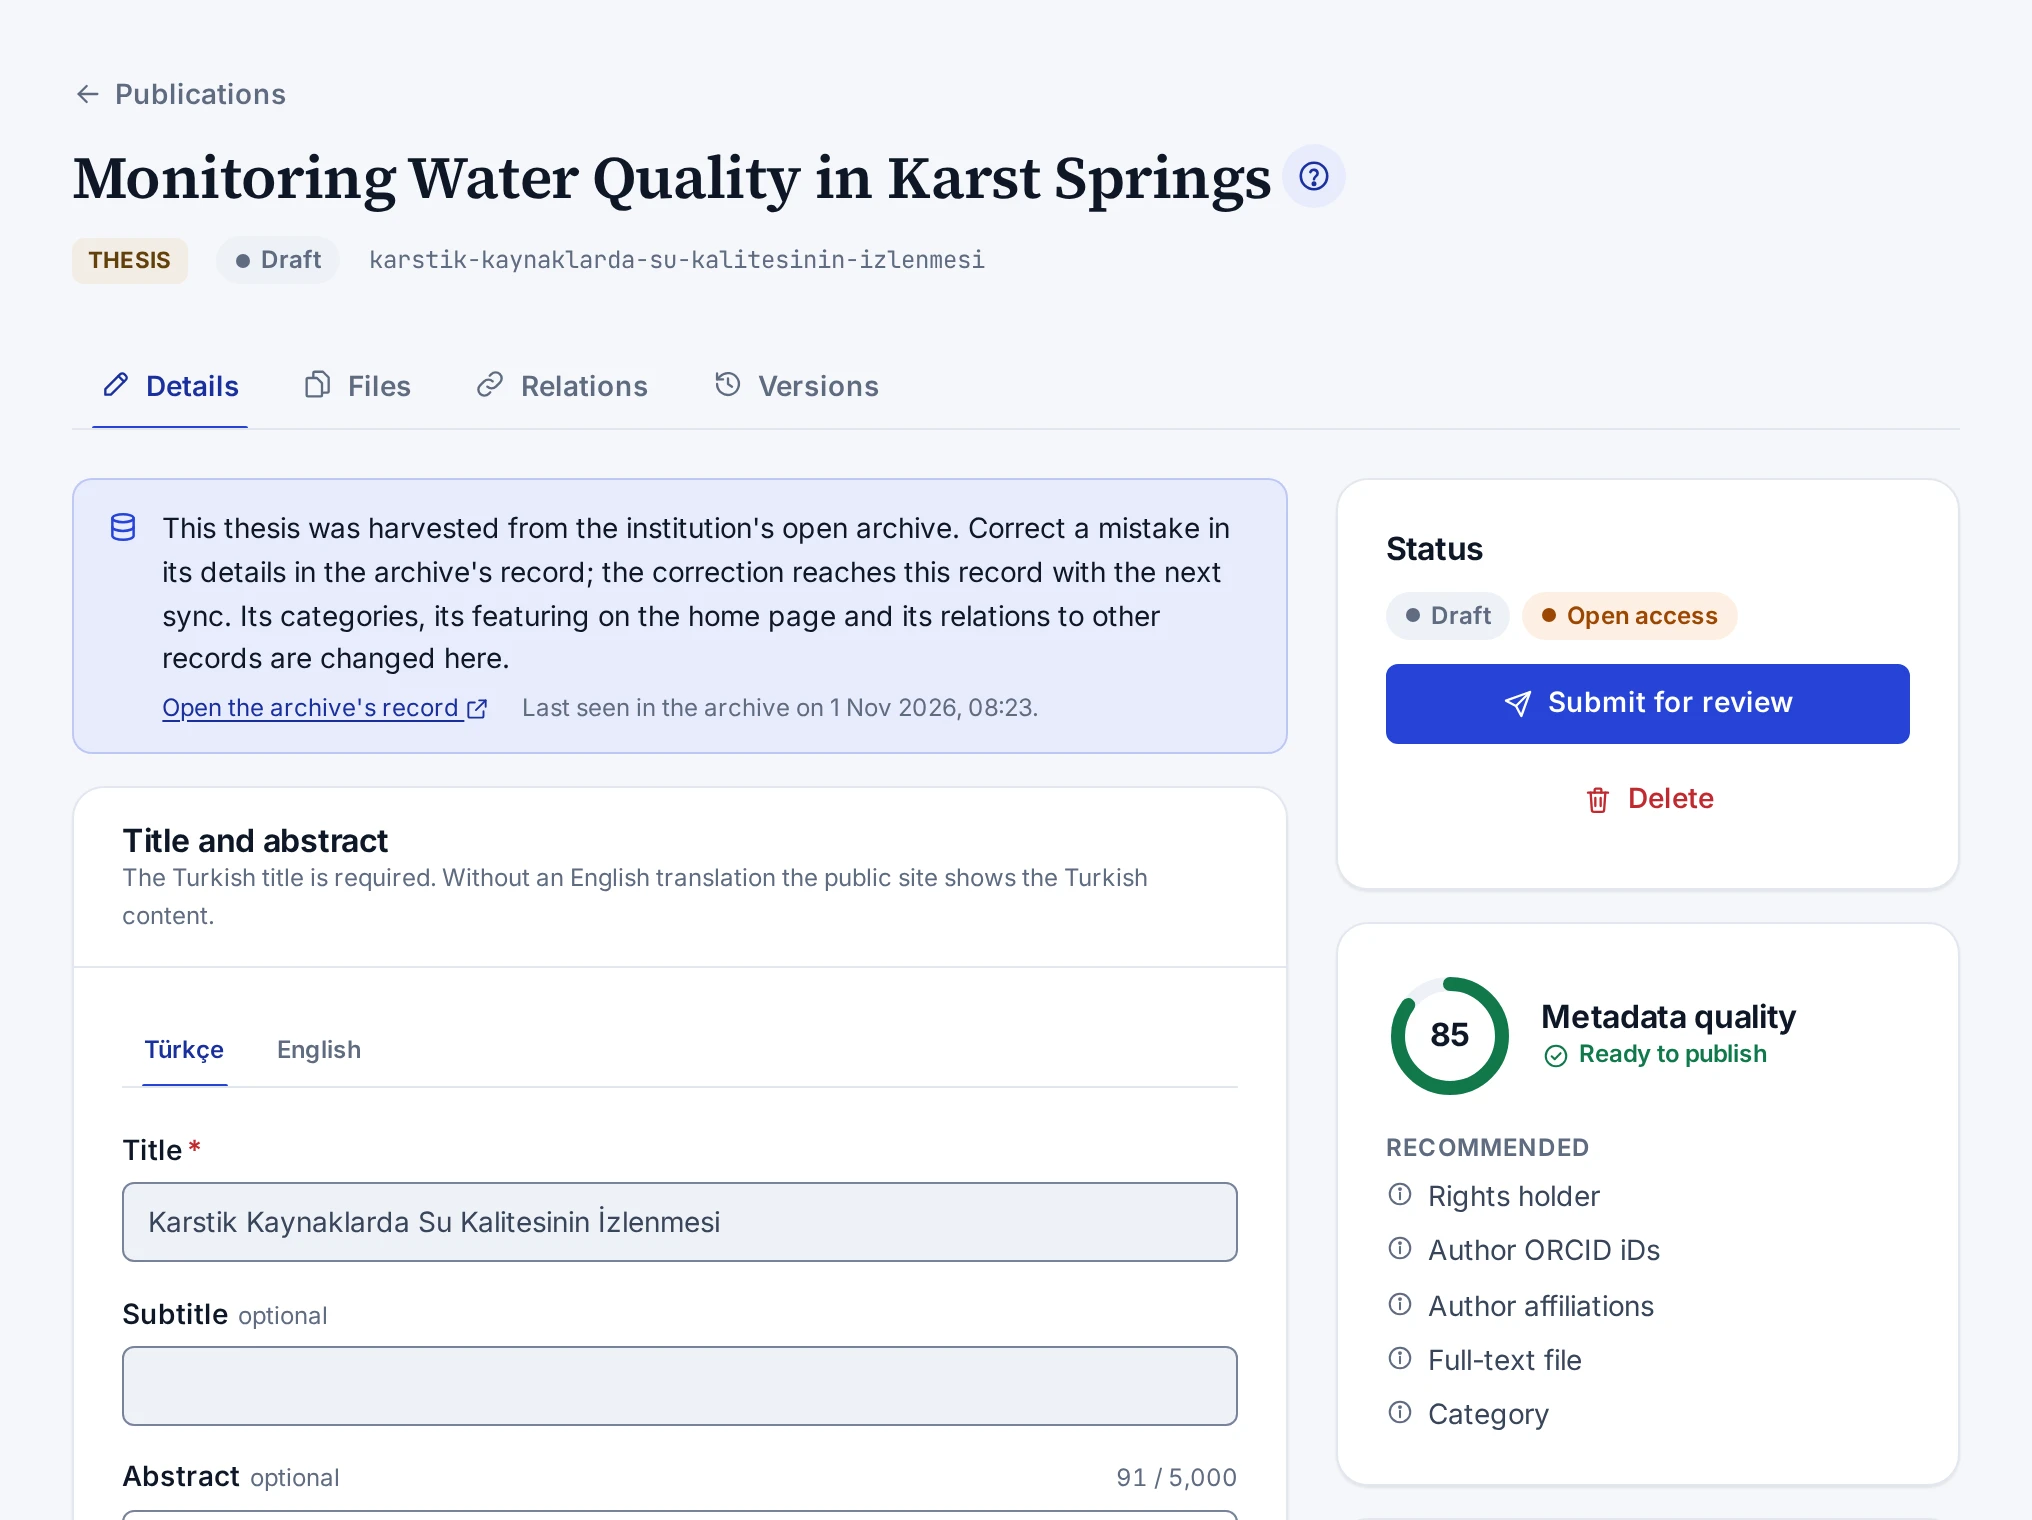
Tabs
| Tab | Contents |
|---|---|
| Details | Title and abstract, contributors, type-specific information, basic information, categories, identifiers, access and licence |
| Files | Full text, cover and supplementary files, the files' access and their earlier versions |
| Relations | Book and chapter, translation, supplement, new edition, correction and retraction relations |
| Versions | The record's version history, comparison and going back to an earlier version |
Cards on the right
- The Status card shows the record's status and access, the link to the public page and the actions open in that status. For a record in review it also shows who sent it for review and when.
- For a retracted or corrected record, a separate card shows the Retraction notice or Correction notice text with its date.
- The Metadata quality card shows the quality score out of 100, whether the record is ready to publish, and the Required and Recommended gaps. For articles the TR Dizin data checks warnings are here too.
- The Record information card has the time of creation, last update and first publication, the record's version number and, for an imported record, a link to the import. For the types that support it, the Download Crossref XML button and the Crossref DOI registration line are on this card too.
- On book, children's book, proceedings paper and thesis records, people with an ISBN permission see the ISBN requests card.
Save bar
When you change a field on the Details tab, a bar that says "There are unsaved changes" opens at the bottom. Save changes saves the changes, and Discard changes returns to the last saved state. The Ctrl+S shortcut (Cmd+S on a Mac) also saves. If you try to leave the page without saving, the panel asks you to confirm first.
Rules of the screen
- While there are unsaved changes, the status buttons and the Restore buttons on the Versions tab are disabled.
- While a status action runs, the other status buttons are disabled. If you press Save changes meanwhile, your changes are saved once the action is done. What you type while the action runs is not lost.
- If you have no permission to edit the catalogue, the record is view-only and a note at the top of the page says so.
- A retracted record cannot be changed. A deleted record cannot be edited until it is restored.
- On a thesis harvested from the institutional repository, a note at the top of the form says it came from the repository. The fields and files that come from the repository cannot be changed, and an earlier version cannot be restored. The categories, featuring and relations can be changed. The details are in Harvested Theses.
- If someone else changed the record while you were editing, saving stops and the "Someone else changed this record" window opens. Reload the page with Reload and make your change again.
Related topics
Screens and settings
Data Quality Screen
The filters and columns of the screen that lists catalogue records by metadata quality score, its Fix button and the CSV file.
The Catalogue → Data quality screen lists catalogue records by their metadata quality score. The record with the lowest score is at the top. You choose a problem and correct the records that have it one by one. How the score is calculated is explained in Data Quality.
Filters
| Filter | Options |
|---|---|
| Problem | The problems are listed in three groups, each with the number of records that have it. Blocks publishing, Recommended field missing, TR Dizin checks |
| Type | The seven record types |
| Status | Record statuses |
| Score | All scores, Below 80, Below 60, Below 40 |
The TR Dizin checks group appears only for articles. TR Dizin is Türkiye's national citation index.
Columns
| Column | What it shows |
|---|---|
| Publication | Title, type, status, year and authors |
| Score | Score out of 100. If the record cannot be published, Cannot be published appears below it |
| Problems | The first three problems and the number of the rest |
The Fix button on a row opens the record. If all of the record's problems concern files, the record's Files tab opens. When you correct and save the record, the score is calculated again.
CSV file
The Download CSV button downloads all rows that match the selected filters. The file has the record's ID, type, status, title, score, missing required and recommended fields, TR Dizin warnings and a link to the panel.
Rules of the screen
- The report scores the 2000 most recently changed records. When more records match the filters, a note at the top of the screen says so. Filter by type or status to see older records.
- Deleted records do not go into the report.
- The list is shown page by page, while the CSV file contains all rows.
Screens and settings
DOAB Readiness
The screen that checks books and chapters against the DOAB requirements, with its cards, its table, the gaps it checks and the template download button.
The Catalogue → DOAB readiness screen checks the books and chapters in the catalogue against the requirements of DOAB (Directory of Open Access Books). Ready records are at the top, and the others show what they lack. Ready books are downloaded in DOAB's Excel template.
Buttons at the top
- Download DOAB template downloads one XLSX file with DOAB's template, a PRISM sheet that shows the books' peer review processes and a check sheet that lists what every book lacks.
- If Also published books that are not ready is ticked, published books that are not ready also go into the template sheet.
The press's requirements
The card titled The press's requirements ticks off what DOAB expects from the press:
- A peer review process with external reviewers before publication must be defined and published on the site.
- At least three books must be ready for DOAB. Chapters do not count here.
- The address and e-mail address of the press must be on the site.
- The site must open over HTTPS.
- Editors and editorial board members must be listed on the site with their institutions. You check this line yourself.
If you have permission to manage the site settings, the card shows the Edit the peer review processes link.
Readiness count and table
The card next to it shows how many books are ready and how many records have each of the gaps that keep books out of DOAB. The table has these columns:
| Column | What it shows |
|---|---|
| Publication | Title, type, status, year and Thema codes |
| State | Ready or the number of gaps |
| Missing | What the record lacks |
| Peer review | The peer review process selected for the record |
The Fix button on a row that is not ready opens the record. If the only gap is the full text, the record's Files tab opens.
Gaps the screen checks
- The record is not published or not open access.
- There is no open licence. "All rights reserved" does not meet DOAB's terms.
- There is no public full-text PDF. This check runs only on published records.
- The book has no ISBN. A chapter goes into DOAB with its book's ISBN. That is why the book's ISBN is checked for a chapter.
- No peer review process is selected, or the process has no external review before publication.
- There is no English abstract or there are no English keywords.
- There is no Thema subject code or no publication year.
In the template, a chapter's row carries the title and the ISBN of its book. The screen checks the 2000 most recently changed books and chapters that are not deleted. The steps for preparing a book are in Preparing a Book for DOAB.
Concept
Data Quality
The metadata quality score out of 100 of a catalogue record, the required and recommended fields, and the TR Dizin data checks for articles.
Every catalogue record has a metadata quality score out of 100. The score shows how complete the record is. A record with a missing required field cannot be published. Recommended fields do not block publishing, but they help the record to be found, indexed and cited correctly.
Score calculation
Required fields make up 60 points of the score and recommended fields 40. Each missing required field lowers the score by 12. The points for recommended fields depend on the share of fields that are filled in. When you correct and save the record, the score is calculated again.
Required fields
The required fields depend on the record's type. The list for each type is in Catalogue Rules. The record's Metadata quality card lists the missing required fields under the Required heading. When nothing is missing, the card says Ready to publish.
Recommended fields
For every type, an English title, an abstract, an English abstract, keywords, a licence and a persistent identifier are recommended. For all types except journals, the rights holder, the publication year, ORCID iDs for all authors, the authors' institutions and a full-text file are recommended too. A record whose access is metadata only is not expected to have a full text.
| Type | Extra recommended fields | Expected persistent identifier |
|---|---|---|
| Book | Publisher, category, cover image | ISBN-13 |
| Children's book | Publisher, category, cover image | ISBN-13 |
| Journal | Publisher, category, cover image | ISSN or e-ISSN |
| Proceedings paper | Publisher, category | DOI or ISBN-13 |
| Thesis | Publisher, category | Handle, DOI or another identifier |
| Book chapter | No extra field | DOI or ISBN-13 |
| Article | No extra field | DOI |
TR Dizin data checks
For articles, the card also shows the TR Dizin data checks warnings. TR Dizin is Türkiye's national citation index. These warnings check details such as the English abstract, the authors' ORCID iDs and institutions, the received and accepted dates, the references, the ethics committee statement and the DOI. The warnings do not block publishing the record. If the journal makes the TR Dizin check mandatory, they block publishing the issue. The details are in Preparing for TR Dizin.
Finding the gaps
The Data Quality Screen lists the gaps in the whole catalogue by score. The Missing data filter in the Publications list also finds records with no licence, no category, no abstract or no English translation.
Concept
Translation Status
Whether a record's title and abstract in each language are in the original language of the work or a translation, and how the public site shows this.
The translation status tells whether a record's title and abstract in each language were written in the language of the work or are a translation. Readers can then tell the original text from a translation.
Default status
Each language tab has a Translation status field with the value Original language or Translation. Unless you choose otherwise, the text in the language of the Language of the work field counts as original and the other languages count as translations. If you change the language of the work, the default status changes too.
If you choose something other than the default, your choice is saved and kept even when the language of the work changes. For example, for a work published in two languages you can select Original language on both language tabs.
Display on the public site
When a reader opens a publication in a translated language, the note "Title and abstract are a translation" and the original language of the work appear below the title. Abstracts in the other languages carry a "translation" mark.
Missing translation
If a language has no title, the panel shows Translation missing on that language's tab. In the Publications list the record carries the EN missing or TR missing label. For a missing language the public site shows the Turkish content.
Concept
Catalogue Rules
The rules the system applies to catalogue records, the required fields of each type, identifier checks, address redirects and the reason rule.
The system applies the rules below to catalogue records by itself. A save or publish that breaks a rule stops, and the panel gives the reason with the name of the field.
Required fields by type
Every record needs a title, the language of the work and an access status. An open-access record also needs a licence, and an embargoed record needs an embargo end date. An open-access record whose licence has expired cannot be published. The extra fields for each type are these:
| Type | Also needed for publishing |
|---|---|
| Book | At least one author or editor, publication year, at least one category |
| Book chapter | At least one contributor, a published parent book, the chapter's order |
| Journal | Scope, publisher |
| Article | At least one author, abstract, keywords, a published issue or early view |
| Proceedings paper | Event name, publication year or event year, at least one contributor |
| Thesis | At least one author, institution, publication year, level |
| Children's book | At least one author, target age, content kind |
An article's year must be the same as the year of its issue. The article's journal must be published too.
A published record keeps these rules while it is edited. A published article cannot leave its issue, cannot move to an unpublished issue, and its year cannot differ from the issue's year. A published chapter cannot leave its book and cannot be linked to an unpublished book. For such a change, unpublish the record first.
Persistent identifiers
- ISBN, ISSN and DOI are checked for their format, and the check digit of ISBN and ISSN is checked too.
- If you enter an ISBN-10, the number is stored as an ISBN-13.
- When an ISBN is saved, it is hyphenated according to the international ISBN range list, for example 978-975-491-495-5.
- The same identifier cannot be used in two separate records.
- The ISSN and e-ISSN of a journal record come from the journal profile.
Addresses and redirects
If a record's Slug (URL) field changes, the old address redirects to the new one. Old addresses also redirect to the new ones for the slugs of people, institutions and categories, for merged people and categories, and when the volume or issue number of a published issue changes.
Records that cannot be unpublished
- A book with published chapters cannot be unpublished.
- A journal with published issues cannot be unpublished.
- An issue with published articles cannot be unpublished.
Unpublish the linked records first.
Reason and notice
Unpublishing, archiving and deleting need a reason of at least 5 characters. For a retraction or correction notice, the public notice must have 10 characters in at least one language. Reasons are written to the audit log.
Simultaneous editing
If someone else changed a record while you were editing it, saving stops. In the window that opens, reload the page and make your change again. This way nobody overwrites someone else's change.
Audit log
Publishing, unpublishing, retraction, merges, imports and changes to file access are written to the audit log. The log cannot be changed. The details are in Audit Log.
Two-factor authentication
If the system administrator made two-factor authentication mandatory for privileged roles, your catalogue permissions do not work until you set it up. You set it up on the My profile → Security tab, as explained in Using Two-Factor Authentication.
Operations alerts
The system administrators get an alert when, within a short time, many records are unpublished or retracted, or many records that were published before are deleted. The threshold and the time window are in Operations Alerts.
Concept
Access Statuses and Embargo
The open access, metadata only, embargoed and restricted access statuses of a catalogue record, the licence rule and how an embargo ends by itself.
A record's access status decides what a reader can open on the public site. You select the access status in the Access status field of the record's Access and licence section. The record's files follow this status, and a file's own setting can only make it more closed.
Access statuses
| Status | Meaning | Extra condition |
|---|---|---|
| Open access | Files are open to everyone. | A licence is required |
| Metadata only | Only the bibliographic data and abstract are shown. | The default for new records |
| Embargoed | Files open when the embargo ends. | An embargo end date is required |
| Restricted | Files are closed to the public. | None |
Licence
An open-access record cannot be published without a licence. The Licence list shows the licences that are active on the platform. If you select a licence that does not allow open access, for example "All rights reserved", a warning appears below the field. An open-access record whose Licence valid until date has passed drops to Metadata only by itself.
End of the embargo
For an embargoed record, Embargo ends is required. When the date comes, the record becomes open access by itself. If the record has no licence, it changes to Metadata only instead of open access. File access goes by the date, and a file whose embargo ends opens on that day.
If a file was given its own embargo, the file follows the publication's access again when the embargo ends.
Access of a file
A file's access cannot be more open than the publication's access. For example, a file set to open on a record with metadata only access stays closed to the public. The cover image and the table of contents are the exception. They appear on the record page unless their own access is restricted.
For a file to become public, the record must be published, and the file must have passed the virus scan and be the current version. An open file needs its own licence or the publication's licence.
Retraction and unpublishing
Access to the files of a retracted record is closed. The cover and the table of contents stay visible. The file links of an unpublished record stop working at once.
When changes take effect
A change to access, licence or embargo takes effect on the file links at once. Browsers and proxy servers check their copy of an open file with the server each time it is opened, and do not show the old copy after a change. Changes to file access are written to the audit log.
Troubleshooting
Reading counts are missing or look too low
Where the view and download counts and the Most read lists on the public site come from, which period they count and when they do not appear.
The reading counts and the Most read lists on the public site come from the site's own visit counters. The counters do not store the visitor's identity or IP address.
The feature is off
If the system administrator switched off the Reading counts and most-read lists feature, neither the counts nor the lists appear. The feature is on the Site settings → Features tab.
Visits that are not counted
Search engine bots are not counted. If the same visitor opens the same record again on the same day, it counts once.
The period counted
- The Views / Downloads line on a publication page shows the record's all-time total. The line appears only when one of the counts is above zero.
- The Most read list on the home page is sorted by the total views and downloads of the last 90 days.
- The Most read list on a journal page counts the last 12 months.
- The Most read sort order in publication lists and in search also counts the last 12 months.
Only published records go into the lists. The lists are refreshed every few minutes. A new reading may not show in a list at once.
Troubleshooting
A file does not appear on the public page
If a full text or supplementary file added to a record does not open on the public site, check the scan, access, embargo, licence and file store reasons in order.
A file's row on the record's Files tab says Public or Not public. If the file is not public, check the reasons below in order.
The virus scan has not finished
The scan status on the row must be Available. If it says Scanning, wait for the scan to finish. The page refreshes by itself. If it says Quarantined, the file did not pass the security scan and is never served. Upload a clean file as a new version.
The record is not published
Files of records in draft or in review are not public. Publish the record. Files of an unpublished record do not open either.
The record's access is closed
If the record's Access status field is Metadata only or Restricted, its files are not public. The file's own setting cannot open them. If the files should be open, set the record's access to Open access.
The embargo has not ended
For an embargoed record or an embargoed file, the file does not open before the embargo end date. The embargo label on the row shows the date.
There is no licence or it has expired
An open file needs its own licence or the publication's licence. A record whose licence has expired drops to metadata only. Check the licence and the date in the record's Access and licence section.
The record was retracted
Access to the files of a retracted record is closed. This is not an error and cannot be undone.
The file is an earlier version
Only the current version is served. Archived files in the Earlier versions list are not public.
The file store does not answer
If the row says Public but the link opens a "Temporarily unavailable" page, the file store is not answering at that moment. The record page and its metadata still open meanwhile. Try again in a few minutes. If the problem persists, tell your system administrator.
The file is missing from the store
If the row says Public but the link opens a "Page not found" page, the file was not found in the store. Upload a new version of the file and tell your system administrator.
All the rules are in Access Statuses and Embargo.
How-to
Publishing an Article as Early View
Publishing an accepted article on the journal page without placing it in an issue, and adding it to an issue later.
With early view, an accepted article is published on the journal page without being placed in an issue. When you later add the article to an issue, it leaves early view automatically. The journal of the article must be published.
Early view from production
- On the Editorial → Production screen, open the job of the article.
- On the Release settings card, leave the Journal issue field empty.
- Tick the Publish as early view box.
- Press the Save button of the card.
- Release the article.
The steps for releasing are in Releasing a Work.
Early view from the catalogue
- Open the catalogue record of the article.
- In the Placement section, select the journal of the article in the Journal field. Leave the Issue field empty.
- Tick the Early view: publish in this journal before placing it in an issue box.
- Save the record and publish it.
Publishing the record is described in Record Statuses and Publishing.
On the site
The article appears in the Early view section of the journal page. The page of the article shows the Early view label, and its source line gives the name of the journal.
When you add the article to an issue, the early view mark is removed automatically and the article leaves this section. An article placed neither in an issue nor in early view cannot be published, and the form says so with an error.
From early view to an issue
An article in early view is a published record, so it goes only into a published issue. Prepare the other articles of the issue and publish the issue, then add the early-view articles to it from the issue's page or from the Placement section of the article. When automatic DOI registration is on, the article's DOI metadata is sent again with the volume and number.
How-to
Deleting a DergiPark Article
Removing an article harvested from DergiPark from the catalogue and knowing what the harvest does with articles that are deleted, unpublished or gone from DergiPark.
To remove an article harvested from DergiPark (Türkiye's national journal platform) from the catalogue, you first unpublish it and then delete it. A deleted article is not taken in again or republished in later harvests.
Deleting the article
- On the Catalogue → Publications screen, open the article.
- On the Status card on the right, press Unpublish.
- Enter a reason of at least 5 characters and confirm.
- On the same card, press Delete.
- Enter the reason and confirm.
A published record cannot be deleted directly. Deleting a record that was published before also needs the publishing permission. A deleted article goes to the trash. You find it in the Publications list with the Show deleted filter and restore it with Undo delete.
Later harvests
- Deleted and retracted articles are skipped. The harvest does not overwrite these records and does not republish them.
- An article that was only unpublished stays a draft. If this article's information changes on DergiPark, the next harvest updates the record and republishes it if the record passes the publish checks. If you never want the article to appear on the site, delete it.
- An article you restore from the trash comes back as a draft. The harvest republishes it only if its information on DergiPark changes.
Articles removed from DergiPark
An article that is no longer on DergiPark is not deleted from the catalogue automatically. The harvest reports these records with the Gone from DergiPark count in the result line. If you want to remove such an article from the catalogue too, delete it with the steps above.
Deleting an issue
You can also delete an issue harvested from DergiPark as described in Deleting a Journal Issue. The delete window also states that the journal is harvested from DergiPark.
- With the Delete the articles too option, the articles go to the trash and are not taken in again in later harvests.
- With the Keep the articles in the catalogue option, the articles stay as drafts without an issue. For an article that is updated on DergiPark, the next harvest creates its issue again, and the article can be published again.
Manual changes
The harvest protects only deleted and retracted records. The catalogue information of an article that changed on DergiPark is rewritten with the information on DergiPark. The details are in Records Harvested from DergiPark.
Troubleshooting
The details of a harvested thesis cannot be changed
What to do when the fields of a thesis harvested from the institutional repository are locked in the record form or saving is refused, by correcting it in the repository and using the fields the panel can change.
The original of a thesis harvested from the institutional repository is in the repository, so the fields that come from there are locked in the record form. The note at the top of the form says the thesis came from the repository and when the repository last listed it.
Correcting a detail
- Open the thesis's record in the repository with the Open the archive's record link at the top of the form.
- Correct the mistake in the repository's record, or have the repository's administrator correct it.
- If you want the correction at once, press Sync now on the Catalogue → Thesis harvest screen.
If you do not press the button, the correction comes with the next night's sync.
What the panel can change
You can change these settings of a harvested thesis in the panel.
- The thesis's categories
- Whether the thesis is featured on the home page, and its place there
- The thesis's relations to other records
These settings do not come from the repository, and the sync leaves them alone. The thesis's files come from the repository and cannot be changed in the panel. An earlier version of the thesis cannot be restored either.
Keeping a thesis off the site
If you do not want a thesis on the site, unpublish it from its record form. The thesis harvest does not publish again a thesis an editor unpublished. If the thesis must also leave the repository, contact the repository's administrator.
Feature
People and Institutions
Editing author, editor and institution records and merging duplicate person records.
The authors, editors and other contributors in the catalogue are person records. People and institutions are managed on the Catalogue → People & institutions screen. Institutions form a tree of parent institutions and their units.
If a person has two separate records, the records are merged and the publications are gathered on one record. The system scans for possible duplicates every day and lists them on the Duplicates tab. A merge cannot be undone and is written to the audit log.
Deleted people and institutions do not disappear permanently. They can be restored if needed. A person's e-mail address is never shown on public pages.
How-to
Managing People and Institutions
Adding, editing and deleting the person records and the institution tree of the catalogue, and restoring deleted ones.
You manage person and institution records on the Catalogue → People & institutions screen. People are on the People tab and institutions on the Institutions tab. You can also create a new person while adding an author to a catalogue record. That way is explained in Adding Authors and Contributors.
Adding a person
- On the People tab, press New person.
- In the Display name field, type the name the person will have in publications.
- If you know them, fill in the Given name, Family name and ORCID iD fields.
- Select the person's current institution from the Institution list.
- Press Create.
The person's page opens. If there are people with similar names, the notification at the bottom right gives their names. If the new record belongs to the same person, merge it with the existing record as in Merging Person Records.
You can type the ORCID iD in the form 0000-0002-1825-0097 or as an https://orcid.org/… link. Its check digit is verified. An ORCID iD can belong to only one person in the catalogue. The address in the E-mail (private) field is never shown on public pages.
Editing a person's details
- On the People tab, press the person's name.
- Correct the details on the Identity card.
- On the Short bio card, write the Turkish and English bio.
- On the Affiliations card, press Add institution.
- Select the institution on the new row.
- If you want, fill in the Title / position, From and To fields.
- Press Save.
A person can have at most 20 institution links. The end date of a link cannot be before its start date. If the Display name changes, the person's slug is renewed from the new name. Whether the slug changes this way or in the Slug (URL) field, the old address redirects to the new one. The Public page button at the top of the page opens the person's author page on the public site.
Deleting and restoring a person
Only a person who does not appear in any publication can be deleted.
- On the person's page or in the row menu of the list, select Delete person.
- Confirm the deletion in the window that opens.
A deleted person is not gone for good. When you tick the Show deleted box, the list shows deleted people. Restore in the row menu brings the person back. Until a deleted person is restored, they cannot be added to publications and their public page does not appear.
Adding an institution
- On the Institutions tab, press New institution.
- Fill in the Name (Turkish) field and, if there is one, the Name (English) field.
- If the institution is a unit of another institution, select the parent from the Parent institution list.
- Fill in the ROR ID, Country code, City and Website fields.
- Press Save.
To add a unit under an institution, select Add sub-unit from that institution's menu in the tree. The parent institution field fills in by itself. To take the institution's details from its ROR record, see Searching ROR for an Institution.
The country code is two capital letters, and a new institution comes with TR filled in. A ROR ID can belong to only one institution. An institution cannot be moved under itself or under one of its sub-units. If an institution's slug changes, its old address redirects to the new one.
Deleting and restoring an institution
An institution with sub-units or linked people, or one that a publication lists as its authors' institution, cannot be deleted. In the tree, the Delete institution item of an institution with sub-units is disabled.
- In the tree, select Delete institution from the institution's menu.
- Confirm the deletion in the window that opens.
The Show deleted box on the Institutions tab lists deleted institutions with the time they were deleted. The Restore button on the row brings the institution back. To restore a sub-unit, restore its parent institution first. Deleting and restoring are written to the audit log.
The reasons why a record cannot be deleted or restored are in A person or institution cannot be deleted and A deleted person or institution cannot be restored.
How-to
Searching ROR for an Institution
Finding an institution's ROR record with the Search ROR button of the institution form and copying its ROR ID, names and contact details into the form.
ROR (Research Organization Registry) gives research organisations a persistent identifier. The Search ROR button in the institution form lists the matches in ROR and writes the ROR ID and the name of the record you select into the form.
Before you start
The button appears only if the system administrator switched on ROR search in the institution form on the Administration → Site settings → Integrations tab. The server must be able to reach api.ror.org.
Searching and selecting
- On the Catalogue → People & institutions screen, open the Institutions tab.
- Press New institution, or select Edit from the menu of an existing institution.
- In the form, press Search ROR. The search box fills with the institution's name from the form.
- If needed, change the name to search for.
- Press Search.
- In the list, press the institution's record.
- Check the details written into the form.
- Press Save.
The list shows at most 10 matches with their name, acronym, city, country and ROR ID. A search needs at least two characters.
Details written into the form
The ROR ID of the record you select is written into the ROR ID field. If the ROR record has a Turkish name, it goes into the Name (Turkish) field. If it has an English name, that goes into the Name (English) field. If the Turkish name field is empty and ROR has no Turkish name, the record's name in ROR is written. The country, city and website are filled in only if they are empty in the form.
Marked matches
- A record that is not active in ROR is marked Inactive in ROR, and a record withdrawn from ROR is marked Withdrawn from ROR.
- A ROR ID used by another institution cannot be selected. The row says which institution uses the ID.
When ROR does not answer
If ROR cannot be reached, the warning "ROR is not answering right now. Try again a little later." appears instead of the list. You can also type the ROR ID into the ROR ID field by hand. The ID has nine characters and starts with 0. You can also paste the ID as an https://ror.org/… link.
Screens and settings
People and Institutions Screen
The tabs, filters, columns and menus of the screen with the person records, the institution tree and the queue of duplicate records.
The Catalogue → People & institutions screen shows the person records of the authors, editors and other contributors in the catalogue, the institution tree and the pairs of people that may be duplicates. The screen needs the person management permission.
Tabs and the button at the top
| Tab | Contents | Button at the top |
|---|---|---|
| People | Person records | New person |
| Institutions | Institutions and their sub-units | New institution |
| Duplicates | Pending pairs that may be duplicates | Scan again |
The Duplicates tab opens only for people with the merge permission and shows the number of pending pairs.
People tab
The search box finds people by any part of their name. Turkish characters and upper or lower case make no difference. To search by ORCID iD, type the full number with its hyphens. The ORCID filter separates people with an ORCID iD from people without one. The Show deleted box lists deleted people.
| Column | What it shows |
|---|---|
| Person | The person's name. A person with an account shows "Linked to a user account", and a deleted person shows "Deleted" |
| ORCID | ORCID iD, with a link to the record on orcid.org |
| Institution | The person's institution links |
| Records | The number of records where the person appears as a contributor. Drafts and records in the trash are counted too |
The row menu has Edit, Merge with another person and Delete person. Deleting is disabled for a person who appears in a publication. The menu of a deleted person shows only Restore.
Institutions tab
Institutions are shown as a tree. A row shows the institution's name, its English name when the panel is in Turkish, its city and country, its ROR ID and the number of sub-units. A missing translation is marked on the row. You open and close the sub-units with the arrow.
The row menu has Add sub-unit, Edit and Delete institution. Deleting is disabled for an institution with sub-units. The Show deleted box shows, instead of the tree, the list of deleted institutions with the Deleted at column and the Restore button.
Duplicates tab
Each row shows the similarity percentage and the two people's names, ORCID iDs and institutions. The two merge buttons on the row start the merge in one of the two directions. The Different people button takes the pair out of the queue.
Related topics
Screens and settings
Person Page
A person record's identity details, bio, institution links, possible duplicates and the merge and delete buttons.
The person page is the screen where you edit the details of a person record. You open the page by pressing the person's name in the Catalogue → People & institutions list.
Page header
The header shows the person's name, the ORCID iD if there is one, and how many publications the person contributed to. If the person is linked to a user account, the "Linked to a user account" label appears. The Public page button opens the person's author page on the public site.
On the page of a merged person, the note "This profile was merged into another profile." and the Open the current profile link appear. The page of a deleted person has a deletion note and the Restore button.
Identity details
| Field | Description |
|---|---|
| Display name | The person's name as shown in publications and on the public site, required |
| Given name and Family name | The given name and family name used in citations and exports. A person with two family names appears in citations with the whole family name. For a corporate or group author, leave the given name empty and write the whole name as the family name. Citations show this name as written |
| ORCID iD | Checked with its check digit, and held by only one person in the catalogue |
| E-mail (private) | Never shown on public pages |
| Web page | An address that starts with https:// or http:// |
| Slug (URL) | The last part of the address on the public site. If it changes, the old address redirects to the new one |
Bio and institution links
On the Short bio card, the Turkish and English texts are written on separate tabs. You can enter at most 4000 characters in each language.
Each row on the Affiliations card has the Institution, Title / position, From and To fields. Add institution adds a new row. A person can have at most 20 institution links.
The Save button becomes active when you make a change.
Side cards
- The Possible duplicates card shows the person's pending matches with their similarity percentage. Each row gives the other person's name and the reason for the match, for example the same ORCID iD or a similar name. The name opens the other person's page. Only people with the merge permission see the card.
- The Merge with another person button opens the merge window with this person as the source. If there are unsaved changes, the panel asks before it opens the merge window.
- The Delete person button is active only for a person who does not appear in any publication.
Related topics
Troubleshooting
A person or institution cannot be deleted
Why Delete person or Delete institution is disabled or deleting gives an error, and how to solve it.
A person can be deleted only if they do not appear in any publication. An institution can be deleted only if it has no sub-units and no linked people and no publication lists it as the institution of its authors. See which of the cases below applies.
The person appears in a publication
If the Records column of the list shows a number above zero, Delete person is disabled. This number also includes records in draft and in the trash. There are two solutions:
- If the person is a duplicate of another person record, merge the two records as in Merging Person Records.
- If the person was added by mistake, remove the person from the Authors and contributors section of the records concerned, then delete the person.
The person was merged or is already deleted
On the page of a merged person, the delete button is disabled. This record stays as a redirect to the kept person. A deleted person is already in the trash and appears in the Show deleted list.
The institution has sub-units
In the tree, the Delete institution item of an institution with sub-units is disabled. First delete the sub-units, or move them under another parent institution with Edit.
People are linked to the institution
If the institution appears on a person's Affiliations card, deleting stops with a warning. On the people's pages, remove this institution from their links or replace it with the right institution, then delete the institution again.
Institution links of deleted people count too. If the link is on a deleted person, restore the person, remove the link and save, then delete the person again.
Authors of publications list the institution
If a contributor in the Authors and contributors section of a publication has this institution, deleting stops with a warning. The warning says how many publications use the institution. In these publications, replace the contributor's institution with the right one and save, then delete the institution again. A deleted institution does not appear as an author's institution on publication pages, because its page no longer opens.
Troubleshooting
Person records cannot be merged
Why the button for merging people does not appear or the merge gives an error, and how to solve it.
If the system finds a detail that shows the two records belong to different people, it does not merge them. Follow the section below that matches the warning in the window or the notification.
The merge button does not appear
The Merge with another person button and the Duplicates tab are open only to people with the merge permission. A Production coordinator can edit people but cannot merge them. A Catalogue editor does the merge.
The two people have different ORCID iDs
Two records with different ORCID iDs count as separate people and are not merged. If the ORCID iD in one of the records is wrong, first correct the ORCID iD on that person's page and save. Then try the merge again.
The people are linked to different user accounts
If both records say "Linked to a user account" and the accounts are different, the records are not merged. These two records belong to separate account holders.
One of the records was merged before
A merged record stays as a redirect to the kept person and cannot be merged again. Go to the current record with the Open the current profile link on the record's page and do the merge with that record.
The source and the target are the same person
If the same person is selected on both cards of the window, the warning "The source and target must be different." appears. Select another person on the target card.
One of the people was deleted
A deleted person cannot be merged. First restore the person from the Show deleted list, then merge.
Troubleshooting
A deleted person or institution cannot be restored
Why a person or institution in the Show deleted list does not come back with Restore, and how to solve it.
Deleted people and institutions come back from the Show deleted list with Restore. Restoring stops in the cases below.
The person's ORCID iD is on another person
If the same ORCID iD was given to another person after the person was deleted, restoring stops and the warning "Another person has this ORCID iD. Merge the two records." appears. An ORCID iD can belong to only one person in the catalogue. A deleted person cannot be merged either. Bring the two records together in this order:
- Open the page of the person who now holds the ORCID iD.
- Clear the ORCID iD field.
- Press Save.
- Restore the deleted person with Restore.
- Merge the two records as in Merging Person Records.
In the merge, the ORCID iD is taken from the removed record if it is empty in the kept record.
The person was merged
A merged person cannot be restored. This record does not appear in the deleted list either, and its old addresses redirect to the page of the kept person. Edit the details on the kept person's page.
The institution's parent was deleted too
A sub-unit goes back under its parent institution. If the parent was deleted, restoring stops and the warning "Restore the parent institution first." appears. In the deleted list on the Institutions tab, restore the parent first and then the sub-unit.
Troubleshooting
A category cannot be selected in the record form
Why a category's box in the Categories section of a catalogue record is disabled, a category is missing from the list, or the list does not open at all.
The Categories section of a catalogue record shows the categories as boxes grouped by their taxonomy. If you cannot select a category, check the reasons below in order.
The category is inactive
The box of an inactive category is disabled for new selections. An inactive category that was linked to the record earlier stays ticked. To make the category selectable, open its form on the Catalogue → Categories screen, tick the Active box and save.
The category cannot be found in the list
Categories are listed in separate groups by their taxonomy. If the list is long, type the category's name in the Filter categories box at the top of the section. If the category does not exist at all, create it first as in Managing Categories.
The record is read-only
If you have no permission to edit the record, or the record was retracted or deleted, the form opens read-only and the boxes cannot be changed. The note at the top of the form gives the reason.
The category list does not open
If, instead of the boxes, a note says that the category management permission is needed, your account cannot read the category list. The record's existing category links are kept. Ask your system administrator for the permission.
The selected category does not appear on the public site
A category labelled Hidden in the list can be selected, but it does not appear on the public site. Tick the Visible on the public site box in the category's form.
Feature
File Library
Seeing all uploaded files, their virus scan status and the places where each file is used.
The Catalogue → File library screen lists the uploaded files, their virus scan status and the places where each file is used. Publication files, covers, images of institutional content, documents and the site logo appear here.
Every file goes through a virus scan, and nobody can open it before the scan has finished. The library shows only the files you have permission to see. The final files of a work in production do not appear in the library until the work is released and linked to its record.
A publication's files are added on the Files tab of its record. The file's access, embargo and licence are also set there. The steps are in Files and Access.
How-to
Uploading Files to the Library
Uploading a publication file, cover, institutional content or branding file to the file library, and the file types each upload purpose accepts.
The file library also accepts files that are not linked to a record. You add a publication's full text and cover on the record's own Files tab instead. The steps are in Files and Access.
- On the Catalogue → File library screen, press Upload file.
- Select the purpose of the file from the Upload purpose list.
- Drag the files onto the upload area or select them from your computer. You can select several files.
After the upload every file goes through a virus scan. Nobody can open the file before the scan finishes. The list refreshes by itself while the scan runs.
Files accepted for each purpose
| Purpose | Accepted file | Permission needed |
|---|---|---|
| Publication file | PDF, EPUB, DOCX, ODT, ZIP or an image | Catalogue edit |
| Cover image | JPG, PNG or WEBP, at most 10 MB | Catalogue edit |
| Institutional content | PDF or an image | Institutional content edit |
| Branding | JPG, PNG or WEBP, at most 10 MB | Institutional content edit or site settings |
The list shows only the purposes you have permission to upload for. The upload area shows the largest file size allowed. If the system administrator switched off the File uploads feature, files cannot be uploaded.
Using an uploaded file
A file that is not linked anywhere appears in the list as Not used. A document in the library can, for example, be made a journal's author template. Files linked to a record cannot be templates. The places where a file is used are described in File Library Screen.
Screens and settings
File Library Screen
The search box, filters and columns of the screen that lists uploaded files, the file details window and the places where a file is used.
The Catalogue → File library screen lists uploaded files with the newest upload at the top. Here you follow each file's scan status and the places where it is used.
Button at the top
Upload file opens the upload area. The steps are in Uploading Files to the Library.
Search and filters
| Filter | Options |
|---|---|
| Search box | File name or SHA-256 value |
| Purpose | Publication file, Cover image, Institutional content, Branding |
| Scan | Scanning, Available, Quarantined, Failed |
The purpose list contains only the purposes you have permission to see.
Columns
| Column | What it shows |
|---|---|
| File | File name, file type and size |
| Purpose | Upload purpose |
| Scan | Status of the virus scan |
| Used by | The first place where the file is used and the number of other places |
| Uploaded | Upload time |
The button at the end of the row downloads the file. If you have permission to open the place where the file is used, the place appears as a link.
File details
When you press a file's name, the File details window opens. The window shows the file's type, size, purpose, scan status and its detail, the scan time, whether its metadata was removed, the dimensions of images, the SHA-256 value, all places where it is used and the File id. Use in a deleted record or in an earlier version is marked separately.
Places of use
A file can be used in these places:
- Publication
- Issue cover
- Journal author template
- Institutional document
- Banner
- News / event cover
- Image in a news text
- Image in a page text
- Site logo
- Dark theme logo
- Default share image
- Tab icon
- Bulk import
Rules of the screen
- Publication files and covers need the permission to see unpublished catalogue records.
- Institutional content and branding files need the file library or the institutional content permission. The person who manages the site settings also sees branding files.
- The final files of a work in production do not appear in the list until the work is released and linked to its record. Open them from the production job.
- Submission and review files never appear on this screen.
Troubleshooting
A file stays in scanning or quarantine
What to do when an uploaded file does not leave the Scanning status or shows as Quarantined or Failed, and why this happens.
Every uploaded file goes through a virus scan and is not served to anyone before the scan finishes. The scan status appears in the file library and on the record's Files tab. For a banner image, a news cover image, the site logo and the article template, the field itself shows the status. If the file does not pass the scan, the field also says what to do.
The file stays in Scanning
The Scanning status shows that the scan is running. The page refreshes by itself, and when the scan finishes the status becomes Available.
If the virus scanner cannot be reached, the scan job is tried again for about an hour. If the scanner is not back by then, the scan is queued again by itself within 15 minutes. The file is scanned once the scanner works again. If the status still does not change for a long time after that, ask the system administrator to look at the background jobs on the System health screen. The details are in Monitoring System Health.
The file is Quarantined
A file with the Quarantined status did not pass the security scan and is not served anywhere. There are two reasons:
- The scan found malware in the file.
- The content of the file does not match its extension. For example, its name ends in .pdf but the file is not a PDF.
The Scan detail line in the file details window gives the reason. Upload a clean copy of the file again. A quarantined file cannot be added to a record.
The file shows Failed
A file with the Failed status could not be scanned and is not served anywhere. The scan is not tried again. There are two reasons:
- The file is larger than the virus scanner accepts. The Scan detail line says
too large for the virus scanner. - The file is missing from the file store. This happens when a database is restored without its files or when a file
is deleted from the store by hand. The Scan detail line says
object missing from the file store.
Upload a smaller copy of a file that is too large, or ask the system administrator to raise the scanner's size limit. Upload a missing file again. The fields of a banner image, a news cover image, the site logo and the article template tell these two cases apart too.
Feature
ISBN and Legal Deposit
Preparing an ISBN request, getting the publishing board's approval, recording the application to the Ministry and following the legal deposit.
ISBNs are issued by the Yayın Standartları ve Derleme Bilgi Sistemi (the publication standards and legal deposit information system) of the Ministry of Culture and Tourism. The person authorised for your institution in the Ministry's system applies there with their own e-Devlet (Türkiye's e-government gateway) login. JournTech never sends an application on your behalf. It collects the details of the application, has the publishing board approve them, and records the Ministry steps and the number that comes back.
Requests run on the Editorial → ISBN & legal deposit screen. The Production coordinator prepares the request and the Publishing board approves it. The Ministry's form is filled in by hand from the copy sheet on the request page, or with the browser extension your institution has installed.
Once the number has been assigned, the barcode for the cover and the copyright page are prepared. When the print date is entered, the 15-day legal deposit period starts and JournTech follows the legal deposit steps. Reminders go out for upcoming and overdue tasks. The whole process is described in ISBN Process.
Screens and settings
ISBN & Legal Deposit Screen
The status filters, search, columns, upcoming obligations card and yearly report card of the screen that lists ISBN requests.
The Editorial → ISBN & legal deposit screen tracks ISBN requests, the publishing board's approval, the steps at the Ministry of Culture and Tourism, printings and legal deposit (derleme) in one place.
Status filters
The buttons above the list filter the requests by status and show the number of requests in each status. You can select several statuses at once.
| Status | Meaning |
|---|---|
| Draft | The data for the Ministry form is being filled in |
| Awaiting approval | The request is waiting for the publishing board's approval |
| Ready to apply | The approved request is waiting to be entered in the Ministry's system |
| Sent to the Ministry | The application is made and the number is awaited |
| ISBN assigned | The number is entered and the book is not printed yet |
| Printed | The print date is entered and the legal deposit period is running |
| Deposit complete | The legal deposit steps of every printing are complete |
| Cancelled | The request was cancelled |
Search and filters
- The Search box searches titles, application numbers and ISBNs. For an ISBN, type at least 4 digits.
- The Form list filters requests by the forms Print, PDF, EPUB and Other.
- The Year of request field filters by the year in which the request was opened.
The filters stay in the address bar.
Columns
| Column | Shows |
|---|---|
| Title | The title. Set and volume requests are marked. |
| Form | Print, PDF, EPUB or other |
| Edition | The edition number |
| Status | The status of the request |
| ISBN | The assigned number |
| Planned date | The planned print or publication date |
| Updated | The time of the last change |
Side cards
The Upcoming and overdue obligations card lists approvals, Ministry steps, print dates, and bandrol (banderole) and legal deposit deadlines by due date. Overdue items are at the top, and each row opens its request. The Yearly report (Excel) card downloads the workbook for the selected year.
New request
The New ISBN request button is shown to the people who handle ISBN requests. The steps are in Preparing an ISBN Request.
How-to
Preparing an ISBN Request
Opening an ISBN request for a book in the catalogue or for a title only, filling in the data for the Ministry form and sending the request to the publishing board for approval.
The Production coordinator prepares the ISBN request. The request does not move on to the application at the Ministry of Culture and Tourism until the publishing board approves it.
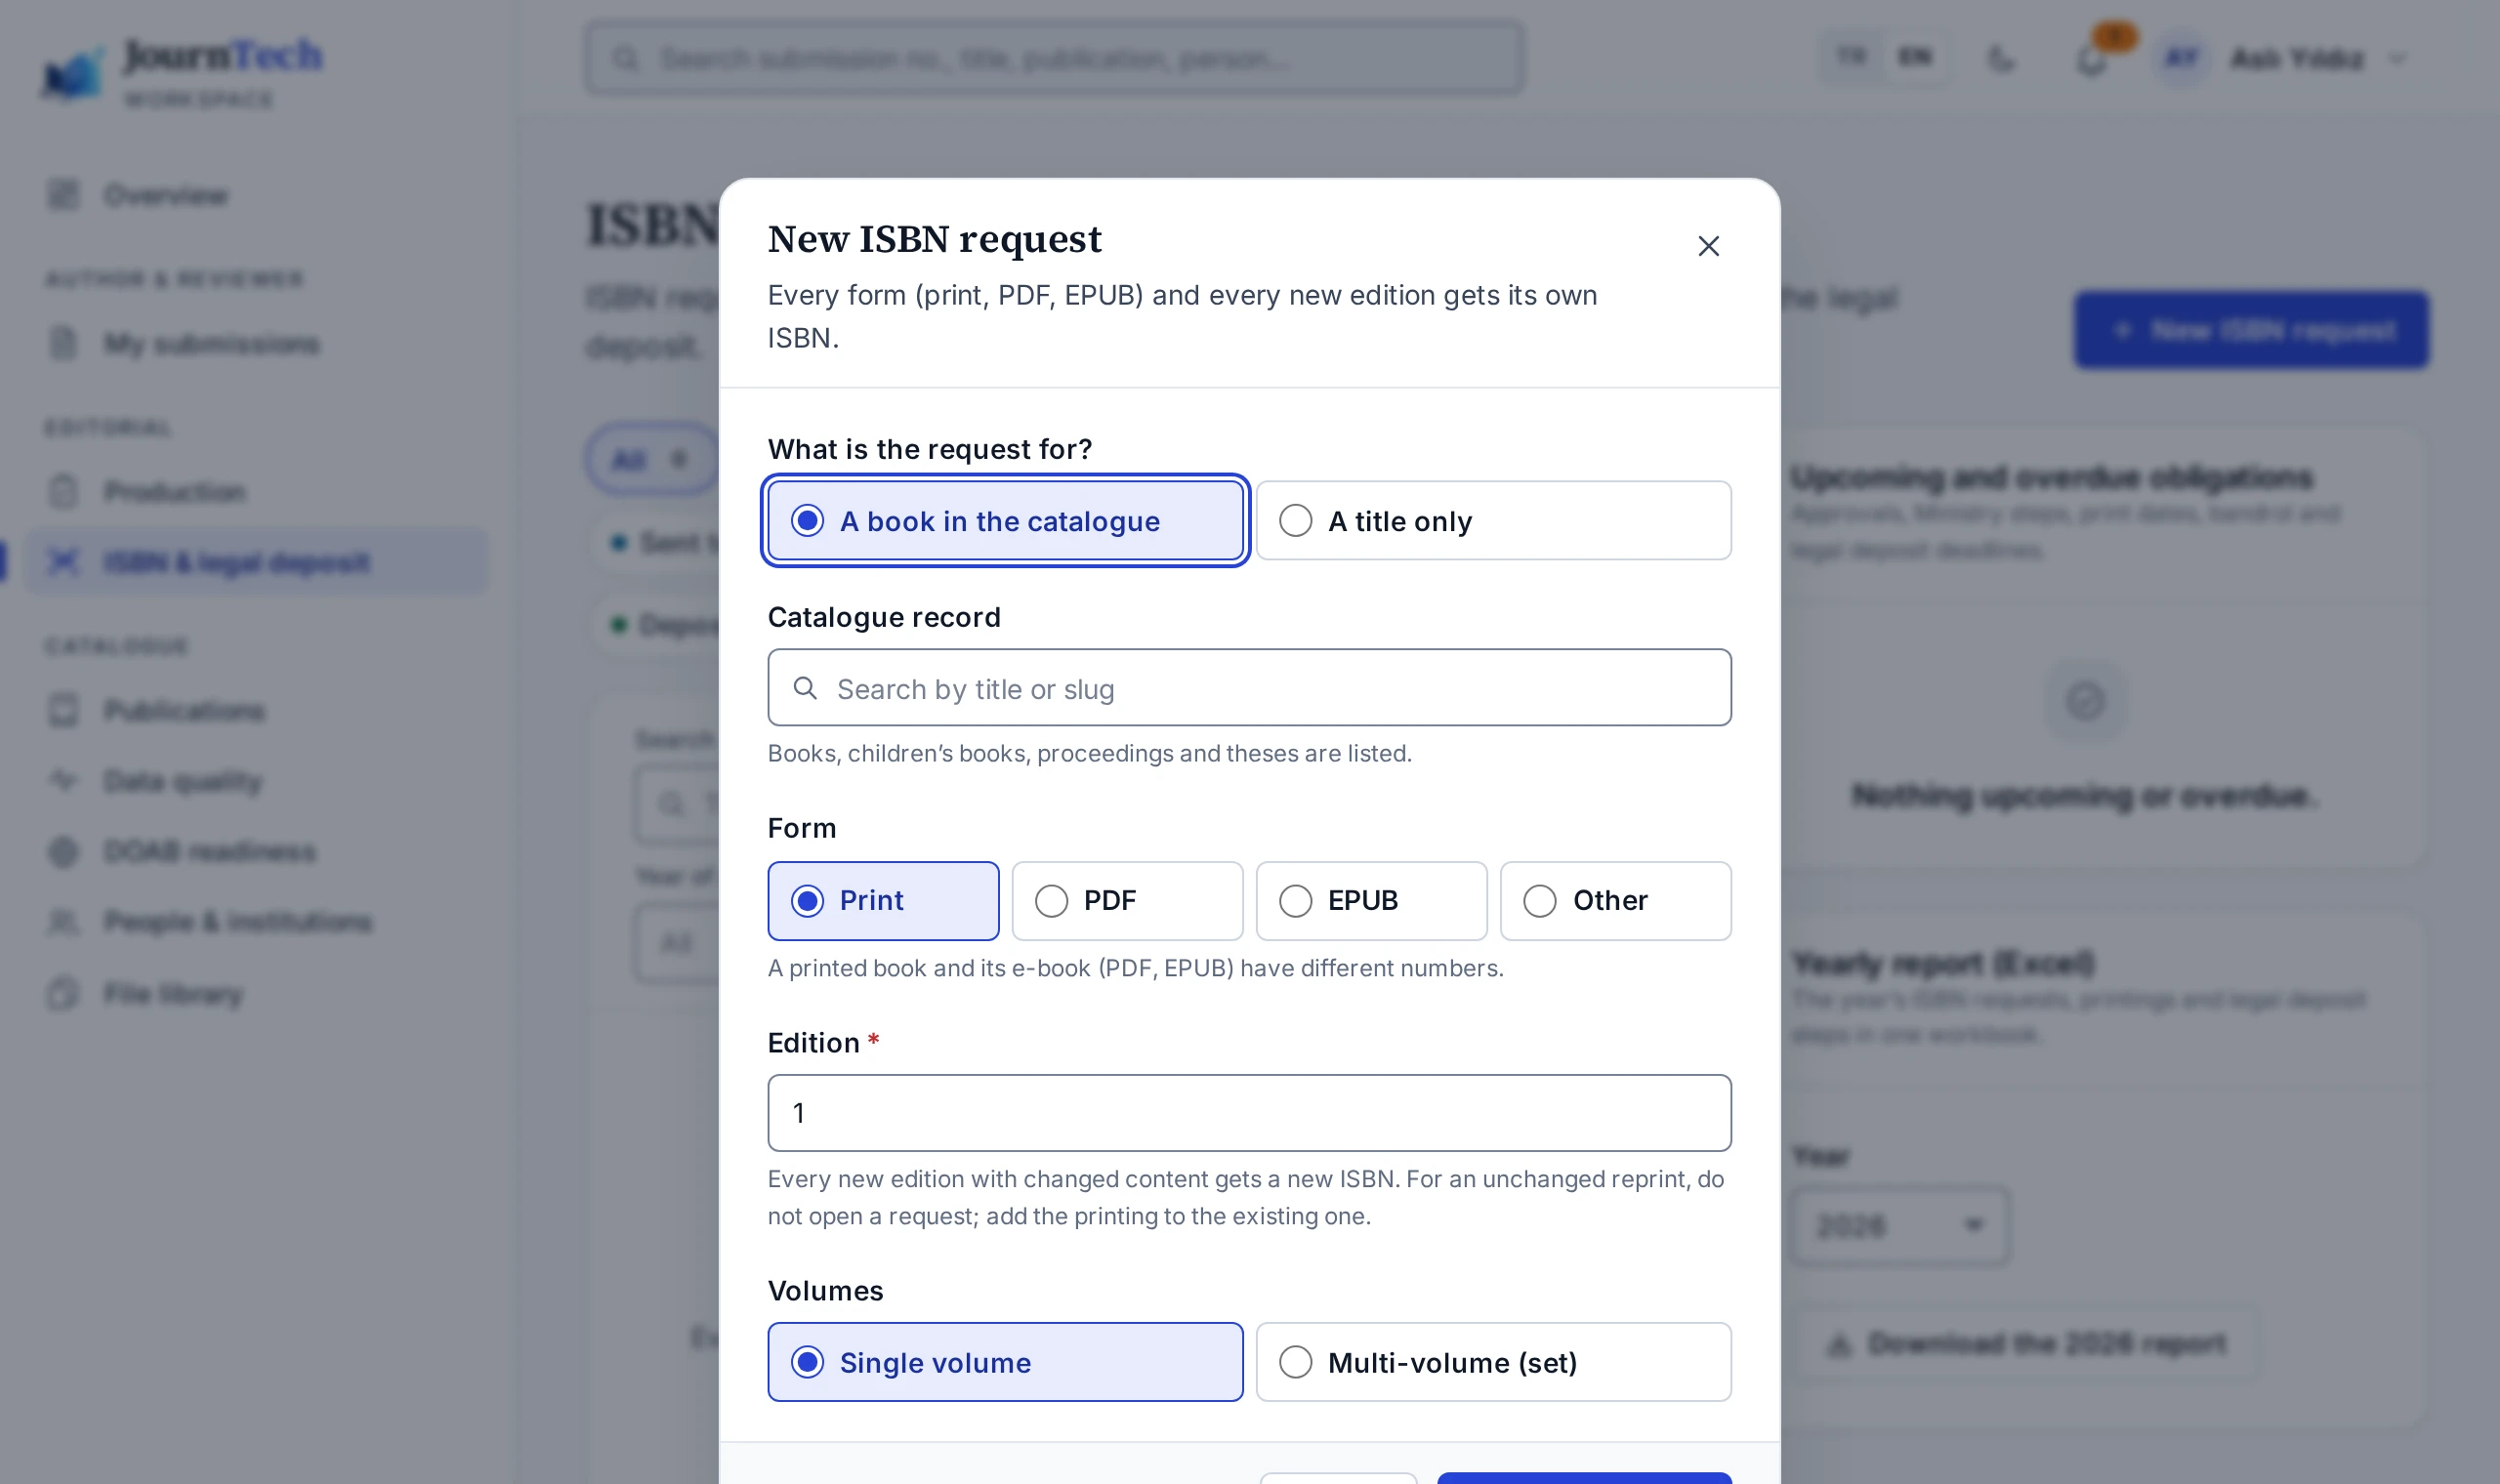
Opening a request
- On the Editorial → ISBN & legal deposit screen, press New ISBN request. The Open an ISBN request button on the ISBN requests card of a catalogue record opens the same dialog.
- With A book in the catalogue, choose the book from the catalogue. For a book that has no catalogue record, select A title only and type the title.
- Under Form, select Print, PDF, EPUB or Other.
- Enter the edition number in Edition.
- For a multi-volume work, select Multi-volume (set) under Volumes.
- Press Open request.
Only book, children's book, proceedings and thesis records can be chosen from the catalogue. The title, authors, language and page count come from the catalogue record and can be edited in the request. A request opened with a title only is not linked to a catalogue record.
Data for the Ministry form
- On the request page, fill in the Data for the Ministry form card. Missing required fields are listed at the top of the card.
- Select the Author type, and add the people under Authors and contributors in the order of the Ministry form.
- For a printed book, complete Binding, Print run and the printer details.
- Press Save.
Sending for approval needs the following.
- The title and the language
- At least one author, unless the author type is No author
- The number of pages, for a printed or PDF book
- The planned print or publication date
- The printer's certificate number, for a printed book
The Note field stays in JournTech and is not part of the Ministry form.
Sending for approval
- Save the changes in the form.
- Press Send for approval and confirm.
The request becomes Awaiting approval and goes to the publishing board. While it awaits approval, the form cannot be edited. A request cannot be sent for approval until a valid publisher certificate is entered in Site settings. The approval steps are in Approving an ISBN Request.
Request rules
- Each form and each new edition gets its own ISBN. You cannot open a second request for the same form and edition of the same record.
- A change of binding also needs a new number.
- A reprint with unchanged content keeps the same number. Do not open a new request for it. Add a printing to the existing request as described in Tracking Legal Deposit.
- For a multi-volume work, you open a set request and add each volume with the Add volume button on the request page. The set and each volume get their own ISBN.
- To change a request that was sent for approval or approved, press Back to draft first. After editing, the request goes for approval again.
- A draft request is deleted with the Delete button. A request past the draft stage can only be cancelled.
Screens and settings
ISBN Request Page
The status line, warnings, action buttons and the form, copy sheet, printings, barcode, copyright page and history cards on the page of an ISBN request.
The header of the request page shows the title, the status, the form and edition, the assigned ISBN and the application number at the Ministry of Culture and Tourism. The line below the header gives the next step and who takes it. On a request linked to a catalogue record, the Catalogue record button opens the record.
Warnings
The warnings at the top of the page show these situations.
- The publishing board sent the request back, or the Ministry returned the application, with a reason.
- The request was cancelled.
- No publisher certificate is entered, or it has expired.
- No Ministry officers are listed.
- The ISBN range message has not been fetched yet.
- The ISBN range message has not been refreshed for more than three weeks and does not know the number of the request.
Action buttons
Which buttons appear depends on the status of the request and on your permissions.
| Button | Request status | Who uses it |
|---|---|---|
| Send for approval | Draft | Production coordinator |
| Approve, Send back | Awaiting approval | Publishing board |
| Back to draft | Awaiting approval, Ready to apply | Production coordinator |
| Sent to the Ministry, Fill with the extension | Ready to apply | Ministry officer |
| Enter the ISBN, Ministry returned it | Sent to the Ministry | Ministry officer |
| Add volume | Set request | Production coordinator |
| Cancel request | Before a print date is entered | Production coordinator |
| Delete | Draft | Production coordinator |
If a button you expect is missing, the reason is shown below the buttons. For example, if you prepared the request, it says that another member of the publishing board has to approve it.
Cards
| Card | What it shows |
|---|---|
| Data for the Ministry form | The data the Ministry form asks for. The card can be edited only while the request is a draft. |
| Copy sheet for the Ministry form | The fields of the Ministry form in the form's order, each with a copy button |
| Printings and legal deposit | The date, bandrol (banderole) and legal deposit steps of each printing. The card appears once the ISBN is assigned. |
| Barcode and copyright page | The EAN-13 barcode and the copyright page. The card appears once the ISBN is assigned. |
| History | Every action on the request, who took it and when |
| Request details | Who prepared the request, sent it for approval and approved it, the board decision, who sent it to the Ministry, the application number and who entered the ISBN |
| Volumes | The volumes of a set, or the set of a volume |
For an electronic publication, the printings card is called Publication and EYDeS. The order of the cards depends on the status of the request. For example, on a request that is ready to apply, the copy sheet moves above the form.
The whole process is described in ISBN Process.
How-to
Applying at the Ministry
Applying in the Ministry's system with your own e-Devlet login for an approved ISBN request, and recording the application in JournTech.
ISBNs are assigned by the Yayın Standartları ve Derleme Bilgi Sistemi (the publication standards and legal deposit information system) of the Ministry of Culture and Tourism. The Ministry offers no public service that other systems can connect to. The person authorised for your institution in the Ministry's system applies with their own e-Devlet login (Türkiye's e-government gateway). JournTech never sends an application on your behalf, and it never sees or asks for your e-Devlet password.
If Ministry officers are listed in the site settings, only the people on the list record these steps.
Applying
- Open the request while it is Ready to apply.
- Log in yourself with e-Devlet at ekygm.gov.tr.
- Fill in the ISBN application form with the help of the Copy sheet for the Ministry form on the request page. The copy button next to each field copies its value to the clipboard, and Copy all copies all fields at once.
- Check the Ministry form, then press the save or submit button on the Ministry page yourself.
The copy sheet lists the fields in the order of the Ministry form and marks the required ones. You can also fill in the form with the browser extension your institution installed. The steps are in Using the ISBN Helper Extension.
Recording it in JournTech
- On the request page, press Sent to the Ministry.
- In Application number, enter the number that the Ministry's system gave the application.
- Check the date of the application in Application date. The date cannot be in the future.
- Press Mark as sent.
The request becomes Sent to the Ministry. The Ministry usually assigns the number the same day. Record the number as described in Entering the ISBN.
If the Ministry returns the application
- On the request, press Ministry returned it.
- In The Ministry’s reason, enter the reason shown in the Ministry's system and confirm. The reason must be at least 5 characters long.
The request returns to draft with the reason. Once it is corrected, it goes to the publishing board for approval again.
If an approved request is not entered at the Ministry within 3 business days, the Ministry officers get a reminder.
How-to
Using the ISBN Helper Extension
Filling in the Ministry form with the JournTech ISBN helper browser extension, checking the fields and sending the application number back to JournTech.
JournTech ISBN yardımcısı (JournTech ISBN helper in an English browser) is a browser extension for Chrome and Edge. In your browser, it fills in the form of the Ministry of Culture and Tourism with the data of the approved request. It does not send the application. You always press the save or submit button on the Ministry page yourself.
Your institution's IT department installs the extension. If the extension is not installed, fill in the form with the copy sheet as described in Applying at the Ministry.
Filling in the form
- While the request is Ready to apply, press Fill with the extension on the request page. The Ministry's system opens in a new tab.
- Log in yourself with e-Devlet (Türkiye's e-government gateway).
- Open the ISBN application form and press Fill the form in the extension's panel.
- Check every field on the Ministry page. Complete by hand the fields that the extension could not find or found to be different.
- Select the authors yourself in the Ministry's Yazar Seç (Select author) dialog.
- Press the save or submit button on the Ministry page yourself.
If the extension's panel does not open, press the JournTech button at the bottom left of the Ministry page, or click the JournTech icon in the browser toolbar. If the Ministry page is not recognised, the link in the extension's panel opens the copy sheet in JournTech.
Sending the application number back
If the Ministry page shows the application number after you save, the extension writes the number into the field in its panel.
- Check the number.
- To count the request as sent, tick Mark the application as submitted.
- Press Send to JournTech.
In JournTech the request becomes Sent to the Ministry. If the transfer does not work, mark the status by hand in JournTech with the Sent to the Ministry button.
Ticket and session
Fill with the extension gives the extension a single-use ticket that is valid for 10 minutes. The ticket is bound to your panel session. Do not sign out of JournTech until you are done at the Ministry. Sending the application number back works within two hours and while you are signed in to JournTech. If the time runs out, press Fill with the extension again.
If the extension does not respond, see The extension does not respond in this browser.
How-to
Entering the ISBN
Entering the ISBN that the Ministry assigned on the request, understanding the number checks, and how the number is written to the catalogue record.
When the Ministry of Culture and Tourism assigns the number, the Ministry officer enters it on the request. At this point the request must be Sent to the Ministry.
- On the request page, press Enter the ISBN.
- In ISBN-13, type the number as the Ministry's screen shows it. You can use hyphens and spaces.
- Check the results in the Number check section.
- Press Save the ISBN.
Number check
Before saving the number, JournTech checks the following.
- The number has 13 digits and its check digit matches. If you enter an ISBN-10, its 13-digit form is saved.
- The number is in one of Türkiye's ISBN groups. These groups are 978-605, 978-625, 978-975 and 978-9944.
- The number is not used on another request or another catalogue record.
If the range message of the International ISBN Agency has been fetched, the group and the registrant range of the number are checked against it. If it has not been fetched yet, only Türkiye's prefixes are checked, and the dialog says so.
If the range message has not been refreshed for more than three weeks, it lacks the groups and registrant ranges opened since it was last fetched. A number it does not know is then not refused. The number is saved with a warning, and the copyright page and the barcode show it without hyphens until the message is refreshed. When you see the warning, compare the number with the one on the Ministry's screen. A number whose check digit does not match, or that belongs to another country's group, is still refused.
After saving
The request becomes ISBN assigned, and the number is written to the identifiers of the catalogue record. On a request opened with a title only, the number stays on the request. The book's first printing is also added to the request automatically. From now on, the barcode and the copyright page (künye) are ready.
If the number is recorded on another request or record, the dialog shows a link that opens it. If no number is entered within 1 business day of sending the request to the Ministry, the Ministry officers get a reminder.
How-to
Downloading the Barcode and Copyright Page
Downloading the cover barcode of a book with an ISBN as SVG or PDF, and copying the text of the copyright page or getting it as a PDF.
Once a request has its ISBN, the Barcode and copyright page card prepares the EAN-13 barcode for the cover and the book's copyright page (künye).
Barcode
- On the request's Barcode and copyright page card, press Download SVG or Download PDF.
- Give the file to the cover designer.
The barcode is at its nominal size and takes up about 37 × 32 mm. Do not shrink it.
Copyright page
- Check the text in the Copyright page section of the card.
- Copy the text with Copy the copyright page, or download the copyright page as a PDF with the Download PDF button next to it.
The copyright page contains the following.
- The title and subtitle, the authors and the contributors
- The publisher's name and publisher certificate number
- The date and number of the publishing board's decision
- The ISBN and the numbers of the other forms of the same edition
- The edition and printing details, the printer and the printer's certificate number
- The place and year of publication
- The licence statement for an openly licensed book, and the copyright line for other books
The publisher's details come from Site settings, and the edition, printing and printer details from the request.
Hyphenation
The hyphens in the number are placed according to the range message of the International ISBN Agency. If the range message has not been fetched yet, the barcode and the copyright page show the 13 digits of the number without hyphens, and the card says so in a warning. The same happens when the message has not been refreshed for more than three weeks and does not know the number. This way a number split in the wrong places is never printed. Before sending the book to print, wait for the range message to be fetched or refreshed, or set the hyphens by hand as the screen of the Ministry of Culture and Tourism shows them.
How-to
Changing the Print Date and Cancelling an ISBN
How the print date reported to the Ministry affects the legal deposit period, what to do when printing is postponed, and cancelling an ISBN that will not be used.
If the print date reported to the Ministry of Culture and Tourism is not changed, the book counts as printed on that date and the legal deposit (derleme) obligation begins. JournTech sends reminders 14 and 3 days before the planned print date. If the date passes and no print date is entered, it sends another reminder the next day and counts the legal deposit period from the planned date.
If printing is postponed
- Update the date in the Ministry's system.
- In JournTech, change the printing's Planned print date to the new date on the request's Printings and legal deposit card.
- Press Save printing.
The reminders follow the new date.
Cancelling the number
The number of a book that will not be published is cancelled.
- On the request page, press Cancel request.
- In Reason for cancelling, enter a reason of at least 5 characters and confirm.
- Have the number cancelled in the Ministry's system too.
The number is removed from the catalogue record and the request is closed. The cancellation cannot be undone. The Ministry may give the cancelled number to the publisher's next book.
The number of a book that was printed or has been made public cannot be cancelled. Nor can the number of a book that has been promoted on sales sites or catalogued in a library.
A request that has no number yet is cancelled with the same button. If you cancel a request that was sent to the Ministry, withdraw the application in the Ministry's system too.
How-to
Tracking Legal Deposit
Entering the print date, recording the bandrol, deposit copies, EYDeS, ISBN agency copy and reprint steps, and uploading the receipts.
Once the ISBN is assigned, the request's Printings and legal deposit card tracks the legal deposit (derleme) steps of each printing. Entering the print date starts the 15-day legal deposit period (Law No. 6279 on legal deposit). The card shows the deadline for each step.
Print date
- On the printing's card, enter the day the book was printed in Print date.
- Press Save printing.
The request becomes Printed, and the card shows the legal deposit deadline. The print date cannot be in the future.
Bandrol
Printed books are distributed with a bandrol, the banderole sticker that the Ministry of Culture and Tourism issues for each copy. The bandrol goes on the copies after printing and before shipment, and the Ministry issues bandrols within 10 business days.
- With Required selected, fill in Bandrol application date and Bandrols received on.
- If free distribution was declared in the bandrol application, select Free distribution declared.
- For the exceptions listed in the regulation, select Exempt.
Deposit copies
Six copies with bandrols are delivered to the Istanbul Legal Deposit Office (İstanbul Derleme Müdürlüğü) in Istanbul, and to the provincial public library (il halk kütüphanesi) in other provinces.
- Enter the date you sent them in Copies sent on.
- Under Delivered to, select İstanbul Derleme Müdürlüğü or Provincial public library. If you selected the provincial public library, fill in Name of the library.
- Upload the receipt in Deposit office receipt.
If you upload a new document, it replaces the old one, and the old document is deleted.
Electronic copy and other steps
- The electronic copy of a printed book is also uploaded within 15 days to EYDeS, the electronic legal deposit system of the National Library (Milli Kütüphane), without a password or copy protection. Enter the upload date in Uploaded to EYDeS on and upload the EYDeS confirmation document.
- EYDeS does not use e-Devlet (Türkiye's e-government gateway). You log in with the e-mail address and password of your EYDeS account. EYDeS has no bulk upload.
- In Copy sent to the ISBN agency on, enter the date of the copy sent to the ISBN agency. This step can be switched off in Site settings.
- For a reprint, enter the date of the "Basım sonrası işlemler" (post-print procedures) record in the Ministry's system in Post-print record in the Ministry’s system on.
For e-books, legal deposit is through EYDeS only. For an electronic publication, the card is called Publication and EYDeS, and you enter the Publication date instead of a print date. An electronic publication takes no deposit office receipt, only the EYDeS document.
When every step is ticked, the printing is complete and the request becomes Deposit complete. The fine for missing legal deposit is charged for each copy, and its amount is revalued every year. The amount announced for 2026 is 11,500 TL. Paying the fine does not remove the legal deposit obligation.
Reprints
A reprint with unchanged content keeps the same ISBN and has its own legal deposit.
- Press Add printing at the top of the card.
- Enter the planned print date and the print run.
- Press Add printing in the dialog.
Before you add a reprint, the print date of the previous printing must be entered. A reprint added by mistake is removed with Remove printing, as long as no print date has been entered for it. For a new edition with changed content, open a new ISBN request.
How-to
Downloading the Yearly ISBN Report
Downloading the ISBN requests, numbers, Ministry dates and the legal deposit steps of each printing for a chosen year as an Excel workbook.
The yearly report gives the ISBN requests and legal deposit (derleme) steps of a year in one Excel workbook.
- On the Yearly report (Excel) card at the side of the Editorial → ISBN & legal deposit screen, select the year in the Year list.
- Press the download button of the card. The label of the button includes the year you selected.
The report contains the requests that were not cancelled. A request is in the report when it was opened or given a number in the selected year, or when one of its printings was printed in that year. Each printing is a separate row and appears in the report of the year it was printed. A reprint of a book whose request was opened in an earlier year is therefore in the report of the year of the reprint. A printing without a print date appears in the report of the year the request was opened or given its number. A request with no printing in the year is a single row, with the printing columns empty. The columns are as follows.
| Column | Content |
|---|---|
| ISBN, Eser adı, Biçim, Baskı, Durum | The details of the request (title, form, edition, status) |
| Başvuru no, Başvuru tarihi, ISBN tarihi | The steps at the Ministry of Culture and Tourism (application number, application date, ISBN date) |
| Basım no, Basım tarihi, Bandrol | The details of the printing (printing number, print date, bandrol) |
| Derleme gönderildi, EYDeS, Ajans nüshası, Derleme tamam | The dates of the legal deposit steps (copies sent, EYDeS, agency copy, deposit complete) |
Cells whose value starts with =, +, - or @ are written as text and do not work as formulas in Excel.
Concept
ISBN Process
The statuses an ISBN request goes through from draft to legal deposit, who takes each step, and the part JournTech plays in the Ministry application.
ISBNs are assigned by the Yayın Standartları ve Derleme Bilgi Sistemi (the publication standards and legal deposit information system, ekygm.gov.tr) of the Ministry of Culture and Tourism. The Ministry offers no public service that other systems can connect to. So the person authorised for your institution in the Ministry's system applies with their own e-Devlet login (Türkiye's e-government gateway). JournTech collects the data for the application and has the request approved. It records the Ministry steps and the number that comes back, tracks the printing and the legal deposit (derleme), and sends reminders before deadlines pass. JournTech never sends an application on your behalf.
The path of a request
| Status | What happens | Who does it |
|---|---|---|
| Draft | The data for the Ministry form is filled in. | Production coordinator |
| Awaiting approval | The request goes to the publishing board. | The Publishing board approves it or sends it back with a reason. |
| Ready to apply | The approved request is entered in the Ministry's system. | Ministry officer |
| Sent to the Ministry | The application number is recorded. The Ministry usually assigns the number the same day. | Ministry officer |
| ISBN assigned | The number is checked and written to the catalogue record. The barcode and the copyright page are ready. | Ministry officer |
| Printed | Entering the print date starts the 15-day legal deposit period. | Production coordinator |
| Deposit complete | All legal deposit steps are ticked. | Production coordinator |
| Cancelled | The request, or a number that will not be used, is cancelled. | Production coordinator |
If the publishing board sends the request back or the Ministry returns the application, the request returns to draft with the reason and goes for approval again. When the print date of a reprint with the same ISBN is entered, the request becomes Printed again, and it is complete again once the legal deposit of that printing is done.
Ministry officer
A Ministry officer is a person who acts for the institution in the Ministry's system. If officers are listed in the site settings, only they record the Ministry steps. If the list is empty, the Production coordinator who handles ISBN requests records these steps too. The list is described in Entering the Publisher Settings.
Approval and the four-eyes principle
The Ministry application is made in the institution's name, and the number it brings is written to the catalogue record. That is why the person who prepared a request does not approve it, and another member of the publishing board gives the approval. The rule is described in Four-Eyes Principle.
Legal deposit
Within 15 days of printing, six copies of a printed book with bandrols (the banderole stickers issued by the Ministry) are delivered to the deposit office, and its electronic copy is uploaded to EYDeS, the electronic legal deposit system. For e-books, legal deposit is through EYDeS only. The steps are in Tracking Legal Deposit.
Screens and settings
ISBN Reminders
Which events in the ISBN and legal deposit process send a reminder, when and to whom, and where the reminder days are changed.
The Upcoming and overdue obligations list on the ISBN & legal deposit screen shows all open tasks by deadline. Reminders go out for the same tasks, as panel notifications and e-mails. The e-mails do not contain the title of the book, only the date and a link.
Default reminders
| Event | When | To whom |
|---|---|---|
| The publisher certificate is about to expire | 90, 30 and 7 days before, then weekly once it has expired | System administrators and production coordinators |
| A Ministry officer's account was closed | Monthly | System administrators |
| A request is awaiting approval | After 3 business days | Publishing board |
| An approved request was not entered at the Ministry | After 3 business days | Ministry officers |
| Sent to the Ministry, no number entered | After 1 business day | Ministry officers |
| The print date is approaching | 14 and 3 days before | The preparer and the Ministry officers |
| The print date has passed and no printing is entered | The next day | The preparer and the Ministry officers |
| No bandrol (banderole) application yet | 21 days before printing | The preparer |
| Legal deposit steps are missing | 10 and 14 days after printing | The preparer |
| The legal deposit period has passed | Weekly from day 16 | The preparer and the publishing board |
| Weekly digest | Monday | Production coordinators and Ministry officers |
Business days are counted from Monday to Friday. Public holidays are not left out: a holiday on a weekday counts as a business day. If no Ministry officers are listed, the reminders meant for the officers go to the production coordinators. The weekly digest goes out only when something is upcoming or overdue. If the e-mail of an e-mail template is switched off, only the panel notification goes out.
Changing the days
A System administrator changes the days on the Reminders card of the Site settings → Publisher and ISBN tab. For the reminders counted in business days and for the bandrol reminder, 0 switches the reminder off. The 15-day legal deposit period set by law does not change. The settings are described in Entering the Publisher Settings.
Troubleshooting
An ISBN request cannot be sent for approval
Missing fields, unsaved changes and the publisher certificate when the Send for approval button is disabled or sending a request for approval gives an error.
A request goes for approval only while it is a draft, its form is saved, and the required fields of the form of the Ministry of Culture and Tourism are filled in. Check the causes below in order.
There are unsaved changes
While the form has unsaved changes, the Send for approval button is disabled, and a note below it says that you need to save them. Press Save.
A required field is missing
The top of the Data for the Ministry form card lists the missing fields. The title, the language and the planned date are required on every request. The number of pages is required for printed and PDF books, and the printer's certificate number for printed books. Unless the author type is No author, at least one author is needed.
The publisher certificate is missing or has expired
If the warning at the top of the request says that no publisher certificate is entered or that it has expired, a System administrator enters the certificate on the Site settings → Publisher and ISBN tab. The steps are in Entering the Publisher Settings.
The request is not a draft
A request that was sent for approval or approved cannot be sent again. If something has to change, press Back to draft.
You do not have the permission
The person who handles ISBN requests sends them for approval. The Production coordinator and System administrator roles have this permission.
Troubleshooting
The buttons for the Ministry steps are missing
The Ministry officer list and the request's status when the Sent to the Ministry, Fill with the extension, Enter the ISBN or Ministry returned it buttons are missing.
The buttons for the steps at the Ministry of Culture and Tourism depend on the request's status and on the list of Ministry officers. Check the causes below in order.
You are not a Ministry officer
If Ministry officers are listed in the site settings, only the people on the list record these steps. A note below the buttons says so. If you should be on the list, a System administrator adds you to the Ministry officers list on the Publisher and ISBN tab. The steps are in Entering the Publisher Settings.
The request is not in the right status
Sent to the Ministry and Fill with the extension appear only on a request that is Ready to apply. Enter the ISBN and Ministry returned it appear only on a request that is Sent to the Ministry. If the request is not approved yet, wait for the publishing board's approval.
You do not have the permission
The Ministry steps need the permission to handle ISBN requests. The Production coordinator and System administrator roles have it. A Catalogue editor and a Unit manager can only view requests.
Troubleshooting
The extension does not respond in this browser
What to do when the JournTech ISBN helper does not respond after Fill with the extension, or says that it could not fill in the form.
After you press Fill with the extension, the panel waits for the extension to answer. If the extension does not answer or cannot fill in the form, the panel says so in a note. In every case you can fill in the form by hand with the Copy sheet for the Ministry form on the request page.
The extension is not installed
If the note in the panel says that the extension did not answer in this browser, the extension is not installed, is
switched off, or is not allowed on this address. Your institution's IT department installs the extension, and the
installation guide is the extension/README.md file in the repository.
The extension did not answer in time
If the extension is installed but no answer came within 30 seconds, the network may be slow. If the tab of the Ministry of Culture and Tourism opened, carry on there. If it did not open, try again.
The extension could not fill in the form
The note in the panel gives the reason the extension reported. The JournTech address may be missing from the extension's settings, or another address may be set there. Enter the address on the extension's Options page. If the ticket has expired or was already used, press Fill with the extension again.
The request is not ready to apply
The extension works only on a request that is Ready to apply. If the request was taken back to draft or marked as sent to the Ministry in the meantime, the fill ticket becomes invalid.
The side panel did not open
Press the JournTech button at the bottom left of the Ministry page, or click the JournTech icon in the browser toolbar. How to use the extension is described in Using the ISBN Helper Extension.
Troubleshooting
The ISBN from the Ministry is not accepted
Causes and fixes when entering the ISBN warns that the number is not valid, does not belong to Türkiye or is used on another record.
The Enter the ISBN dialog checks the number before saving it and shows any problem in the dialog. Check the causes below.
The check digit does not match
The number may have been mistyped. Check the number again on the screen of the Ministry of Culture and Tourism. Use digits, hyphens and spaces only.
The number is not in one of Türkiye's groups
ISBNs assigned in Türkiye start with 978-605, 978-625, 978-975 or 978-9944. Once the range message (the International ISBN Agency's file of ISBN ranges) has been fetched, the registrant range of the number is checked too. The dialog says which group the number belongs to. Enter the number again exactly as the Ministry's screen shows it.
If the range message has not been refreshed for more than three weeks, a number it does not know is not refused. The number is saved with a warning. The details are in Entering the ISBN.
The number is recorded elsewhere
If the number is recorded on another request or another catalogue record, the dialog shows a link that opens that request or record. If the number was entered on the wrong record, correct that record first.
The button is missing
If the Enter the ISBN button is missing, see The buttons for the Ministry steps are missing.