

JournTech
Editor-in-Chief Guide
This guide was made from the help pages on 9 November 2026. The help centre has the latest version.
Help Press Ctrl+P to print it or save it as a PDF.
Role
Editor-in-Chief
In addition to the section editor's work, issues the final decision, assigns editors and manages the journal profile and the issues.
The editor-in-chief issues the final decision and assigns editors to submissions. A desk rejection is also a final decision, and only the editor-in-chief can issue it. The editor-in-chief also manages the journal's profile, its author guidelines, the reviewer criteria and the issues.
In the panel you see the Editor queue, Production and Journals & issues screens. If the role was granted for the whole platform, the Reports screen opens as well.
Permissions of this role
- See the submissions in scope (editor queue)
- Screen submissions, request missing documents, send to review
- Invite and manage reviewers
- Record a decision recommendation
- Message authors about their submission
- See production jobs
- Start a submission for an author's account (the author submits it)
- Assign editors to submissions
- Issue final decisions
- Edit the profiles and issues of the journals in scope
- See reports and indicators
Screens and settings
Panel Search
Searching submissions, publications, people, users, pages and help topics at once with the search box in the panel's top bar.
The search box in the top bar searches many parts of the panel at once. When you type in the box and press Enter, the
Search screen opens and the results are grouped into sections. Turkish characters and upper and
lower case make no difference. For example, typing ışık also finds the title Işık Kirliliği.
The box appears for all roles other than Registered researcher and Reviewer. Which sections you see depends on your permissions.
Result sections
| Section | Permission needed to see it | Screen that opens all results |
|---|---|---|
| Submissions | See the submissions in scope (editor queue) | Editor queue |
| Publications | See unpublished catalogue records | Publications |
| People | Create and edit persons and institutions | People & institutions |
| Users | See user accounts | Users & roles |
| Pages | Edit pages, menus, banners, news, events and documents | Pages & policies |
| Help | No permission needed | The help centre's search |
Each section shows at most six results. If there are more, the See all link at the top of the section opens the search in that screen's list. Submission and publication results also show the type and the status.
When you press a help result, the topic opens in the help panel next to the screen, and you do not leave the screen you are working on.
When there are no results
Check the spelling or try a shorter phrase. If you are searching by submission number, type the whole number, for example JT-2026-00012.
Concept
Peer Review Types
What authors and reviewers see of each other in double-anonymous, single-anonymous and open review, and when the type is set.
The peer review type decides whether the author and the reviewer see each other's identity. The type is chosen in the Peer review field of the journal profile. Submissions not tied to a journal are reviewed double-anonymously.
| Type | What the reviewer sees | What the author sees |
|---|---|---|
| Double-anonymous | The identity of the authors is not shown | The identity of the reviewer is not shown |
| Single-anonymous | The authors and their institutions | The identity of the reviewer is not shown |
| Open review | The authors and their institutions | The name of the reviewer of a shared review |
Rules for every type
- Reviewers see only the anonymous files. The title page, the cover letter and the declaration documents are open only to editors.
- Editors always see the authors and the reviewers.
- The author sees only the comments-to-the-author section and the attachment of the reviews the editor shares.
- Confidential comments to the editor are never shown to the author.
- The invitation e-mail contains only the submission number and the journal name.
When the type is set
The peer review type of each submission is recorded when the author first submits it. If the journal changes the type later, the change applies only to new submissions. The editor sees the type of the submission in the header of the submission screen. The reviewer sees it in the note at the top of the invitation page.
The steps for changing the type are in Editing the Journal Profile.
Concept
Reviewer Deadlines and Reminders
The response and review periods of reviewer invitations, when reminders go out and how unanswered invitations close.
Each invitation has two deadlines. The reviewer responds to the invitation by the response deadline. If they accept, they submit the review by the review deadline. The exact dates are in the invitation and on the Deadlines card of the invitation page.
Default periods
If the editor does not set periods in the invitation, the periods from the site settings apply. By default these are 7 days for the response and 21 days for the review. A system administrator changes them on the Workflow tab of the Administration → Site settings screen.
In an invitation, the response period can be between 1 and 60 days and the review period between 1 and 180 days. Both periods count from the moment the invitation is sent. The review deadline cannot be earlier than the response deadline.
Reminders
- A reviewer who has not responded to the invitation yet is reminded once before the response deadline.
- For an accepted invitation, a reminder goes out before the review deadline.
- If the review is late, the reminders continue at the same interval. At most five review reminders are sent for one invitation.
- A site setting decides how many days before the deadline the reminder goes out. By default this is 3 days.
- Reminders go out only while the review round is open.
The editor sees the number of reminders sent in the row of the invitation.
Unanswered invitations
An invitation that is not answered by the response deadline closes automatically, and its status changes to Expired. The reviewer and the editors of the submission get a notification. An expired invitation can no longer be accepted. The editor can invite the same reviewer again.
Changing the deadlines
Only the editor changes the deadlines. The change is written to the audit log and the reminder counter is reset. The panel has no button for the reviewer to ask for more time. For more time, the reviewer contacts the inviting editor directly.
The editor's steps are in Tracking Invitations and Reviews. For a reviewer who cannot meet the deadline, see I cannot meet the deadline.
Feature
Editorial Work and Decisions
Following submissions in the queue, screening them, inviting reviewers, issuing decisions and corresponding with authors.
Editors follow submissions on the Editorial → Editor queue screen. A submission goes through screening, moves on to peer review and ends with a decision. The Next step card on the submission's page says what needs to be done at that moment.
The Section editor screens submissions, invites reviewers, corresponds with the author and records a decision recommendation. The Editor-in-chief also issues the final decision, assigns editors to submissions and manages the journal settings. The System administrator cannot issue final decisions. If a role was granted for one journal, only that journal's submissions are visible.
If the system administrator has made two-factor authentication mandatory for editorial roles, your editor permissions do not work until you set it up. The set-up is described in Using Two-Factor Authentication. Start by getting to know the Editor Queue screen.
Screens and settings
Editor Queue
The quick filters, filters, columns and sorting of the screen where editors follow submissions.
The Editorial → Editor queue screen lists the submissions within your scope. If your role was granted for one journal, you see only the submissions of that journal. Submissions you are an author of are not in the list. Drafts do not appear in the queue either. A submission enters the queue when the author submits it.
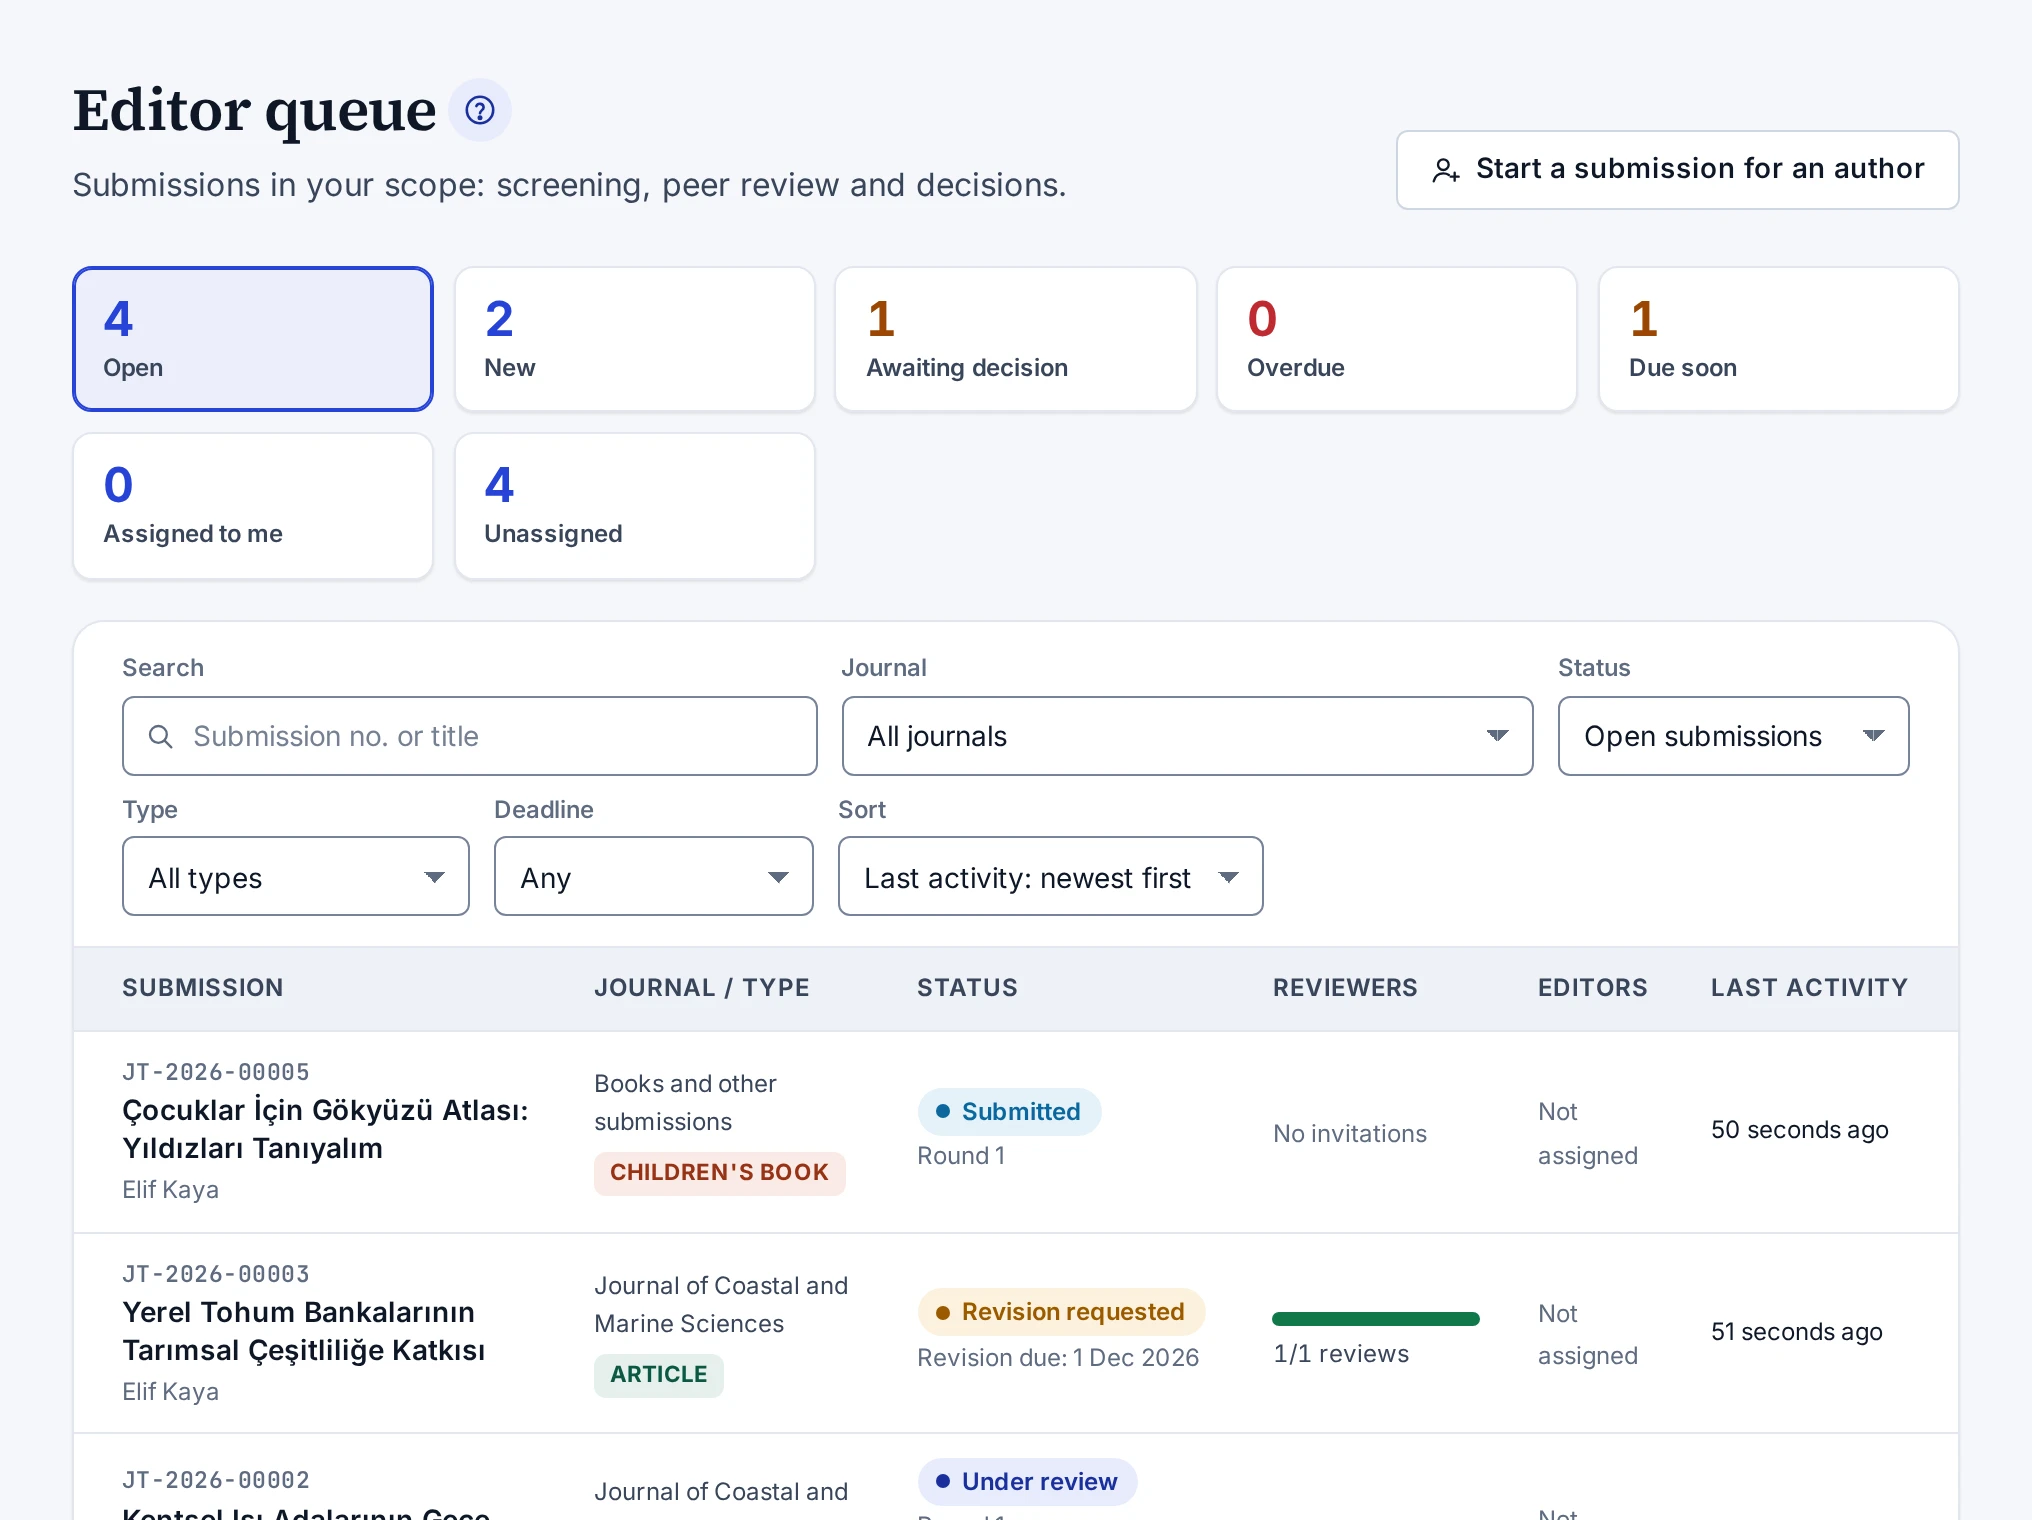
Quick filters
The boxes above the list, with their counts, are quick filters. Pressing a box narrows the list to those submissions.
| Box | Submissions it shows |
|---|---|
| Open | All submissions without a final outcome |
| New | Submissions that are submitted or in screening |
| Awaiting decision | Submissions under review and submissions with a submitted revision |
| Overdue | Submissions where the deadline for a reviewer response, a review or a requested revision has passed |
| Due soon | Submissions where one of these deadlines falls within 7 days |
| Assigned to me | Open submissions assigned to you |
| Unassigned | Open submissions without an assigned editor |
Filters
The Filters section has the following filters:
- The Submission no. or title box searches the submission number and the title.
- In the Journal list, editors authorised for the whole platform also see the Without a journal (books, chapters, theses …) option.
- The Status and Type lists narrow the submissions by status and by type.
- The Deadline list shows submissions whose deadline falls within 3, 7, 14 or 30 days. Overdue submissions are not in this list but in the Overdue box.
The filters stay in the address bar. If you share the link, the same list opens.
Sorting
The Sort list sorts by last activity, by submission date or by deadline. By default the list is sorted by last activity. The Deadline: nearest first option puts overdue submissions at the top and submissions without a deadline at the bottom.
Columns
| Column | What it shows |
|---|---|
| Submission | Submission number, title and the name of the submitter |
| Journal / type | The journal of the submission or Books and other submissions, and the publication type |
| Status | Status, the Overdue label if any, the review round or the revision deadline, and the nearest reviewer deadline |
| Reviewers | The number of reviews received and the number of invitations in the current round. Hovering over it shows how many reviewers are awaiting a response, reviewing or have declined |
| Editors | The assigned editors or Not assigned |
| Last activity | The time of the last activity on the submission |
Submitting on behalf of an author
Only people with the permission to start submissions on behalf of authors see the Start a submission for an author button. The screen it opens is described in Submitting on Behalf of an Author.
When you open a submission, the Next step card tells you what to do at that moment. The parts of the submission screen are described in Editor Submission Screen.
How-to
Screening a Submission
Checking the form of a new submission, asking the author for missing documents and sending the submission to peer review.
During screening you check whether a submission is ready to go to reviewers. A new submission arrives with the status Submitted. When you send it to peer review, its status changes to Under review.
Starting screening
- On the Editorial → Editor queue screen, open the submission.
- On the Next step card of the Overview tab, press Start screening.
- In the confirmation dialog, press the same button again.
The status of the submission changes to Screening. The author sees the new status on the page of their submission. This step is optional. You can also send a suitable submission straight to peer review.
Cards to check
Check the following cards on the Overview tab:
- The Metadata card shows the title, abstract, keywords and type-specific details. If the submission is written in two languages, you switch between them with the language tabs.
- The Authors card shows the authors in order with their institutions and ORCID iDs. The corresponding author is marked separately.
- The Declarations card shows the declarations the author confirmed and the answers they gave.
- On the Files card, the Anonymous files are the files the reviewers will see. A file whose metadata was removed carries the Metadata removed label. A file whose text contains an author's name, e-mail address or ORCID iD carries the The text of the file names an author label, with whose details appear where below it. Reviewers do not see this result. The Identified files are open only to editors.
Requesting missing documents
- On the Next step card, press Request missing documents.
- Optionally, fill in the Subject field.
- In the Message to the author field, state clearly what is missing. The text must be at least 10 characters long.
- Press Request missing documents in the dialog.
The status of the submission changes to Documents missing and an e-mail goes to the author. Your message also appears on the Messages tab of the submission. When the author completes the missing items and submits again, the status returns to Submitted and you get a notification.
Missing documents can be requested only for a submission whose status is Submitted or Screening.
Uploading an anonymous copy
If the anonymous manuscript still contains the name or institution of an author, you can upload a cleaned copy for the reviewers. The The text of the file names an author label appears when an author's name, e-mail address or ORCID iD is in the text. Institution names and self-citations such as "Author, 2024" are not searched for; look out for them as you read.
- Go to the Upload an editor file section at the bottom of the Files card.
- In the File type list, select Anonymous manuscript.
- Optionally, fill in the Description field.
- Drop the PDF, DOCX or ODT file on the upload area.
The new file replaces the author's anonymous manuscript. The old file stays in the list with the Replaced by a newer file label. The file you upload carries the Uploaded by an editor label and opens after the virus scan. Author details in the file properties are removed during the upload. The reviewers also see the files you upload as Supplementary file.
When the submission has the status Revision requested, the copy you upload goes to the new round the author is preparing and replaces the author's revised manuscript there. The text the reviewers of the previous round read stays as it was.
Sending to peer review
- On the Next step card, press Send to peer review.
- In the confirmation dialog, press the same button again.
The status of the submission changes to Under review and the author gets a notification. From this stage on, the author cannot change the files. You can now invite reviewers. The steps are in Inviting Reviewers.
To reject an out-of-scope or unsuitable submission without sending it to reviewers, see Desk-Rejecting a Submission.
How-to
Desk-Rejecting a Submission
Rejecting an out-of-scope or unsuitable submission without sending it to reviewers, or saving a rejection recommendation for it.
A desk rejection is a final decision. The submission is rejected without going to reviewers, a decision letter goes to the author and the process closes. Only an Editor-in-chief makes this decision. In the same situation a Section editor saves a rejection recommendation.
You can make this decision while the status of the submission is Submitted, Screening or Documents missing. For a submission in peer review, see Making a Decision.
Rejecting the submission
- On the Next step card of the Overview tab, press Desk reject.
- In the Rationale (editors only) field, write the rationale for the decision. The rationale must be at least 10 characters long and is not shown to the author.
- The Decision letter to the author field comes filled with a draft letter. Edit the letter. The letter must be at least 10 characters long.
- Press Desk reject in the dialog.
- Read the outcome in the confirmation dialog and confirm.
You can also make the same decision on the Decision tab by selecting Desk reject. On this tab the letter starts empty, and the Draft a letter button writes the draft. If you wrote or changed the letter yourself, the panel asks before it replaces the letter with the draft.
The status of the submission changes to Rejected. The decision is stored as a record that cannot be changed, and it is written to the audit log.
A section editor's rejection recommendation
For a submission in screening, a Section editor sees the Decision recommendation section on the Decision tab. Only Desk reject can be selected in this section.
- On the Decision tab, select Desk reject.
- Fill in the Rationale (editors only) field. The letter is optional for this recommendation.
- Press Save recommendation and confirm.
The recommendation does not change the status of the submission. A notification goes to the editors-in-chief assigned to the submission or, if none is assigned, to the editors with the permission to decide. The recommendation appears in the Decisions and recommendations section at the bottom of the tab.
How-to
Assigning Editors
Assigning a handling editor, section editor or editor-in-chief to a submission and removing an assignment.
When you assign editors to a submission, the notifications of the submission go only to the assigned editors. If no editor is assigned, the notifications go to all editors in scope. The permission to assign editors belongs to the Editor-in-chief role.
- On the Overview tab of the submission, find the Editor assignments card.
- Press Assign editor.
- Select the person in the Editor list. Editors who can decide carry the Can decide label. If a person is already assigned with another role, that role appears under their name.
- In the Role list, select Handling editor, Section editor or Editor-in-chief.
- Press Assign editor in the dialog.
The assigned editor gets a notification and sees the submission in the Assigned to me box of the queue. The assignment is written to the timeline and the audit log.
An editor whose account was closed counts as not assigned. The Account closed label appears next to the name, the notifications go to the other editors, and the submission is also listed in the Unassigned box of the queue. Assign another editor to the submission.
Editors you can assign
- The list includes only editors who may see this submission and whose e-mail address is verified.
- The authors of the submission and the reviewers who accepted an invitation for it do not appear in the list.
- The Editor-in-chief role can be given only to an editor with the permission to decide.
- You cannot assign the same person with the same role twice.
- Editors cannot be assigned to a withdrawn submission.
Removing an assignment
- On the Editor assignments card, press the cross button in the editor's row.
- In the confirmation dialog, press Unassign.
An editor you unassign keeps seeing the submission in the queue as long as it is within their scope. They are no longer among the assigned editors.
How-to
Inviting Reviewers
Inviting a reviewer to a submission under review, from the reviewer pool or by e-mail address.
You invite reviewers from the Reviewers tab of the submission. You can invite only while the status of the submission is Under review.
- On the Editorial → Editor queue screen, open the submission and go to the Reviewers tab.
- Press Invite reviewer.
- Choose the reviewer in one of two ways:
- On the From the reviewer pool tab, search by name, e-mail, institution or expertise. The candidates are ranked by the keywords of the submission. You can change the ranking with the Matching keywords field. Each candidate shows their number of ongoing, completed and declined invitations. A candidate whose expertise matches the submission carries the Matched label. Select the row of a suitable candidate.
- On the By e-mail tab, fill in the E-mail address, Full name and Invitation language fields. If an account with this address exists, the invitation goes to that account. For a person without an account, a reviewer account is created and a link for setting a password is sent. In this case the full name is required.
- Optionally, add a Personal message. If you leave Days to respond and Days to review empty, the periods from the site settings apply. By default these are 7 and 21 days.
- Press Send invitation.
The response period can be between 1 and 60 days, the review period between 1 and 180 days. The review deadline cannot be earlier than the response deadline. If you enter a review period shorter than the response period, both deadlines fall on the same day.
After the invitation
The invitation e-mail contains only the submission number and the journal name. The reviewer also gets a notification in the panel. Reminders go out automatically, and an invitation that is not answered in time closes. The periods are described in Reviewer Deadlines and Reminders.
You follow the status of the invitation, its deadlines and the incoming review on the same tab. Changing deadlines, cancelling an invitation and inviting the same person again are described in Tracking Invitations and Reviews.
Rules the system applies
- The authors of the submission and the people already invited in this round do not appear in the candidate list.
- The pool includes only active accounts with a verified e-mail address that have the reviewer role or joined the reviewer pool from their profile.
- You cannot invite yourself as a reviewer.
- If a person already has an open invitation in the same round, a second invitation is not sent to them.
- The Reviewer rules note at the top of the tab checks the number of reviewers and their institutions. These warnings do not block the action.
How-to
Tracking Invitations and Reviews
Following the status and deadlines of invitations on the Reviewers tab, reading reviews, changing deadlines, cancelling an invitation or inviting a reviewer again.
The Reviewers tab of a submission shows the reviewer invitations by round. The newest round is at the top and carries the Current round label. The card of a closed round shows the date it closed.
Invitation row
Each invitation row shows the reviewer's name, e-mail address, institution and the status of the invitation. The status is Awaiting response, Accepted, Declined, Expired or Cancelled.
| In the row | What it shows |
|---|---|
| Invited | The invitation date and the editor who sent the invitation |
| Respond by | For an invitation awaiting a response, the response deadline and the number of days left |
| Review due | For an open invitation, the review deadline and the number of days left |
| Responded | When the reviewer responded to the invitation |
| Account closed | Shown on an open invitation when the reviewer's account was closed. The reviewer gets no reminders; cancel the invitation and invite another reviewer. |
| Overdue | The label that appears when an open deadline has passed |
If the reviewer accepted the invitation, the row shows their conflict-of-interest declaration. If the reviewer disclosed a possible conflict, their explanation is here too. If they declined, the Reason for declining they wrote appears. The row also shows the number of reminders sent to the reviewer.
Reading the review
When the reviewer submits the review, a Show review link appears in the row. The review shows the reviewer's recommendation and scores, the Comments to the author and Confidential comments to the editor sections and, if there is one, the Review attachment file. Confidential comments to the editor are never shown to the author.
If the reviewer has started the review but not submitted it, the row says the review is a draft. The submitted reviews of the round also appear side by side on the Decision tab. Notes the reviewer sends after the review are listed as internal notes on the Messages tab.
Invitation actions
The Invitation actions menu of each invitation in the current round holds the actions that fit the status of the invitation:
- Change deadlines appears for open invitations. For an invitation awaiting a response, you change both dates. For an accepted invitation, you change only the review deadline. The date fields cannot be left empty. The new date must be in the future, and the review deadline cannot be earlier than the response deadline.
- Cancel invitation appears for open invitations. You need to write at least 5 characters in the Reason (not shown to the reviewer) field. The reviewer loses access to the files and is informed. An invitation whose review has been submitted cannot be cancelled.
- Invite again appears for declined, expired and cancelled invitations. A new invitation record opens for the same reviewer, and the earlier invitation stays closed. Once a decision is made, the round takes no more reviewers and this action no longer appears in the menu.
A deadline change is written to the audit log, and the reminder counter is reset. Editors with the permission to invite reviewers see the menu. An invitation with no action left has no menu, for example one whose review has been submitted.
Reviewer rules note
The Reviewer rules note at the top of the tab warns about the following cases, based on the criteria of TR Dizin (Türkiye's national citation index):
- The number of reviewers in the round is below the minimum the journal requires. If the journal has not set a number, at least two reviewers are expected.
- Two reviewers are from the same institution.
- A reviewer is from the same institution as an author.
- The reviews received include an accept or minor revision recommendation together with a reject recommendation, and there are fewer than three reviews. In this case you may want to invite a third reviewer.
Invitations awaiting a response, accepted invitations and invitations with a submitted review count towards the number of reviewers. The warnings do not block any action. The minimum number of reviewers the journal requires is the setting described in Setting the Reviewer Minimum and Reviewer List.
When reminders go out is described in Reviewer Deadlines and Reminders.
How-to
Making a Decision
Reading the reviews of a review round and making the final decision, or saving a decision recommendation as a section editor.
You make the decision on the Decision tab of the submission. An Editor-in-chief makes the final decision. A Section editor saves a decision recommendation on the same tab. The submitted reviews of the round appear side by side at the top of the tab.
A decision is made while the status of the submission is Under review or Revision submitted. To reject a submission that has not been sent to reviewers, see Desk-Rejecting a Submission.
Final decision
- In the Decision section of the Decision tab, select Accept, Minor revision, Major revision or Reject.
- For a revision decision, check the Revision period (days) field. The field comes filled with the period from the site settings and must be between 7 and 365 days.
- In the Rationale (editors only) field, write the academic rationale for the decision. The rationale must be at least 10 characters long and is not shown to the author.
- In the Reviewer comments to share with the author section, clear the tick of any review you do not want to share with the author. All submitted reviews come ticked.
- Fill in the Decision letter to the author field. The Draft a letter button writes a draft based on the decision you selected and the shared reviews. If the field holds text you wrote or changed, the panel asks before it replaces that text with the draft. The letter must be at least 10 characters long.
- Press Issue decision, then read the outcome in the confirmation dialog and confirm.
Unless the site settings were changed, the revision period is 30 days for a minor revision and 60 days for a major revision.
While you fill in the form, you can move to another tab to look at a file or at the details of the submission. The decision type, rationale and letter you entered stay in the form until you come back.
Effects of the decision
- The decision is stored as a record that cannot be changed, and it is written to the audit log.
- The round closes. The invitations of reviewers who have not submitted a review close, and these reviewers are informed.
- The decision letter goes to the author. Of the shared reviews, the author sees only the Comments to the author section and the attachment, if any. In open review the author also sees the name of the reviewer of a shared review.
- An accept decision opens a production job automatically.
- A revision decision gives the author a deadline. The author is reminded once before the deadline. Unless the setting was changed, the reminder goes out 3 days before the deadline.
Decision recommendation
A Section editor sees the Decision recommendation section on the same tab.
- In the Decision section, select the decision you recommend.
- Fill in the Rationale (editors only) field. Optionally, also write a draft letter for the editor-in-chief.
- Press Save recommendation and confirm.
The recommendation does not change the status of the submission. A notification goes to the editors-in-chief assigned to the submission or, if none is assigned, to the editors with the permission to decide.
Decision and recommendation history
All decisions and recommendations stay in the Decisions and recommendations section at the bottom of the tab. Each entry shows the decision type, whether it is a final decision or a recommendation, the round, the person who made it, the date and the rationale. You open the letter with the Show letter link.
If you cannot see the decision button, see The decision button is missing. The steps after a revision arrives are in Starting a New Round After a Revision.
How-to
Starting a New Round After a Revision
Making a decision directly after the author submits a revision, or sending the submission to a new review round.
When the author submits a revision, the status of the submission changes to Revision submitted and a new round starts. The editors of the submission get a notification. It is up to you whether you send the revision to reviewers again or make a decision directly.
Checking the revision
The card of the new round opens on the Reviewers tab. The card shows the Author’s response to reviewers text and the Files of this round list. The invitations and reviews of the earlier rounds stay on the tab.
Direct decision
If no new reviewer opinion is needed, an Editor-in-chief makes the decision right away on the Decision tab. The steps are in Making a Decision.
New review round
- On the Next step card of the Overview tab, press Send to peer review and confirm.
- On the Reviewers tab, press Invite reviewer.
- Select the reviewers of the previous round from the pool again. If a reviewer does not appear in the pool, enter their e-mail address on the By e-mail tab. If an account with this address exists, the invitation goes to that account.
- Press Send invitation.
You cannot use the Invite again action for an invitation from a previous round, because the action appears only on the invitations of the current round. The reviewer receives a new invitation for the new round. After accepting it, they see the author's response to the reviewers and the current anonymous files.
The steps of the invitation are in Inviting Reviewers.
How-to
Messaging the Author
Sending messages to the author from the Messages tab of a submission, writing internal notes between editors and following the correspondence.
All correspondence with the author runs on the Messages tab of the submission. On the same tab you also write internal notes that only editors see.
- Open the submission and go to the Messages tab.
- Select Message to the author or Internal note (editors only).
- Optionally, fill in the Subject field.
- Write your text in the Message field.
- Press Send.
When you send a message to the author, the author is informed by e-mail. The e-mail does not contain the text of the message and directs the author to the panel. Internal notes are never shown to the author and are marked with the Internal note label in the list.
If you move to another tab before you send the message, what you wrote stays in the box until you come back. If you try to leave the screen without sending it, the panel asks first.
Other entries on the tab
- Requests for missing documents sent during screening are listed as messages to the author.
- Notes that reviewers send after their reviews appear as internal notes.
- Messages the author writes to the editors are in the same list.
Messaging permission
Sending messages to the author requires the Message authors about their submission permission. If you do not have this permission, the tab says so in a note and you can only add internal notes.
Withdrawal reason
If the author withdraws the submission, the reason they wrote appears under the Submission withdrawn entry on the Timeline tab. The reason is not included in e-mails and is not shown to reviewers. A withdrawal also closes the open reviewer invitations.
How-to
Submitting on Behalf of an Author
Opening a submission draft for a registered author account, filling in the metadata, authors and files, and leaving the draft to the author.
If an author cannot prepare their submission themselves, you can open the draft for them. Only the author confirms the declarations, and only the author submits. The author needs a registered, active account with a verified e-mail address.
Starting the draft
- On the Editorial → Editor queue screen, press Start a submission for an author.
- In the Author account field, type at least 3 letters of the author's name or the full e-mail address.
- In the list, press Select in the author's row.
- Select the Publication type and the Main language of the submission. For an article, also select the Journal.
- Press Create the draft.
The list shows e-mail addresses masked. Only the account whose full address you typed shows its address in full. The journal list contains the journals in the scope of your role that accept submissions. Types not tied to a journal, such as books, chapters or theses, need a role granted for the whole platform.
The draft appears in the author's My submissions list, and the author gets a notification in the panel. This notification is not sent by e-mail.
Filling in the draft
- On the screen that opens, fill in the Metadata, Authors and Files tabs. Changes are saved automatically.
- On the Status tab, check what is left for the author.
- Press Leave it to the author.
When the author confirms the declarations and submits, the submission appears on the Editor queue screen. The submission does not enter the queue until the author submits it.
Rules
- Only the person who started the draft edits it. For that, the draft must not have been submitted yet and your permission for the journal must still be in place.
- You cannot open a draft in your own name this way. You start your own submissions from the My submissions screen.
- The action is written to the audit log. The Started by the editorial office on the author’s behalf entry appears on the author's timeline.
- Your drafts that have not been submitted yet stay in the Drafts I started for authors list.
The parts of the screens are described in On-Behalf Submission Screen and On-Behalf Draft Screen.
How-to
Downloading the Referee Dossier
Downloading the referee dossier of a submission, which TR Dizin asks for, as a single PDF.
The referee dossier collects the whole review process of a submission in a single PDF. TR Dizin (Türkiye's national citation index) asks for this dossier for at least 15% of the articles in each issue, and for no fewer than two articles. It also asks for the dossier of one rejected article each year.
Downloading the dossier
- Open the submission from the Editorial → Editor queue screen.
- Press Referee dossier (PDF) in the page header.
Editors with the permission to decide see the button. The button does not appear while the status of the submission is Submitted or Screening. You also get the dossier of a rejected submission here.
Contents of the dossier
The first pages of the dossier are a summary with a confidentiality notice:
- The summary shows the journal name, the submission number, the titles and the authors with their institutions.
- For each round it gives the names and institutions of the reviewers and the invitation, response and review dates.
- It includes the recommendations and scores of the reviewers and their comments to the author and to the editor.
- Decisions, recommendations and decision letters are listed with their dates.
After the summary come the manuscript files of each round in PDF format, the responses of the author to the reviewers and the PDF attachments of the reviews. Files in other formats are listed by name in the list of attachments. You download those from the panel.
Confidentiality
The dossier contains the names of the reviewers and is confidential. Every download is written to the audit log. Anonymising the account of a user who wrote a review in the last five years requires a second confirmation from the system administrator. Details are in Anonymising an Account.
The ODİS package of a published issue, made for TR Dizin's journal system ODİS, adds the referee dossiers of the selected articles automatically. Details are in Downloading the ODİS Package.
Screens and settings
Editor Submission Screen
The header, Next step card, tabs, cards and rules of the screen where an editor opens a submission.
This screen opens when you open a submission from the queue. Screening, reviewer invitations, the decision and the correspondence all run from this screen. The buttons on the screen depend on the status of the submission and on your permissions.
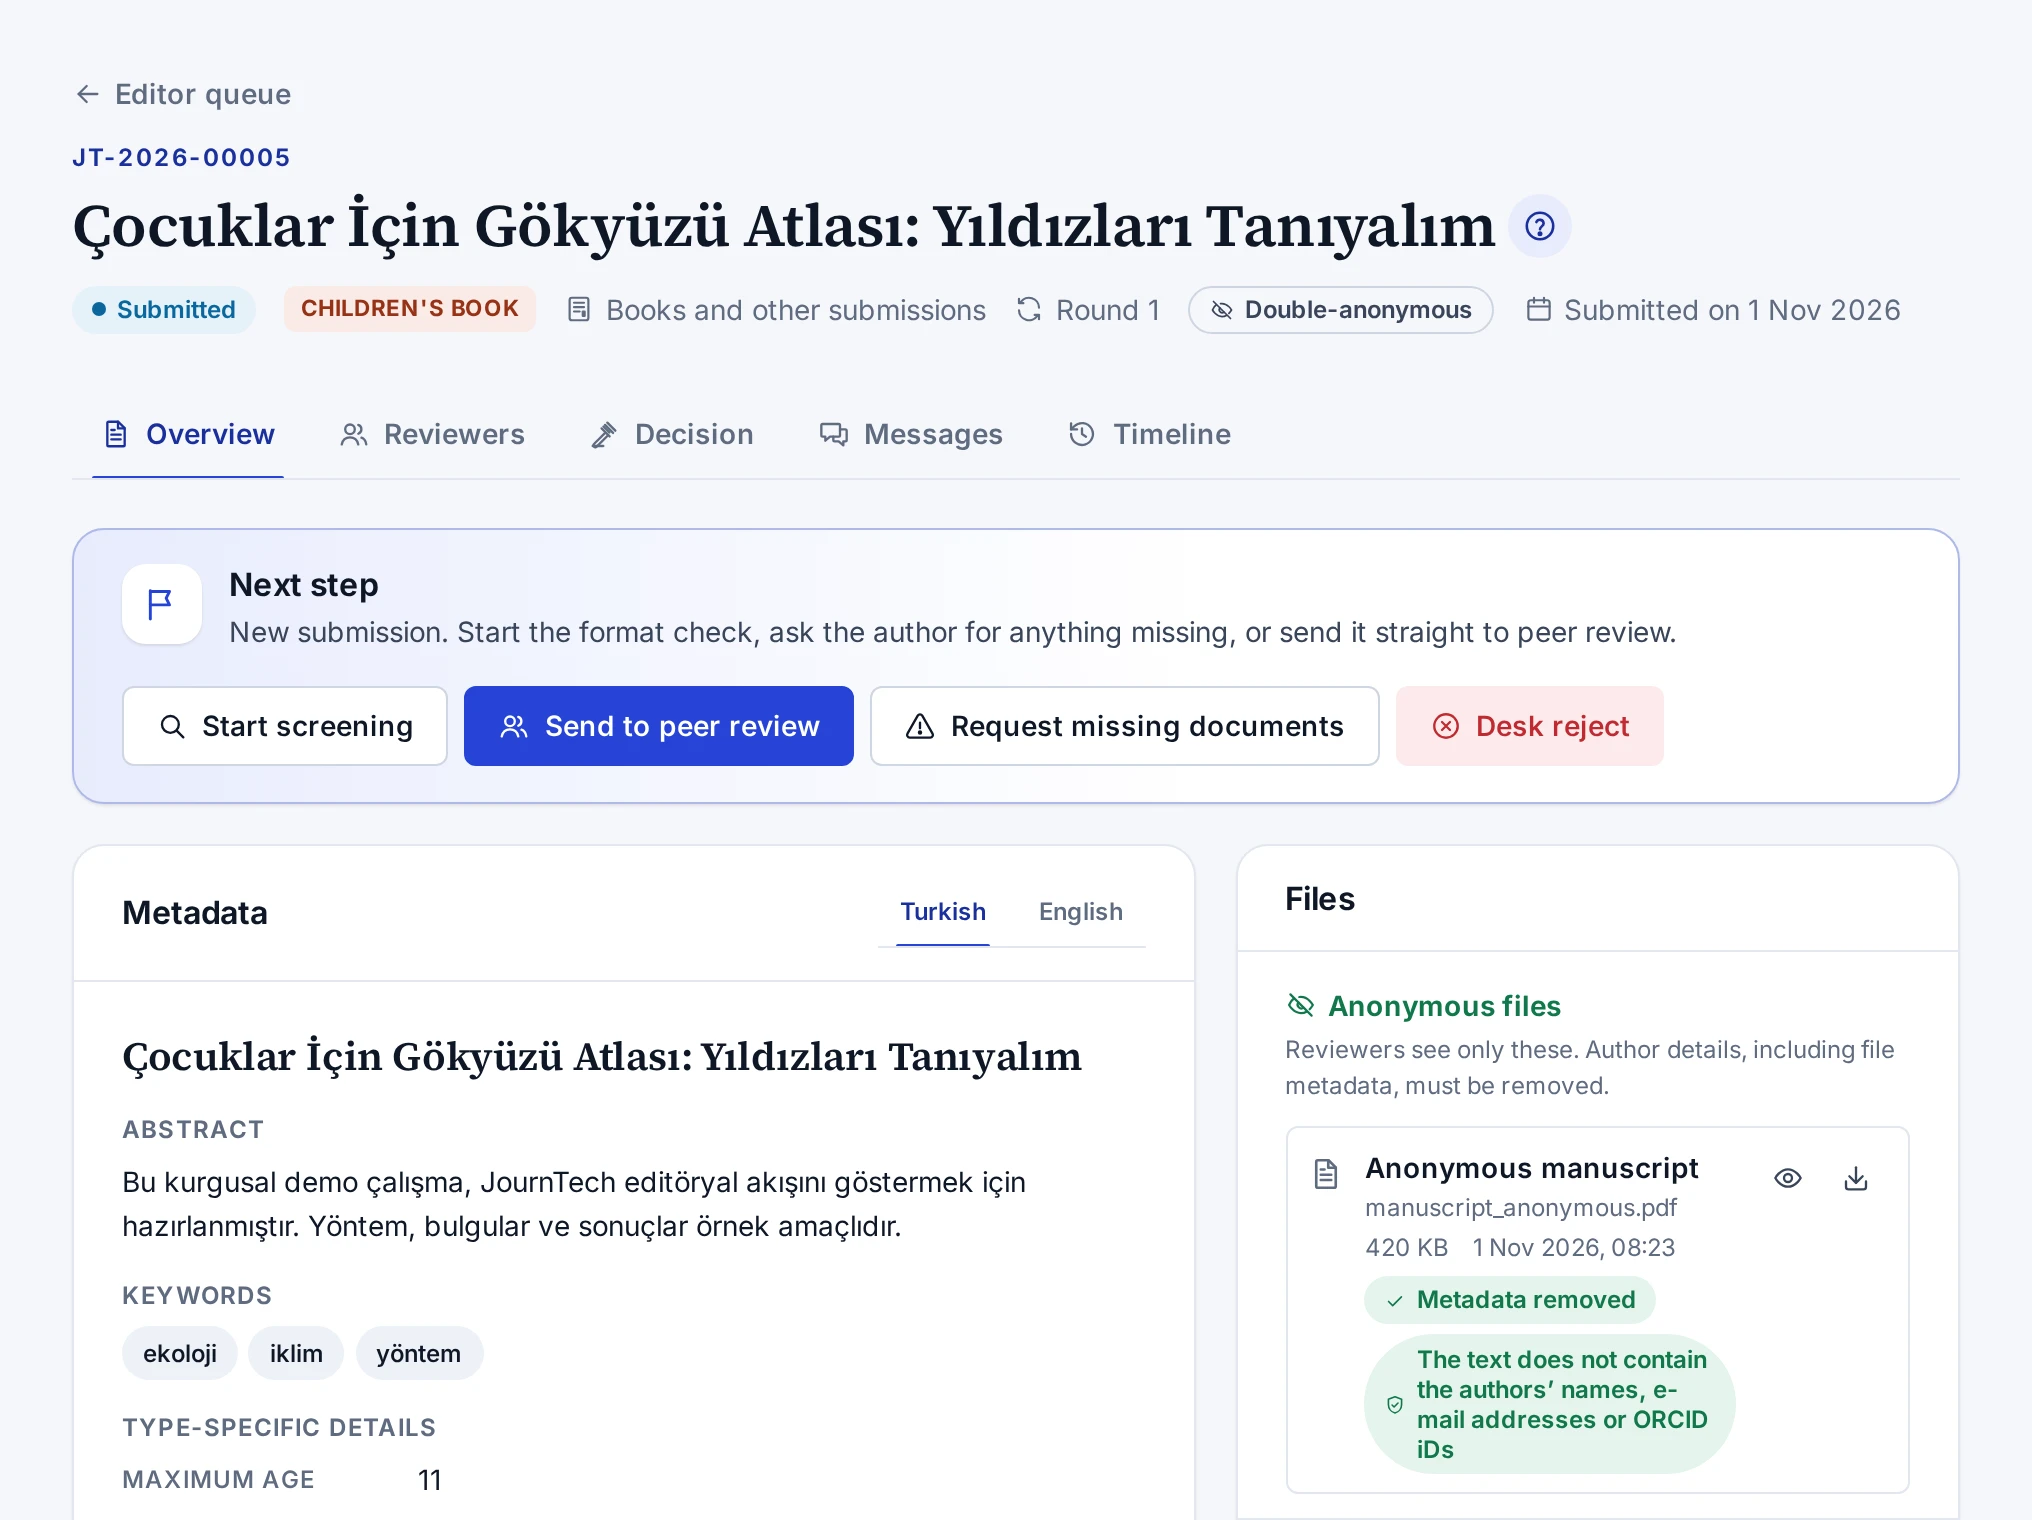
Header
The header shows the submission number and title. Below them are the status of the submission, the publication type, the journal, the review round and the submission date. The peer review type also appears here as Double-anonymous, Single-anonymous or Open review. For submissions not tied to a journal, Books and other submissions appears in place of the journal.
| Button | When it appears |
|---|---|
| Referee dossier (PDF) | If you have the permission to decide. It does not appear while the status of the submission is Submitted or Screening. Details are in Downloading the Referee Dossier |
| Open the production job | If a production job has been opened for the submission and you may see production jobs |
| Catalogue record | If the submission has a catalogue record and you may see draft records |
If you reviewed this submission as a reviewer, a separation-of-duties warning appears under the header. In that case you cannot make the final decision.
Tabs
| Tab | Contents |
|---|---|
| Overview | The Next step card, metadata, authors, declarations, files, editor assignments and the submitter |
| Reviewers | Reviewer invitations by round, deadlines, reviews and the reviewer rules note. The number on the tab is the count of open invitations in the current round |
| Decision | The reviews of the round, the final decision or decision recommendation form, and the history of decisions and recommendations. On a submission awaiting a decision the tab shows a dot |
| Messages | Messages with the author and the internal notes of the editors |
| Timeline | Every event of the submission. Events the author does not see carry the Editors only label |
The open tab stays in the address bar. If you share the link, the same tab opens.
Next step card
The card says what you need to do in the current status of the submission and shows the buttons for the actions available in that status.
| Status | Buttons |
|---|---|
| Submitted | Start screening, Send to peer review, Request missing documents, Desk reject |
| Screening | Send to peer review, Request missing documents, Desk reject |
| Documents missing | Desk reject |
| Under review | Invite reviewer, Final decision or Decision recommendation |
| Revision submitted | Send to peer review, Reviewers, Final decision or Decision recommendation |
Only editors with the permission to decide see the Desk reject button. For submissions awaiting a revision and for accepted, rejected and withdrawn submissions, the card only explains the status.
Overview cards
| Card | Contents |
|---|---|
| Metadata | Title, subtitle, abstract, keywords and type-specific details. Language tabs if the submission is in two languages |
| Authors | The authors in order with their institutions, e-mail addresses and ORCID iDs, the corresponding author and the contributor roles |
| Declarations | The declarations the author confirmed, with their versions, answers and dates |
| Files | Anonymous files, Identified files and the Upload an editor file section |
| Editor assignments | The assigned editors, their roles and the person who assigned them |
| Submitted by | The name, e-mail address and institution of the account that sent the submission |
Screen rules
- The screen opens only submissions within your scope that have been submitted. Drafts do not open here.
- A submission you are an author of does not open.
- If the status of the submission changed after you opened the screen, an action may be refused. Reload the page to see the current status.
- The decision type, rationale and letter you entered in the decision form stay when you move to another tab. The message you are writing stays too. If you try to leave the screen before you issue the decision or send the message, the panel asks first.
Related topics
Screens and settings
On-Behalf Submission Screen
The New draft card of the screen where editors open a draft for a registered author, and the list of the drafts they started.
The Submission on behalf of an author screen is where you open a submission draft for a registered author. You reach the screen with the Start a submission for an author button on the Editor queue screen.
New draft card
| Field | Description |
|---|---|
| Author account | Search with at least 3 letters of the author's name or with the full e-mail address. Only active accounts with a verified e-mail address are listed. You change the selected account with the Change button |
| Publication type | Article, Book, Book chapter, Proceedings paper, Thesis or Children's book. Types not tied to a journal appear only for roles granted for the whole platform |
| Main language of the submission | Turkish or English. The options come from the institution's metadata languages |
| Journal | Appears only for an article. Lists the journals in your scope that accept submissions through the panel |
The Create the draft button opens the draft in the author's account and takes you to the draft screen.
If there is no matching account, the author has to register first or a system administrator has to invite the account. If no journal in your scope accepts submissions, a warning saying so appears in place of the journal field.
Drafts I started for authors
The Drafts I started for authors list shows your drafts that the author has not submitted yet. Each row shows the title and type of the draft, the author's name, the journal and the time of the last activity. The Edit button opens the draft. When the author submits, the draft leaves the list and appears in the editor queue.
Screen rules
- Editors and system administrators with the permission to start submissions on behalf of authors see the screen.
- You cannot open a draft in your own name.
- The notification to the author is sent only inside the panel.
The steps are in Submitting on Behalf of an Author. The screen where you fill in the draft is described in On-Behalf Draft Screen.
Screens and settings
On-Behalf Draft Screen
The header, the Metadata, Authors, Files and Status tabs and the rules of the screen where you fill in a draft opened for an author.
On this screen you fill in the draft you opened for an author. The title of the screen is the title of the draft. If no title has been entered, it reads Untitled draft.
Header
The note under the title says for whom the draft is being prepared. The publication type, the journal and the author's name and e-mail address also appear here. The save status shows as Saving…, Unsaved changes or the time of the last save.
The Leave it to the author button in the header saves the changes and takes you back to the Submissions for authors screen.
Tabs
| Tab | Contents |
|---|---|
| Metadata | The metadata step of the submission wizard. Title, abstract, keywords and type-specific details |
| Authors | The authors, their order and institutions, and the corresponding author |
| Files | The anonymous manuscript and the other files |
| Status | The "What is left for the author" list. It says so when everything except the declarations is complete |
A tab with missing items shows a dot.
Screen rules
- Changes are saved automatically.
- If an author card has details but no name, the screen keeps you on the Authors tab and shows the error.
- The declarations are not on this screen. The author confirms the declarations and submits.
- Only the person who started the draft opens it. Once the author submits, the draft no longer opens on this screen and the submission enters the editor queue.
The steps are in Submitting on Behalf of an Author.
Concept
Separation of Duties
An editor who reviewed a submission cannot decide on it, authors take no role on their own submissions, and only the editor-in-chief makes final decisions.
Separation of duties means that one person does not take two roles on the same submission. A person who reviews a work does not decide on it. An author is not an editor or a reviewer on their own submission either. JournTech applies these rules automatically.
Editors who review
If you accepted a reviewer invitation for a submission, you cannot make the final decision on that submission. The rule applies even if you have an editor role, and it covers every round of the submission. A warning appears on the submission screen and the decision buttons are hidden. You cannot be assigned to such a submission as an editor either. Another editor-in-chief makes the decision.
Your own submissions
Submissions you are an author of do not appear in your queue and do not open. The system recognises you as an author if you own the submission or if your e-mail address or ORCID iD is in the author list. The authors of a submission cannot be assigned to it as reviewers or editors. You cannot invite yourself as a reviewer either.
Permission to make final decisions
Only an Editor-in-chief makes final decisions. A Section editor saves a decision recommendation, and the recommendation does not change the status of the submission. A System administrator can open every screen but cannot make final decisions. An administrator who needs to make decisions is also given the editor-in-chief role.
Whether reviewers and authors see each other's identity is explained in Peer Review Types.
Troubleshooting
The decision button is missing
Causes and fixes when the Decision tab of a submission has no Issue decision button or only lets you save a recommendation.
The Issue decision button depends on your role, the status of the submission and your part in the submission. Check the causes below in order.
You are a section editor
A Section editor does not make final decisions. They see the Decision recommendation section on the tab and save a recommendation with the Save recommendation button. An Editor-in-chief makes the decision.
Your editor-in-chief role is for another journal
Your roles can differ from journal to journal. For example, you can be editor-in-chief of one journal and section editor of another. Your permission to decide applies only to the journal where you are editor-in-chief.
The submission is not at the decision stage
A final decision is made while the status of the submission is Under review or Revision submitted. In any other status the tab gives the current status of the submission in a note. To reject a submission that has not been sent to reviewers, see Desk-Rejecting a Submission.
You reviewed this submission
If you accepted a reviewer invitation for the submission, the decision buttons do not appear and the tab says so in a note. Another editor-in-chief has to make the decision. The rule is explained in Separation of Duties.
You are a system administrator
The System administrator role does not carry the permission to make final decisions. With this role you can only save decision recommendations. If you need to make decisions, you also have to be given the Editor-in-chief role.
Troubleshooting
I made a wrong decision
Explaining the situation to the author when a final decision cannot be undone, and what to watch for in later decisions.
Decisions cannot be undone or changed. Every decision is stored with the person, the time and the rationale, and it is written to the audit log.
If the author needs an explanation, write to them on the Messages tab of the submission with the Message to the author option. The steps are in Messaging the Author.
After a revision decision
After a revision decision, the submission returns to the decision stage when the author submits the revision. You can make a new decision then. The steps are in Starting a New Round After a Revision.
Future decisions
Before you decide, read the outcome text in the confirmation dialog carefully. The text says what the decision will close and what will go to the author.
Troubleshooting
The reviewer did not receive the invitation e-mail
Helping a reviewer who says the invitation e-mail never arrived to find the invitation in the panel.
E-mail sending may be turned off on the installation. The invitation also goes out as a notification in the panel, along with the e-mail. A reviewer with an account therefore finds the invitation in the panel.
A reviewer with an account
The reviewer signs in with the e-mail address the invitation was sent to and opens the Invitations tab of the Author & reviewer → Reviewing screen. The View invitation button opens the invitation there.
The reviewing screens require a verified e-mail address. If the reviewer's address is not verified, they need to verify it first.
A reviewer with a new account
If the person you invited by e-mail address has no account, the link for setting a password goes out only by e-mail. If e-mail sending is turned off, a system administrator creates this link and passes it on to the person. The administrator's steps are in Managing User Accounts.
The e-mail sending setting is described in Configuring Outgoing E-mail.
Troubleshooting
The reviewer's deadline has passed
Giving more time, cancelling the invitation or inviting another reviewer when a reviewer did not respond in time or is late with the review.
The row of an invitation whose deadline has passed carries the Overdue label. What you do depends on the status of the invitation.
The reviewer did not respond to the invitation
An invitation whose response period has ended closes automatically shortly afterwards, and its status changes to Expired. You get a notification too. You can invite the same reviewer again with Invite again in the Invitation actions menu of the invitation, or invite another reviewer.
The reviewer is late with the review
For an accepted invitation, reminders go to the reviewer at regular intervals once the review deadline has passed. To give the reviewer more time, select Change deadlines in the Invitation actions menu of the invitation and enter a new Review due date. The reminder counter is reset.
If the reviewer is not going to send a review, cancel the invitation with Cancel invitation and invite another reviewer.
The actions are described in Tracking Invitations and Reviews. When reminders go out is described in Reviewer Deadlines and Reminders.
Troubleshooting
Book submissions do not appear in the queue
Why submissions not tied to a journal, such as books, chapters and theses, do not appear in the editor queue, and how to fix it.
Submissions not tied to a journal are visible only to editors whose role was granted for the whole platform. Book, book chapter, proceedings paper, thesis and children's book submissions belong to this group. If your role was granted for one journal, you do not see these submissions.
Solution
If you need to work on these submissions, ask your system administrator to grant your role for the whole platform. Granting roles is described in Granting and Revoking Roles.
Filtering these submissions
Editors authorised for the whole platform list only these submissions with the Without a journal (books, chapters, theses …) option of the Journal filter in the queue. The journal column of these submissions shows Books and other submissions.
Feature
Production
Running the copy-editing, typesetting and proof work for an accepted work and releasing it to the catalogue.
When an editor accepts a submission, a job for the work opens automatically on the Editorial → Production screen. The job's checklist has these tasks: copy-editing, typesetting, cover, proof and author approval, metadata check, identifiers, licence and access, and final approval. The Production coordinator assigns the tasks, uploads the proofs and the final files and shares the proof with the author.
When the checklist is complete, the work is released to the catalogue with its publication settings. The record is published at once or stays a draft for the catalogue editors' final check. Because the release is an editorial decision, the catalogue's editor approval rule does not cover this step.
Editors and the Unit manager role can only view jobs. A job's statuses are described in Job Statuses.
Screens and settings
Production Board
The cards, filters and Open job button of the board that lists production jobs in columns by status.
The Editorial → Production screen shows the production jobs of accepted works as a board. If your role was granted for one journal, you see only the jobs of that journal.
Columns
Jobs are listed in four columns by status. Each column shows its number of jobs at the top, and the numbers follow the filters you choose. The Released column shows the jobs released last. The button at the bottom of the column brings the earlier ones too.
| Column | Jobs |
|---|---|
| Open | Jobs where work has not started yet |
| In progress | Jobs where work has started |
| Ready to release | Jobs with all required tasks done |
| Released | Jobs released to the catalogue |
The statuses are described in Job Statuses.
Cards
Each card shows the submission number and the type, title and journal of the work. The progress bar of the card counts the completed tasks. Below it you see the number of open required tasks, or Required tasks done. The bottom line of the card gives the production lead and the planned release date. An overdue job carries the Overdue badge.
Filters
- The Search box searches submission numbers and titles.
- Assigned to me shows the jobs where you are the production lead or have an open task assigned to you.
- Overdue shows the jobs that have a task past its due date, or that are not released by their planned release date.
- Show cancelled jobs lists cancelled jobs in a separate section at the bottom of the board. The ones cancelled last come first.
Opening a job
Jobs open automatically with the editor's acceptance decision. If an accepted submission has no job, use the Open job button. The button appears to people with the permission to manage production. The steps are in Planning a Job.
Screens and settings
Production Job Page
The checklist, tasks, files, front matter, comments, job details and release settings cards on the page of a production job.
When you open a job from the board, the header shows the title, submission number, type and journal of the work, the production lead, the planned release date and the acceptance date. Without the production permission, you can only view the page, and a note says so. When the production lead's account was closed, the Account closed label appears next to the name, and the production coordinators receive the notifications meant for the lead.
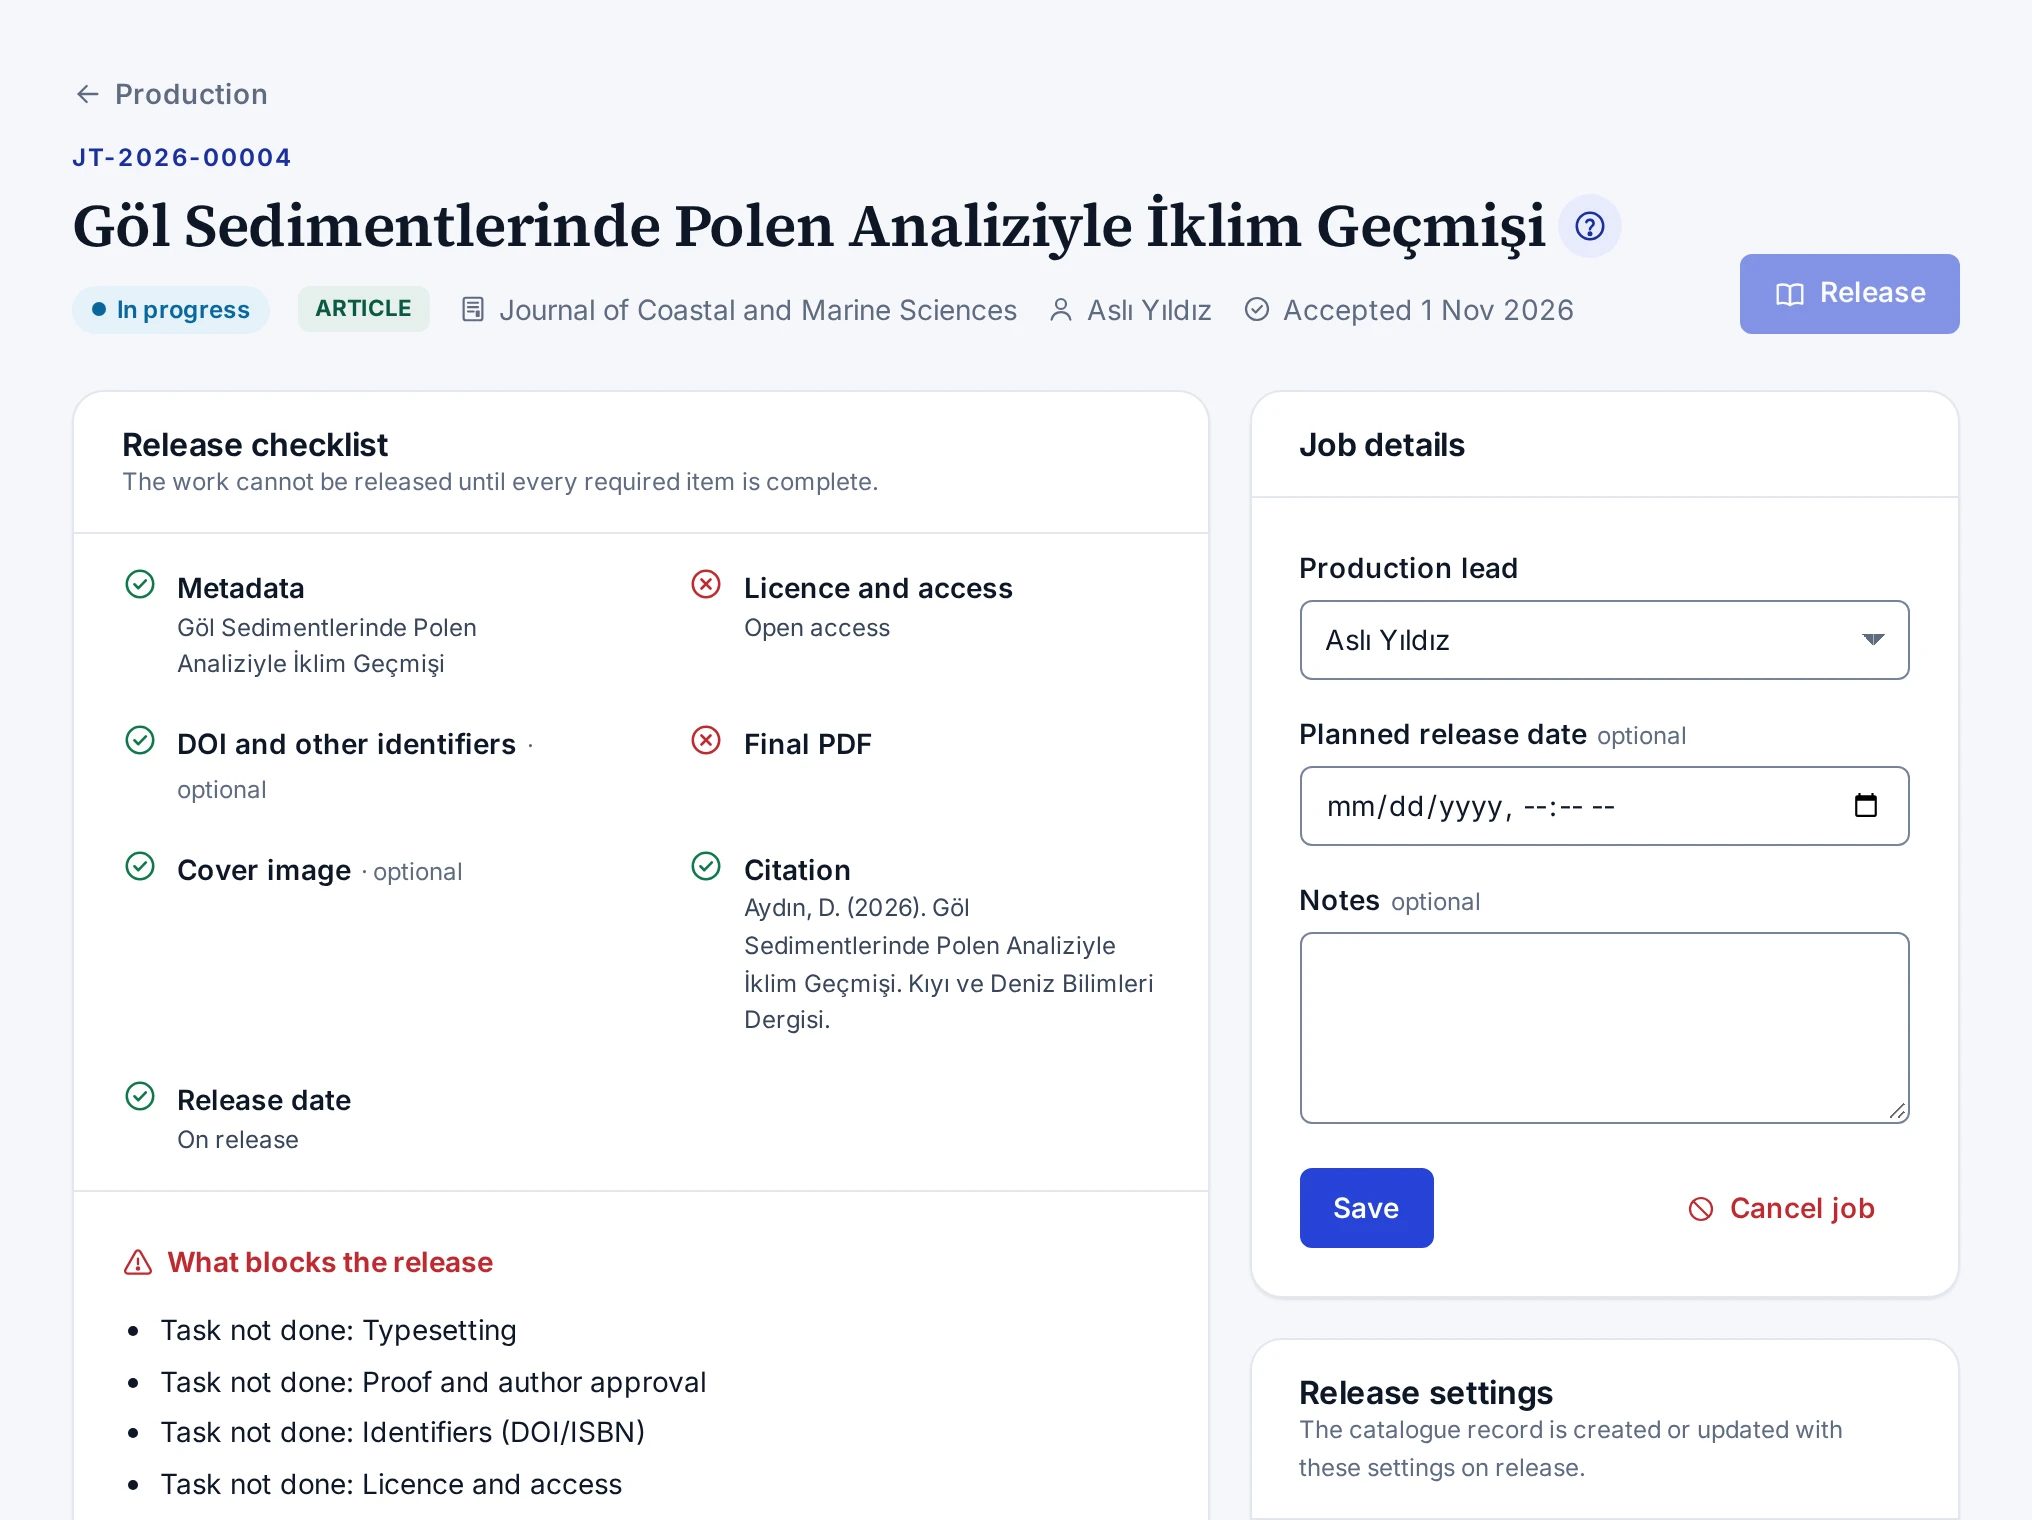
Top buttons
- Open the submission opens the editor page of the submission and appears to people who can see the editor queue.
- Open the catalogue record opens the catalogue record once the job is released.
- Release opens the release dialog. While an item blocks the release, the button cannot be pressed.
Cards
| Card | What it shows |
|---|---|
| Release checklist | The metadata, licence, identifier, final PDF, cover, citation and release date items, and what blocks the release |
| Tasks | The tasks of the checklist with their statuses, assignees and due dates |
| Files and proofs | The versions of the proof, final PDF, EPUB, cover and other files |
| Front matter | The front matter for the first page of the article. Shown for articles only. |
| Comments | The comments of the team and the author |
| Job details | The production lead, planned release date, notes, cancelling and reopening |
| Release settings | The access, licence, identifier, placement and address settings of the catalogue record |
Rules of the screen
- On a released or cancelled job, tasks and settings cannot be changed. Reopen the job to change them.
- You cannot upload files to a cancelled job.
- The assignee of a task can change the status and the note of their own task, even without the production permission.
- While a file is being scanned for viruses, the page refreshes itself every few seconds.
The steps are in Planning a Job, Managing Tasks, Uploading Files and Sharing Proofs, Filling in the Release Settings and Releasing a Work.
Concept
Job Statuses
The Open, In progress, Ready to release, Released and Cancelled statuses of a production job, and how the status follows the checklist.
You do not choose the status of a job by hand. The status changes automatically with the tasks on the checklist. Only releasing, cancelling and reopening change the status directly. This way each column on the board shows where a job really stands.
| Status | When |
|---|---|
| Open | The job is open and no task has started |
| In progress | A task has started or is done. Uploading a file to the job also moves it to this status. |
| Ready to release | All required tasks are done |
| Released | The work has been released to the catalogue |
| Cancelled | The job was cancelled with a reason |
Overdue jobs
A job counts as overdue while a task past its due date is still open. Done and skipped tasks do not count. A job that is not released by its planned release date counts as overdue too. Overdue jobs are marked on the board and listed by the Overdue filter.
Who changes a job
The Production coordinator changes all settings of a job and releases the work. Editors and the Unit manager can only view the job. The assignee of a task can change the status and the note of their own task.
The release steps are in Releasing a Work, and cancelling and reopening in Cancelling and Reopening a Job.
Troubleshooting
The Open job button is missing on the board
Causes when the Open job button does not appear on the production board, or the dialog lists no accepted submission.
Jobs open automatically with the editor's acceptance decision. The Open job button is only for jobs that did not open automatically, and it appears to people with the permission to manage production. The Production coordinator and System administrator roles have this permission.
You do not have the permission
Editors and the Unit manager can only view the board. If an accepted work has no job on the board, tell a person with the Production coordinator role or your system administrator.
The dialog lists no submission
The dialog lists only accepted submissions in your scope that have no job. If there is none, the dialog says No accepted submissions found. A submission whose job was cancelled does not appear either, because the submission has a job. Find the cancelled job with the Show cancelled jobs button on the board and reopen it.
Troubleshooting
The Release button is disabled or missing
Causes and fixes when you cannot press the Release button of a production job, or the button does not appear at all.
The Release button depends on the status of the job, its checklist and your permissions. Check the causes below in order.
An item blocks the release
If the button is disabled, look at the What blocks the release list on the Release checklist card and complete each item. The details are in Releasing a Work.
The job is released or cancelled
On a released or cancelled job, the button is hidden. Reopen the job to make a correction.
You do not have the permission
Releasing needs a separate permission (Release accepted works to the catalogue). Editors and the Unit manager can only view the job.
The check passes but the release fails
The Check button also tries the catalogue rules and lists any problems on the card. If an error comes up in the release dialog, the dialog lists the blockers one by one.
How-to
Downloading Crossref XML
Downloading the Crossref XML file of a catalogue record or a journal issue for DOI registration, and the conditions the file needs.
To upload to Crossref by hand, you download the Crossref XML file of a record or of a journal issue. The file is made only for public records that have a DOI. If your institution's automatic DOI registration is on, records go to Crossref by themselves and you do not need this file.
The file of a record
- On the record's page, find the Record information card on the right.
- Press Download Crossref XML.
The button appears on article, book, book chapter and proceedings paper records. An article's file also carries the details of its journal and its published issue. An article in early view has no issue yet, and its file is made with the details of its journal only. The file of an article whose issue went back to draft carries no issue details.
A book's file carries all the book's ISBNs. A number obtained through an ISBN request is written as print or electronic, depending on the form of the request. A number typed into the catalogue by hand counts as print.
The file of an issue
- Open the issue's page.
- Press the Crossref XML button at the top of the page.
The issue's file contains every public article of the issue that has a valid DOI. Articles without a DOI are left out of the file. The file needs a published journal record and a published issue.
Conditions for the file
- The record must be published, archived or retracted.
- The record must have a DOI.
- If a DOI prefix is entered in the site settings, the DOI must start with that prefix.
- A thesis must have an author and the institution where it was written.
If a thesis's institution is not typed in but only linked to an institution record, the institution's name and ROR ID come from that record. Imported theses may be like this. If the institution record was deleted, the thesis's file is not made.
Crossref accepts only two-letter ISO 639-1 codes as languages. Ottoman Turkish has no such code. The file does not state the language of a record or a title in that language.
An article's file also contains its reference list. References that mention a DOI in their text are written with their DOIs. If the system administrator switches off the Crossref XML export feature, the file cannot be downloaded.
Sending records to Crossref automatically is explained in Automatic DOI Registration.
Feature
Journals and Issues
Managing a journal's profile, boards, guidelines and reviewer criteria, and creating and publishing volumes and issues.
Journals are managed on the Catalogue → Journals & issues screen. Every journal is also a catalogue record of the journal type. The issues of a journal cannot be published before the journal record is published.
Issues are created on the journal's Issues tab. Articles are added to the issue and put in order, the issue is checked for consistency, and then it is published. The journal's profile, boards, guidelines and policies are on the other tabs of the same screen.
The editor-in-chief of a journal manages only their own journal and can add only their own journal's articles to an issue. Catalogue editors place the other records. The archive of a journal that is managed on DergiPark (Türkiye's national journal platform) is brought into the catalogue with DergiPark Harvesting.
How-to
Adding a Journal
Opening a new journal record in the catalogue, choosing the submission method and the peer review type, and publishing the journal record.
A new journal is created as a catalogue record of the journal type. After you create the record, you manage the profile, issues and other settings of the journal from the Catalogue → Journals & issues screen.
- On the Catalogue → Journals & issues screen, press New journal.
- In the Title and abstract section, type the name of the journal on the Turkish tab.
- On the Journal profile card, write the scope of the journal in the Scope (TR) field.
- Select a value in the Submissions and Peer review fields.
- If the journal has them, fill in the ISSN (print) and e-ISSN fields.
- In the Basic information section, fill in the Publisher field.
- Press Create draft.
The journal record is created as a draft. Before you publish the issues of the journal, send the journal record to review and publish it. The steps are in Record Statuses and Publishing. The scope and the publisher are required to publish the journal record.
Submission method
| Method | Meaning |
|---|---|
| Through the workspace (JournTech) | Authors send articles with the submission wizard of the panel |
| External platform | Submissions run on the journal's own platform. The External platform address field opens |
| Managed on DergiPark | Submission and peer review run on DergiPark, the national journal platform of TÜBİTAK ULAKBİM. The DergiPark address is required |
| Closed to submissions | The journal does not take submissions |
A journal appears in the submission wizard only if its record is published and its method is Through the workspace (JournTech). Entering the DergiPark address is described in Finding a Journal on DergiPark.
ISSN and categories
The ISSN and e-ISSN are written to the journal profile and added to the persistent identifiers of the record automatically. The check digit is verified. Select the categories of the journal in the Categories section of the record. The categories appear as links to the category page on the journal page and on the card of the journal in the journal list of the public site.
Next steps
Open the journal with Manage journal on the Journals & issues screen. The profile, boards, guidelines and policies are edited there. The details are in Editing the Journal Profile, Adding Board Members and Indexes and Writing Journal Policies. For the first issue, go on to Creating an Issue.
Required permissions
Creating a new journal requires both the permission to edit the catalogue and the permission to manage journals. These permissions belong to the Catalogue editor and System administrator roles. The Editor-in-chief of a journal cannot create journals but manages the profile and issues of their own journal.
How-to
Creating an Issue
Creating a new volume and issue of a journal and entering the year, date, title and special issue details of the issue.
You create a new issue on the Issues tab of the journal. The issue is created as a draft. You publish it after you have added and checked the articles.
- On the Catalogue → Journals & issues screen, open the journal with Manage journal.
- On the Issues tab, press New issue.
- Fill in the Volume, Number and Year fields.
- If you know it, fill in the Publication date field.
- Optionally, enter an Issue title in Turkish and in English.
- If the issue is a special issue, tick the Special issue box.
- Press Create.
The page of the issue opens. Add the articles to the issue as described in Adding Articles to an Issue.
Fields
- Volume is a number. The dialog fills this field with the latest volume of the journal.
- Number has at most 16 characters and can also be a name such as "Special".
- Year is a four-digit year. The year of the articles in the issue must be the same as this year.
- Publication date is needed to publish the issue. You can also enter the date later.
A journal cannot have a second issue with the same volume and issue number.
Changing the issue details
You change the details of the issue on the Issue details card of the issue page. The Editor's note is on this card too. If you change the volume or issue number of a published issue, the old address of the issue redirects to the new one.
Issues without a date
To publish old issues whose date is unknown, a system administrator can turn off the Journal issues need a date to be published switch on the Administration → Site settings → Workflow tab. The switch is on by default.
How-to
Adding Articles to an Issue
Adding articles to a journal issue, ordering the table of contents, writing section headings and removing an article from the issue.
You add articles to an issue on the Table of contents card of the issue page. You can also place an article in an issue from the Placement section of the article's own record.
- On the Catalogue → Journals & issues screen, open the journal with Manage journal.
- On the Issues tab, press Open in the row of the issue.
- In the Add article field, type the title or the short name of the article.
- Select the article in the list.
The article is added to the end of the table of contents and saved at once.
Order and section headings
- Put the articles in order by dragging them or with the arrows.
- If needed, type the section heading in the field in the row of the article, for example "Research Article".
- Press the Save contents button that appears at the top of the card. The button saves the order and the section headings together.
The order and the section headings appear in this arrangement on the issue page of the public site.
Removing an article from the issue
- Press the cross button (Remove from issue) in the row of the article.
- Confirm.
The article record is not deleted. Only its link to the issue is removed. A published article must be unpublished first. An archived or retracted article cannot leave its issue.
Rules
- Only article records can be added to an issue.
- An article can be in only one issue. An article in another issue must first be removed from that issue.
- The editor-in-chief of a journal can add to the issue only the articles of their own journal, that is records released from submissions to the journal. Catalogue editors place the other records.
- The year of the article must be the same as the year of the issue.
- A published article goes only into a published issue. Add an early-view article after the issue is published.
- An article added to the issue moves to the issue's journal and leaves early view. A new version of the article is saved. When automatic DOI registration is on, the article's DOI metadata is sent again with the volume and number.
If an article cannot be added, see An article cannot be added to the issue.
How-to
Publishing an Issue
Running the consistency check on a journal issue, publishing it with its articles or on its own, and unpublishing it.
You publish an issue with the Publish issue button on the issue page. Before publishing, check the issue and its articles with Consistency check.
- On the issue page, press Consistency check.
- Check in the notes at the top of the page that nothing is missing.
- Press Publish issue.
- To publish the articles as well, tick the Also publish draft and in-review articles box in the dialog.
- Press Publish issue in the dialog.
The issue becomes visible on the journal page. Articles are not listed on the issue page unless they are published as well. The notification says how many articles were published together with the issue and how many stayed drafts.
Consistency check
The check verifies the volume, number, year and publication date of the issue, whether the journal record is published and the publishing conditions of each article. The row of an article with problems shows its gaps in red. A separate TR Dizin data checks note lists the warnings of the articles for TR Dizin (Türkiye's national citation index), articles with the same title in the issue and overlapping page ranges.
Publishing with the articles
The Also publish draft and in-review articles option requires the permission to publish in the catalogue. If the option is ticked, the draft articles are sent to review and published together with the articles in review. If an article does not meet the publishing conditions, the issue is not published either, and the check shows the article with problems.
If the editor approval rule is on for the installation, the option is called Also publish the in-review articles. Draft articles stay drafts. If there is an article you sent to review, the issue is not published, and another catalogue editor publishes that article. The rule is described in Four-Eyes Principle.
Publishing conditions
- The catalogue record of the journal itself must be published.
- The volume, number, year and publication date of the issue must be entered. The date rule can be turned off in the site settings.
- If the TR Dizin check is mandatory for the journal, an issue whose article data still has TR Dizin warnings is not published. Details are in Preparing for TR Dizin.
- The year of the published articles in the issue must be the same as the year of the issue.
Unpublishing the issue
- On the issue page, press Unpublish issue.
- Write a reason of at least 5 characters in the Reason (written to the audit log) field.
- Confirm.
If the issue has published articles, it cannot be unpublished. Unpublish the articles first. Publishing and unpublishing are written to the audit log.
Required permissions
Publishing and unpublishing an issue require the permission to manage the journal. The editor-in-chief of the journal can publish the issue. Publishing the articles of the issue, however, requires the permission to publish in the catalogue, which the Catalogue editor role has.
How-to
Deleting a Journal Issue
Deleting a journal issue while keeping its articles in the catalogue, or together with its articles.
You can delete an issue even if it has been published. The articles of the issue either stay in the catalogue as drafts or go to the trash together with the issue. A deleted issue cannot be restored.
- On the Catalogue → Journals & issues screen, open the journal with Manage journal.
- On the Issues tab, press the trash button in the row of the issue. The Delete issue button on the page of the issue opens the same dialog.
- The dialog shows how many articles the issue has and how many of them are published. Under
The issue's articles, select an option.
- With Keep the articles in the catalogue, the articles leave the issue and return to draft. You can place them in another issue later. Published articles do not appear on the site until they are published again.
- With Delete the articles too, the articles move to the trash. They can be restored with the Show deleted filter of the Publications list.
- If the issue is not an empty draft, write a reason of at least 5 characters in the Reason (written to the audit log) field.
- Press Delete issue.
Issues that cannot be deleted
If the issue contains an archived or retracted article, the issue cannot be deleted, because these articles stay part of the publication record. In this case the dialog shows how many articles block the deletion.
Required permissions
Deleting an issue requires the permission to manage the journal. Unpublishing the published articles requires the permission to publish in the catalogue, and deleting the articles requires the permission to edit the catalogue. All these permissions belong to the Catalogue editor role.
The Editor-in-chief of a journal cannot delete an issue that has published articles. In this case the dialog says that a catalogue editor can delete the issue.
Effects of deletion
- When a published issue is deleted, the page of the issue is removed from the site.
- If a published article has a DOI, the DOI link no longer opens the article.
- If the journal is harvested from DergiPark, later harvests do not take the deleted articles in again.
- The issue placement of the production jobs planned for the issue is cleared.
- The deletion is written to the audit log together with the details of the issue and the list of its articles.
If needed, you can create a new issue with the same volume and issue number.
How-to
Editing the Journal Profile
Editing the ISSN, scope, submission method, peer review type, publication facts and contact details of a journal on the Profile tab.
The journal profile shapes the journal page on the site and sets where the journal takes submissions from. You open the journal with Manage journal on the Catalogue → Journals & issues screen and edit the profile on the Profile tab.
Profile fields
- Enter the ISSN (print) and e-ISSN. The system verifies the check digit.
- Write the aims and scope of the journal in the Scope (TR) and Scope (EN) fields. Each language takes up to 5,000 characters. You can write a long text in a larger window with the Write in a larger window button next to the field.
- In the Submissions list, select the way the journal takes submissions. The options are described below.
- In the Peer review list, select Double-anonymous, Single-anonymous or Open review.
- Fill in the Publication facts and Journal contact details sections.
- Press Save.
The peer review type of each submission is recorded when the author first submits it. A change you make later applies only to new submissions. The difference between the types is explained in Peer Review Types.
Submission methods
| Option | Result |
|---|---|
| Through the workspace (JournTech) | Authors submit through the panel. A published journal appears in the journal list of the submission wizard |
| External platform | Submissions run on another platform. The External platform address field opens and the journal page links to that address |
| Managed on DergiPark | Submission and peer review run on DergiPark, the national journal platform of TÜBİTAK ULAKBİM. The DergiPark fields open |
| Closed to submissions | The journal does not take submissions |
Submissions through the panel are possible only for journals set to Through the workspace (JournTech).
Journal managed on DergiPark
For a journal whose submission and peer review run on DergiPark, set the Submissions field to Managed on DergiPark. With this option the DergiPark address or short name and DergiPark journal number fields open in the profile. The profile is not saved without the address. Authors cannot submit to this journal through the panel, and the submit button on the site opens the submission page on DergiPark.
The steps for entering the address and finding the journal are in Finding a Journal on DergiPark. To bring the DergiPark issues of the journal into the catalogue, see Harvesting from DergiPark. The harvest card opens at the bottom of this tab once the address is saved.
Publication facts and contact details
The details in the Publication facts section appear in the About the journal section of the journal page. The checks for TR Dizin (Türkiye's national citation index) use them too.
- The Field sets the minimum number of issues a year that TR Dizin expects. Journals in the health sciences are expected to publish 3 issues a year, in science and engineering 2, and in the social sciences and humanities 1.
- Issues a year and Publication months must match. Select as many months as there are issues a year.
- In the Languages field, type the language codes, for example tr, en or de.
- The Frequency field is free text that appears on the page as written.
In the Journal contact details section you enter the e-mail address, telephone number and postal address of the journal. The TR Dizin checklist asks for the e-mail address and the postal address.
Record details
The name, abbreviation, publisher, access status and licence of the journal are in the catalogue record of the journal. If you may see draft records, the Record details button in the page header opens the record.
How-to
Adding Board Members and Indexes
Entering the editorial board of a journal with its role groups and adding the indexes that cover the journal with their verification addresses.
You enter the board members and the indexes on the Board & indexes tab of the journal. The journal page shows the boards divided into role groups. The indexes are listed on the page with their links.
Adding a board member
- Open the journal with Manage journal and go to the Board & indexes tab.
- On the Editorial board card, press Add board member.
- Type the name of the member in the Full name field. This field is required.
- In the Role group list, select the group of the member.
- Optionally, type the title to show on the page in the Role field.
- Enter the institution, city, two-letter country code and ORCID iD of the member.
- In the last list, select Publishing institution or Another institution for the member.
- When you have added all members, press Save at the bottom of the tab.
The role groups are Editor-in-chief, Editor, Associate editor, Section editor, Language editor, Statistics editor, Editorial board, Advisory board and Other. You change the order of the members by dragging the rows. You remove a row with the cross button.
Board details for TR Dizin
TR Dizin (Türkiye's national citation index) requires at least one third of the editorial board to come from other institutions. For this reason, select for each member whether they are from the publishing institution or from another one. If the Editorial board group has members, the share is calculated from this group. Otherwise it is calculated from the whole board.
The TR Dizin checklist also looks for the editor-in-chief, the section editors and the language editor. Enter these members with the matching groups. Members with a missing institution, city or country also appear as warnings in the checklist.
Adding an index
- On the Indexes card, press Add index.
- Type the name of the index in the Index name field.
- In the Verification address field, type the address of the journal's page in that index. The address
must start with
https://. - Press Save.
An index without an address is saved too. The Source links of the indexes row in the TR Dizin checklist shows which indexes have no link. If TR Dizin is among the indexes, JournTech sends reminders to upload published issues to ODİS, the journal system of TR Dizin. Details are in Downloading the ODİS Package.
How-to
Setting Author Guidelines and Review Criteria
Entering the author guidelines, reference style, abstract limit and former titles of a journal, and defining the criteria scored in the review form.
The Guidelines & review criteria tab of the journal keeps the author guidelines shown to authors and the criteria that reviewers score in one place. You save the changes on the tab with the Save button at the bottom of the tab. The article template on the same tab, however, is saved as soon as you upload it. The template steps are in Uploading the Article Template.
Author guidelines
- Open the journal with Manage journal and go to the Guidelines & review criteria tab.
- In the Reference style field, type the style the journal uses, for example APA 7 or ISNAD 2.
- In the Similarity check tool field, type the similarity software the journal uses.
- In the Abstract word limit field, type the maximum number of words in an abstract. The value must be between 50 and 2000.
- Write the author guidelines in the Author guidelines (TR) and Author guidelines (EN) fields. You can use simple HTML such as paragraphs, lists and links.
- Press Save.
The author guidelines appear in the submission wizard when the journal is selected, and in the Author guidelines section of the journal page. The reference style, the abstract limit and the similarity tool appear at the top of the same section. The data check for TR Dizin (Türkiye's national citation index) warns about articles whose abstract exceeds this limit.
Former titles of the journal
If the title or the ISSN of the journal has changed, add its former titles to the Former titles card.
- Press Add a former title.
- Fill in the Former title, ISSN and Last year fields.
- Press Save.
The former titles appear in the About the journal section of the journal page.
Review criteria
The Review criteria card defines the criteria scored in the review form. If the journal has not defined any criteria, the card lists the default criteria used in the review form. If you add criteria, only your criteria are used.
- Press Add criterion.
- In the Code field, type a short code that starts with a lower-case letter, for example originality. The code consists of lower-case letters, digits and underscores.
- In the Name (TR) field, type the Turkish name of the criterion. The Name (EN) field is optional.
- In the Maximum score field, type a value between 2 and 10.
- Press Save.
You change the order of the criteria by dragging the rows. The reviewer gives each criterion a score between 1 and the maximum score.
The criteria are copied to a review at the moment the reviewer accepts the invitation. A change you make later applies only to invitations accepted after it.
The minimum number of reviewers and the yearly reviewer list on the same card are described in Setting the Reviewer Minimum and Reviewer List.
How-to
Uploading the Article Template
Uploading, replacing or removing the writing template that authors download from the journal page.
The article template is the file authors use when they prepare their articles. Once the template has passed the virus scan, it can be downloaded from the journal page with the Manuscript template button.
- Open the journal with Manage journal and go to the Guidelines & review criteria tab.
- Drop the file on the Upload a template area of the Article template card.
You can upload a DOCX, ODT or PDF file. For a LaTeX template, upload a ZIP file. The upload is saved at once, and your other unsaved changes on the tab are kept. While the scan runs, the card says that the file is being scanned. If the file does not pass the scan, the card says why, and the template does not appear on the journal page. In that case, upload a smaller or clean copy of the file. If the card says that the file is missing from the file store, uploading the same file again is enough.
Replacing and removing the template
- Uploading a new file replaces the previous one.
- The Remove the template button removes the template from the journal page. The file itself stays in the library.
- If you may see draft catalogue records or manage the file library, the Choose from the file library button appears too. With this button you select a document in the library and press Use as template. Files linked to a catalogue record cannot be templates.
- The list starts with the newest files of the library. You can also find a document by typing its name in the Search by file name box. If the library has more than 1,000 files, the list looks at the newest 1,000 and a note says so. Search for an older document by its name.
Template changes are written to the audit log. The checklist for TR Dizin (Türkiye's national citation index) suggests adding a template, and the Fix link in the checklist takes you straight to this card.
How-to
Setting the Reviewer Minimum and Reviewer List
Setting the minimum number of reviewers expected in a review round and publishing the yearly list of reviewers of the journal.
You set the minimum number of reviewers and the yearly reviewer list at the top of the Review criteria card on the Guidelines & review criteria tab of the journal.
- Open the journal with Manage journal and go to the Guidelines & review criteria tab.
- In the Minimum reviewers per round field, type a number between 1 and 5. The default value is 2.
- To publish the reviewer list, tick the Publish the yearly list of reviewers box.
- Press Save at the bottom of the tab.
Minimum number of reviewers
If a round has fewer reviewers than this number, the editor is warned by the Reviewer rules note on the Reviewers tab of the submission. The warning does not block any action. TR Dizin (Türkiye's national citation index) expects at least two reviewers. The note is described in Tracking Invitations and Reviews.
Yearly reviewer list
If the list is turned on, an Our reviewers link appears on the journal page. The list includes only reviewers who allowed the publication of their name in their review. The reviewers are listed by the year they submitted the review, with their titles, names and institutions. Within each year the list is in alphabetical order of the full name; the title does not affect the order. The list does not say which article they reviewed. While the list is turned off, this page does not open.
The permission of the reviewer is an optional box in the review form, and it starts unticked. Details are in Writing a Review.
How-to
Writing Journal Policies
Writing the peer review, open access, copyright, ethics, AI, fee, archiving and complaints policies of a journal in Turkish and English.
You write the policies of the journal on the Policies tab. The policies you fill in are published on the journal page as separate sections under the Journal policies heading. Policies you leave empty are not shown.
- Open the journal with Manage journal and go to the Policies tab.
- Select a policy in the list on the left. The list shows whether each policy has been written.
- Select Turkish in the language tabs and write the text. Then write the English text.
- Repeat steps 2 and 3 for the other policies.
- Press Save.
You can use formatting such as headings, lists and links in the text. Harmful tags are removed when you save.
Policies and TR Dizin
The list has eleven policies. The checklist for TR Dizin (Türkiye's national citation index) shows a missing policy as a warning or as a suggestion.
| Policy | If missing in the TR Dizin checklist |
|---|---|
| Peer review process | Warning |
| Open access policy | Warning |
| Copyright and licensing | Warning |
| Ethical responsibilities of authors | Warning |
| Ethical responsibilities of reviewers | Warning |
| Ethical responsibilities of editors | Warning |
| Plagiarism and similarity checks | Suggestion. The row is complete if a similarity tool was entered on the guidelines tab |
| Use of AI tools | Suggestion |
| Publication fees | Warning |
| Archiving policy | Suggestion |
| Complaints and appeals | Suggestion |
If the journal charges no fees, say so clearly in the Publication fees policy, for example "The journal charges authors no fees." The TR Dizin checklist is described in detail in Preparing for TR Dizin.
How-to
Posting Journal Announcements and Calls
Writing, publishing, unpublishing and deleting the announcements of a journal and its calls for papers, such as calls for a special issue.
You manage the announcements and calls for papers of the journal on the Announcements & calls tab. Published announcements and open calls appear on the journal page. Calls are also listed on the Calls page of the site.
Writing an announcement or a call
- Open the journal with Manage journal and go to the Announcements & calls tab.
- Press New announcement or New call for papers.
- For a call, fill in the Deadline field. This field is required for calls.
- On the Turkish tab, fill in the Title, Short description and Text fields. The Turkish title is required.
- Optionally, fill in the same fields on the English tab.
- Press Save.
A saved item stays a draft and does not appear on the site. To edit an item, press its title in the list.
Publishing and unpublishing
- In the list, press Publish in the row of the item.
The item is published at once. You remove a published item from the site with the Unpublish button. The trash button deletes the item. Both actions ask for confirmation.
Journal announcements are not subject to the review rule of institutional content. An editor who can use this tab publishes the items themselves.
On the site
- The journal page shows the last three announcements and the open calls.
- The Calls page of the site sorts the open calls by deadline. Expired calls stay on the same page in a separate section.
- A call whose deadline has passed drops off the journal page automatically.
News and calls of the institution that are not tied to a journal are described in Adding News, Announcements and Events.
How-to
Preparing for TR Dizin
Checking how ready a journal is for the TR Dizin criteria with the checklist on the TR Dizin tab, fixing the gaps and turning on the strict check.
The TR Dizin tab of the journal checks the details, boards, recent issues and article data of the journal against the journal criteria of TR Dizin, the national citation index of Türkiye run by TÜBİTAK ULAKBİM. The list shows whether the data is ready. You still upload the issues and articles to TR Dizin yourself, through ODİS, the journal system of TR Dizin.
Reading the list
| Group | What is checked |
|---|---|
| Journal details | ISSN, Turkish and English journal title, abbreviation, publisher, scope in two languages, field, publication frequency and months, the minimum number of issues a year for the field, languages, contact details, open access and licence, indexes and former titles |
| Guidelines and policies | Author guidelines, reference style, abstract limit, article template, policies and similarity check |
| Boards | Editor-in-chief, section and language editors, the institution and location details of the members, the share of external members on the editorial board, and ORCID |
| Recent issues | The number of issues published in recent years, combined and special issues, match with the publication months, and continuous page numbering within a volume |
| Article data (last two years) | English data, completeness of the second language, ORCID, institution, dates, references, ethics committee statement, article type, DOI and abstract limit |
Each row carries the Done, Warning, Missing or Suggestion label. Above the list you see the number of done, warning and missing rows and the time of the check.
Fixing the gaps
- In a missing or warning row, press the Fix link. The link opens the tab where you fix the gap. In the template and index rows it goes straight to the field concerned.
- Fix the gap and save.
- Go back to the TR Dizin tab and press Check again.
The link in the journal title, abbreviation, publisher, open access and licence rows opens the catalogue record of the journal. If you do not have the permission to open this record, ask a catalogue editor to correct these details.
The link in the article data rows opens the Issues tab. The Consistency check button on the issue screen shows the TR Dizin warnings of each article separately.
Strict check
If the Hold issues to the TR Dizin data checks switch is on, an issue whose article data still has TR Dizin warnings cannot be published. While the switch is off, the warnings are for information only. The setting is saved the moment you change the switch. Journals that turn on the strict check also get the ODİS upload reminders.
TR Dizin record
If a system administrator turned on the Show TR Dizin data feature flag, the TR Dizin record card appears at the top of the tab. The card reads the open data of TR Dizin by the ISSN of the journal. It shows whether the journal is indexed in TR Dizin and, by year, the numbers of missing issues, missing review reports and expert warnings.
The record refreshes automatically once a week. To refresh it now, press Fetch from TR Dizin. Because the record is read by ISSN, the journal must have an ISSN. If there is no ISSN, the card says so.
The steps for uploading issues to ODİS are in Downloading the ODİS Package.
How-to
Downloading the ODİS Package
Downloading the files of a published issue for upload to TR Dizin as a single ZIP file, and marking the issue as uploaded to ODİS.
The ODİS package collects the files you need to upload an issue to ODİS, the journal system of TR Dizin (Türkiye's national citation index), in a single ZIP file. JournTech does not upload the issue to ODİS for you.
Downloading the package
- On the Catalogue → Journals & issues screen, open the journal.
- Open the published issue from the Issues tab.
- Press ODİS package in the page header.
The button appears only on published issues.
Contents of the package
| File | Contents |
|---|---|
| 00-tam-sayi.pdf | The full issue, with the cover, the table of contents and the articles in order |
| makaleler | A folder with the PDF of each article, numbered in table-of-contents order |
| odis-veri.xlsx | The article, author and reference details to copy when you enter them in ODİS |
| hakem-dosyalari | A folder with the referee dossiers of the selected articles |
| BENIOKU.txt | A read-me file with the steps for uploading to ODİS |
By default the package adds the referee dossiers of 15% of the articles, and of no fewer than two. Referee dossiers are added only for articles reviewed in the panel, and only with the permissions of an editor-in-chief. If you do not have these permissions, the BENIOKU file says that the referee dossiers were not added. Articles without a PDF are also listed in this file.
Uploading to ODİS
The BENIOKU file describes these steps:
- Create the issue in ODİS and upload the full issue PDF.
- Enter each article with the details from the data sheet and attach its PDF.
- Upload the referee dossiers. Also add the dossier of one rejected article each year.
- Send the issue to the checking process in ODİS.
You get the referee dossier of a rejected article from the editor screen of the submission. Details are in Downloading the Referee Dossier.
Uploaded mark
- After uploading the issue to ODİS, press Mark as uploaded to ODİS on the issue page.
From then on the button shows the date of the mark. If you set the mark by mistake, press the same button again to remove it.
Reminders
For issues without the mark, reminders go out 14 and 45 days after the issue is published. Reminders go out only for journals that list TR Dizin among their indexes or have turned on the strict TR Dizin check. They reach the editors authorised for the journal by e-mail and as panel notifications. If there is no such editor, they go to the other users with the permission to manage the journal.
A system administrator changes the days in the ODİS upload reminder (days after the issue was published) field on the Workflow tab of the Administration → Site settings screen. If the field is left empty, no reminders are sent.
Screens and settings
Journals and Issues Screen
The screen that lists the journals in your scope as cards, the details on the cards and the Manage journal and Record details buttons.
The Catalogue → Journals & issues screen lists the journals you may manage as cards. If your role was granted for a single journal, you see only that journal. The menu is hidden from people without the permission to manage journals.
Button at the top
New journal opens a new journal record and requires the permission to edit the catalogue. The steps are in Adding a Journal.
Journal card
Each card shows the following:
- The name of the journal and its ISSN and e-ISSN numbers, or its short name if it has no numbers.
- The status of the journal record.
- A short excerpt from the scope of the journal.
- The submission method, the peer review type and the number of issues.
- The EN missing or TR missing label if a translation is missing.
Manage journal at the bottom of the card opens the management screen of the journal. Record details opens the page of the journal record in the catalogue and requires the permission to see unpublished catalogue records.
Related topics
Screens and settings
Journal Management
The tabs, the issue list, the DergiPark card on the Profile tab and the buttons at the top of the screen that Manage journal opens.
You open the management screen of a journal with the Manage journal button in the Journals & issues list. The screen gathers the issues, profile, boards, guidelines, policies and announcements of the journal and its readiness for TR Dizin (Türkiye's national citation index) in tabs. Next to the title you see the status of the journal record, the submission method and the peer review type.
Buttons at the top
- Record details opens the page of the journal record in the catalogue. The name, categories, publisher and licence of the journal are edited there.
- Public page opens the page of the journal on the public site in a new tab, if the journal record is published.
Tabs
| Tab | Contents | Topic |
|---|---|---|
| Issues | The list of volumes and issues | Creating an Issue |
| Profile | ISSN, scope, submission method, peer review type, publication facts, contact details | Editing the Journal Profile |
| Board & indexes | Editorial board members and indexes | Adding Board Members and Indexes |
| Guidelines & review criteria | Author guidelines, article template, former titles, reviewer settings and criteria | Setting Author Guidelines and Review Criteria |
| Policies | The publication policies of the journal | Writing Journal Policies |
| Announcements & calls | Journal announcements and calls for papers | Posting Journal Announcements and Calls |
| TR Dizin | The readiness checklist for the TR Dizin journal criteria | Preparing for TR Dizin |
Issues tab
The tab lists the issues of the journal with the newest volume at the top. The table has the Issue, Year, Status and Articles columns. Special issues are marked separately. Open in a row opens the page of the issue, and the trash button opens the dialog for deleting the issue. New issue creates a new issue.
DergiPark card on the Profile tab
For a journal whose submission method is Managed on DergiPark and whose DergiPark address is saved, the Harvest from DergiPark card appears at the bottom of the Profile tab. The card brings the archive of the journal from DergiPark, the national journal platform of TÜBİTAK ULAKBİM, into the catalogue. Details are in Harvesting from DergiPark.
Screen rules
- People with the permission to manage journals open the screen. An editor whose role was granted for one journal sees only that journal.
- The profile, board, guidelines and policies tabs each have their own Save button. A change on a tab is saved with the button of that tab.
- Saving one tab does not discard the unsaved changes on the other tabs. Moving between tabs keeps them as well. If you try to leave the screen with unsaved changes, the panel asks first.
- If two people edit the profile at the same time, the person who saves last gets the "Someone else changed this record" warning. Reload the page and make the change again.
Screens and settings
Issue Page
The table of contents, the issue details card, the consistency check, the publishing, ODİS and Crossref buttons and the deletion of a journal issue.
The issue page shows the articles and the details of a journal issue together. You open the page from the row of the issue on the Issues tab of the journal. The header shows the volume and issue number, and next to them the status, year and title of the issue and the special issue mark.
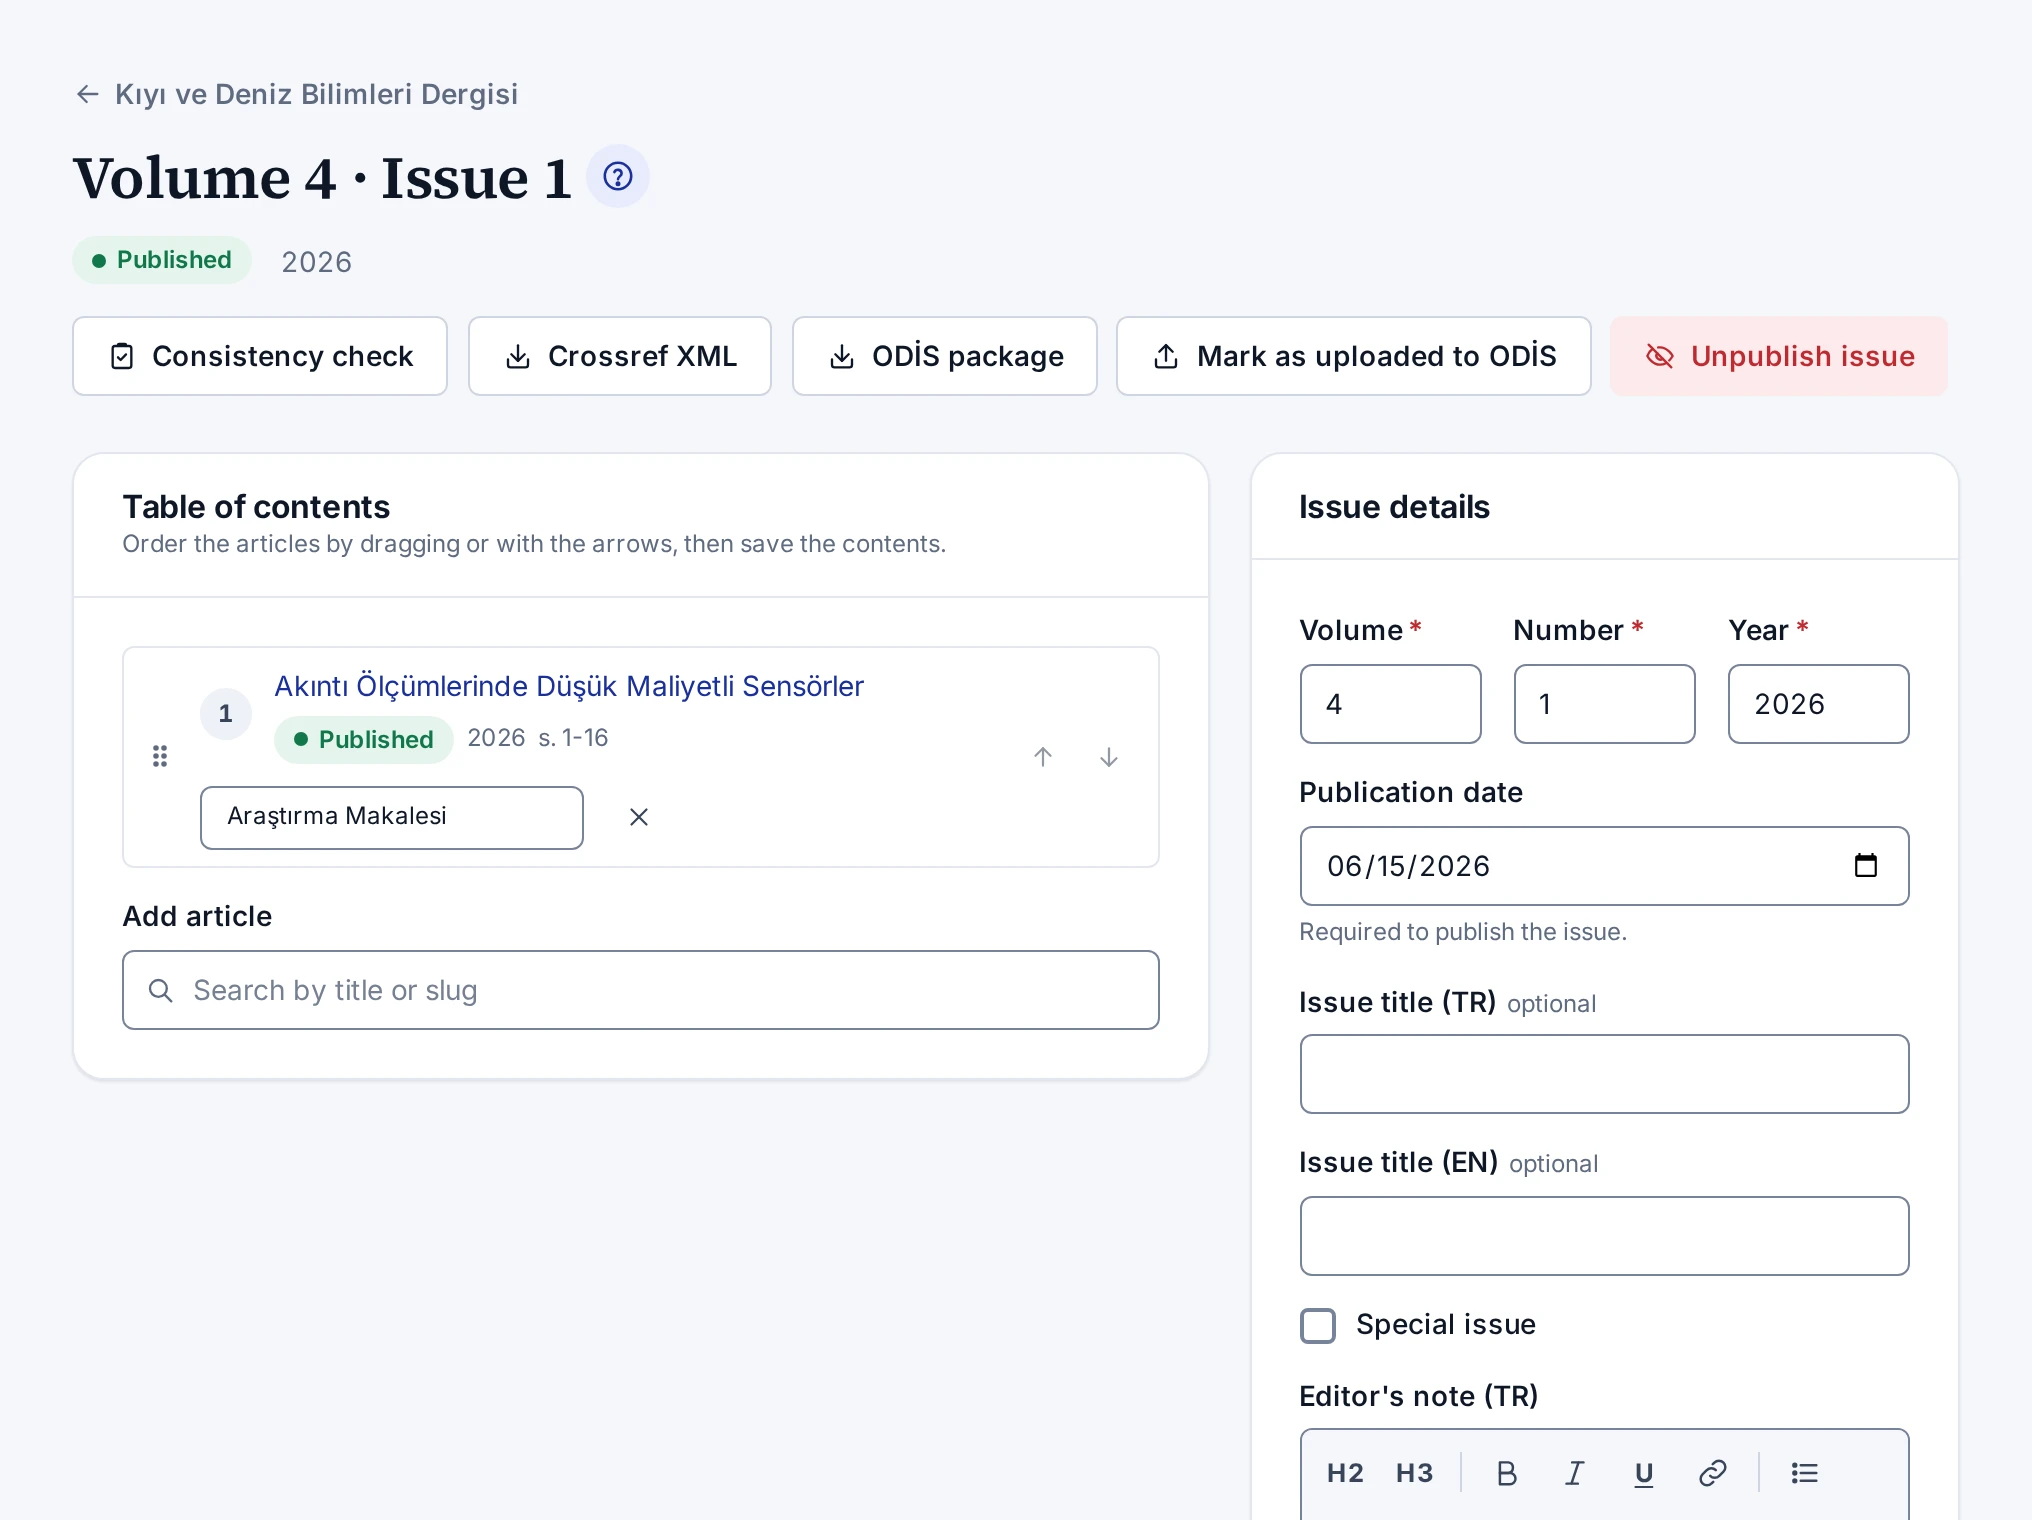
Buttons at the top
| Button | What it does |
|---|---|
| Consistency check | Checks the issue and its articles and shows the result at the top of the page |
| Crossref XML | Downloads the Crossref file of the public articles of the issue that have a DOI |
| ODİS package | Downloads the ODİS package of the published issue |
| Mark as uploaded to ODİS | Marks, with the date, that the issue has been uploaded to ODİS |
| Publish issue | Publishes the draft issue |
| Unpublish issue | Unpublishes the published issue, with a reason |
ODİS is the journal system of TR Dizin, the national citation index of Türkiye. The ODİS buttons appear only on a published issue and are described in Downloading the ODİS Package.
Table of contents
The Table of contents card lists the articles of the issue in order. Each row shows the title, status, year and pages of the article and a field for the section heading. After a check, the row of an article with problems shows its gaps and TR Dizin warnings.
- You put the rows in order by dragging them. When the order or a section heading changes, the Save contents button appears. The button saves the order and the section headings together.
- The Add article field at the bottom of the card adds an article to the issue.
- The cross button in a row removes the article from the issue.
The steps are in Adding Articles to an Issue.
Issue details
The Issue details card has the Volume, Number, Year, Publication date, Turkish and English Issue title, Special issue and Turkish and English Editor's note fields. The editor's note is formatted text: the toolbar adds headings, bold or italic text, lists and links. The note appears on the issue's public page under "From the editor". The Save button of the card is active only when there is a change. The Delete issue button at the bottom of the card opens the dialog for deleting the issue.
Screen rules
- Only people who may manage the journal open and change the page.
- Publishing the articles together with the issue requires the permission to publish in the catalogue.
- An issue with published articles cannot be unpublished.
- Changes to the order you set by dragging, to the section headings and to the issue details stay until you save them. Adding or removing an article, publishing the issue or saving the other card does not discard them. If you try to leave the page with unsaved changes, the panel asks first.
- Deleting the issue is described in Deleting a Journal Issue.
The publishing steps are in Publishing an Issue.
Troubleshooting
The journal does not appear in the submission wizard
Causes when authors cannot find your journal in the journal list of the submission wizard, or the journal page has no Submit an article button.
The journal list of the submission wizard contains only published journals that accept submissions through the panel. Check the causes below in order.
The submission method is not the panel
On the Profile tab of the journal, the Submissions field must be set to Through the workspace (JournTech). With the other options, authors cannot submit to the journal through the panel. The difference between the options is explained in Editing the Journal Profile.
The journal record is not published
The catalogue record of the journal must be published. A catalogue editor publishes the record. The steps are in Record Statuses and Publishing.
Submissions are closed
If a system administrator turned off the New submissions feature flag, no journal accepts submissions and the Submit an article button on the journal pages is hidden. A system administrator turns the flag back on.
Troubleshooting
The issue cannot be published
Checking the journal record, the missing details of the issue, the TR Dizin check and the status of the articles when Publish issue fails.
If an issue is not published, the panel gives the reason in the notification at the bottom right and shows the result of the consistency check at the top of the page. Check the causes below in order.
The journal record is not published
The notification reads "Publish the journal first." Publish the catalogue record of the journal itself before the issue. You open the journal record with the Record details button on the management screen of the journal.
The details of the issue are missing
The volume, number, year and publication date of the issue must be entered. If the date is missing, the notification reads "Enter the issue date before publishing the issue." Enter the missing details on the Issue details card and press Save.
The TR Dizin check is mandatory
The notification reads "The issue does not pass the TR Dizin data checks." If the data check for TR Dizin (Türkiye's national citation index) is mandatory for the journal, an issue whose article data still has warnings is not published. Fix the warnings in the TR Dizin data checks note of the check. Details are in Preparing for TR Dizin.
An article does not meet the conditions
When you publish the issue with its articles and an article cannot be published, the issue is not published either. The row of the article with problems shows its gaps in red. Fix the article, or publish the issue without the articles.
If the year of a published article in the issue differs from the year of the issue, the issue is not published. Correct the year of the article or of the issue.
You sent the article to review
If the editor approval rule is on for the installation and you sent an article of the issue to review, the notification reads "You sent this article to review. Another editor has to publish it." Have another catalogue editor publish the article, or publish the issue without the articles. The rule is described in Four-Eyes Principle.
The option to publish the articles is missing
The Also publish draft and in-review articles box in the publishing dialog requires the permission to publish in the catalogue. The editor-in-chief of the journal publishes the issue, and a Catalogue editor publishes the articles.
Troubleshooting
The issue cannot be unpublished
Unpublishing the articles first, or deleting the issue, when an issue with published articles cannot be unpublished.
An issue cannot be unpublished while it has published articles. The notification reads "Unpublish the issue's published articles first." Unpublish the articles first, then unpublish the issue.
- On the Catalogue → Publications screen, find the articles of the issue.
- Select the articles and press Unpublish in the bulk action bar.
- Write the reason and confirm the preview.
- On the issue page, press Unpublish issue.
- Write a reason of at least 5 characters and confirm.
The steps of the bulk action are in Bulk Actions. Unpublishing articles requires the permission to publish in the catalogue.
Removing the issue completely
If the issue will not be published again, you can delete it even while it is published. The deletion dialog either keeps the published articles in the catalogue as drafts or moves them to the trash. The steps are in Deleting a Journal Issue.
Troubleshooting
An article cannot be added to the issue
Checking whether the article is in another issue and whether the journal editor restriction applies when an article cannot be added to the table of contents of an issue.
The Add article field of an issue searches only article records. If the article cannot be found or a warning appears when you add it, check the causes below.
The article is in another issue
An article can be in only one issue. The warning reads "The article is in another issue." First remove the article from the table of contents of the other issue, or change its issue in the Placement section of its record.
The article does not belong to this journal
If your role was granted for one journal only, you can add to the issue only the articles of that journal, that is records released from submissions to the journal. In this case the warning reads "This article cannot be placed: a journal's editors place only their journal's articles (released from submissions to the journal). Catalogue editors place other records." Have a catalogue editor place the other records.
The record is not an article or has been deleted
Only records of the article type can be added to an issue. A book chapter or a proceedings paper is linked to a book, not to an issue. A deleted article does not appear in the search. First find it with the Show deleted filter in the Publications list and restore it.
A published article cannot be added to an unpublished issue
A published article, for example one in early view, goes only into a published issue. The warning reads "Publish the issue first." Publish the issue first, then add the article.
A published article cannot be removed from the issue
To remove a published article from the issue, unpublish the article first. The warning reads "Unpublish the issue's published articles first." An archived or retracted article cannot leave its issue at all. In this case the warning reads "An archived or retracted article cannot leave its issue."
Feature
DergiPark Harvesting
Copying the issues and articles of a journal managed on DergiPark into the catalogue and keeping them up to date.
For a journal managed on DergiPark (Türkiye's national journal platform), submissions and peer review take place on DergiPark. DergiPark is selected as the submission method in the journal's profile, and the journal's DergiPark address is entered. From then on, the submit button on the public site opens the submission form on DergiPark.
Once harvesting is turned on, the issues and articles the journal has published on DergiPark are copied into the catalogue and updated automatically once a week. The original page of a harvested article is on DergiPark. For this reason these articles are not included in the sitemap or in OAI-PMH, but they appear on the public site, in search and on the issue pages.
JournTech sends its requests to DergiPark one at a time and with pauses between them. If DergiPark turns a request down, JournTech waits for the time DergiPark asks for and tries again. PDFs that cannot be fetched at the moment are requested again later.
How-to
Finding a Journal on DergiPark
Entering the DergiPark address in the profile of a journal managed on DergiPark, finding the journal number and sending authors to DergiPark.
For a journal whose submissions and peer review take place on DergiPark (Türkiye's national journal platform), Managed on DergiPark is selected as the submission method in the profile, and the journal's DergiPark address is entered. The Find on DergiPark button finds the journal on DergiPark and automatically fills in the journal number that the submission link needs.
Entering the address
- On the Catalogue → Journals & issues screen, open the journal with Manage journal.
- Go to the Profile tab.
- In the Submissions list, select Managed on DergiPark.
- In the DergiPark address or short name field, enter the journal's DergiPark address or only its short name. For example, the
short name in the address
https://dergipark.org.tr/en/pub/shortnameisshortname. - Press Find on DergiPark.
- Check the journal name and the journal number that appear under the field.
- Press Save.
Find on DergiPark saves nothing. The address and the journal number are saved only with the Save button. If the search cannot find the journal number, you can also fill in the DergiPark journal number field by hand. The link under the field shows the address that authors will be sent to.
For a journal that changed its name, DergiPark redirects the old short name to the new address. In that case, the search writes the journal's new short name in the field. For a journal without a Turkish interface, DergiPark sends Turkish addresses to the English page, and the search follows this redirect too.
When creating a new journal
The same fields are used when you create a new journal record. In the New journal form, the address field, the Find on DergiPark button and the journal number appear once Managed on DergiPark is selected in the Submissions field. If the address is empty, the form warns you before saving. The journal profile card on the journal's Record details page has the same fields. The steps for adding a journal are in Adding a Journal.
Changes on the public site
When you save the profile, the public site shows the journal like this.
- The note This journal is managed on DergiPark appears at the top of the journal page.
- The submission button becomes Submit on DergiPark and opens the submission form on DergiPark in the visitor's language. If no journal number is saved, the button opens the journal's page on DergiPark.
- Links to the journal's DergiPark page, its archive and its writing rules appear at the side of the journal page.
- In the journal list, the journal is shown with the DergiPark label.
- In the author guide, the journal's row has a button that goes to DergiPark.
Submissions to this journal cannot be made in the panel. The journal list of the submission wizard shows only the journals that take submissions through the panel.
Next step
To bring the journal's published DergiPark issues into the catalogue, go on to Harvesting from DergiPark. If the search cannot find the journal, see The Find on DergiPark button cannot find the journal.
How-to
Harvesting from DergiPark
Turning on the harvest of the issues and articles a DergiPark-managed journal has published into the catalogue, starting it at once and reading its results.
The DergiPark harvest copies the issues and articles that a journal has published on DergiPark (Türkiye's national journal platform) into the catalogue and updates them automatically once a week. You turn the harvest on in the Harvest from DergiPark card on the journal's Profile tab. The card appears only for journals whose submission method is saved as Managed on DergiPark and whose DergiPark address has been entered.
Before you start
- Save the journal's DergiPark address as described in Finding a Journal on DergiPark.
- Publish the journal's own catalogue record. If the journal record is not published, the harvested issues and articles stay as drafts.
- If you are going to copy the PDFs too, select a licence in the journal record. The copied PDFs are published under this licence.
- Get permission for the harvest from the journal's editorial board. You confirm this permission when you turn the harvest on.
Turning the harvest on
- On the Catalogue → Journals & issues screen, open the journal with Manage journal.
- On the Profile tab, scroll down to the Harvest from DergiPark card.
- Turn on the Harvest the published issues from DergiPark switch.
- If you want the PDFs to be copied too, turn on the Copy the PDFs too switch.
- Tick the box that confirms the editorial board's permission.
- Press Save.
The confirmation box appears only the first time you turn the harvest on. The Save button does not work until the box is ticked, and your confirmation is written to the audit log. Turning the harvest on needs the catalogue publishing permission, because the harvested articles are published in the catalogue. This permission is in the Catalogue editor and System administrator roles. The journal's editor with the Editor-in-chief role sees the card but cannot turn the harvest on.
Starting the harvest
Once you save, the Harvest now button appears on the card.
- Press Harvest now.
- Wait for the results while the button says Harvest running….
The harvest runs in the background, and you can leave the page. The card refreshes the results by itself. Only one harvest runs at a time for a journal.
If you do not press the button, the system starts the harvest itself. The system checks the journals that have the harvest on every six hours and starts a new run for a journal whose last run was a week ago or longer. Each run reads all of the journal's records on DergiPark and skips the articles that have not changed. The speed of a run depends on DergiPark's responses. The details are in DergiPark Request Intervals.
Reading the results
The line under the card shows the number of DergiPark records in the catalogue, how many of them are published and the date the harvest was turned on. The table lists the last ten runs.
| Column | What it shows |
|---|---|
| Started | When the run started. Runs that the system started show scheduled under the time |
| Status | Running, Done or Failed |
| Result | The counts above zero and the first three problems |
The counts in the result column are these.
| Count | Meaning |
|---|---|
| Records | DergiPark records processed in this run |
| New | Articles newly created in the catalogue |
| Updated | Articles updated because they changed on DergiPark |
| Unchanged | Articles skipped because they did not change on DergiPark |
| Published | Articles published in this run |
| Left as drafts | Articles left as drafts because they failed the publish checks |
| Issues opened | Issues published in this run |
| PDFs | PDFs copied |
| PDFs to try again | PDFs that DergiPark did not give at the time and that will be requested again later |
| Gone from DergiPark | Records taken in earlier runs that are no longer on DergiPark |
| Errors | Problems found in records |
Problem lines give the record's DergiPark ID and the reason for the problem. For articles left as drafts, see Articles harvested from DergiPark stay as drafts. For failed runs, see The DergiPark harvest shows as failed.
Turning the harvest off
If you turn off the Harvest the published issues from DergiPark switch and press Save, the weekly harvest stops. Records harvested earlier stay in the catalogue. How harvested records behave is described in Records Harvested from DergiPark, and the PDF copies in DergiPark PDF Copies.
Concept
Records Harvested from DergiPark
What the DergiPark harvest brings into the catalogue, when it publishes issues and articles, and how the harvested records appear on the site.
The DergiPark harvest creates an article record in the catalogue for every article that a journal has published on DergiPark (Türkiye's national journal platform). The record's original page stays on DergiPark. The article appears on the public site, in search and on issue pages, but the sitemap and OAI-PMH leave it out, because the DergiPark record announces the article itself.
Information taken over
The harvest takes an article's information from two sources.
- DergiPark's OAI-PMH record provides the title, abstract and keywords in each language, the authors, the language of the work, the publication date, the DOI, the volume, the issue and the pages.
- The article's DergiPark page provides the authors' ORCID iDs and institutions, the references, the article type and the PDF address.
The article page is read only for new or changed articles. A page that cannot be read appears as a problem in the result line and is read again in the next harvest. When the page cannot be read, the ORCID iDs, affiliations, references and article type of an existing record are not removed.
The authors on the article page are matched to the authors of the OAI-PMH record by their names. An author whose name does not match is matched by position only when both lists have the same number of authors. If the lists differ, that author's ORCID iD and institution are not taken from the page. This way, no author gets someone else's ORCID iD.
Authors are linked to existing person records by their ORCID iDs, or by an exact match of their names when there is no ORCID iD. If there is no match, a new person record is created. Institutions are matched by their Turkish or English names too. An institution without a match is added to the institution tree, and if the institution text ends with Türkiye or Turkey, the city and the country are filled in too. You can merge duplicate person records as described in Merging Person Records.
The article's access depends on the Copy the PDFs too option. If the PDFs are copied, the article becomes open access under the journal's licence. If they are not copied, the article stays Metadata only, and its page links to the original page on DergiPark. The details are in DergiPark PDF Copies.
Issues and publishing
- An article is placed in the journal's issue that has the same volume and issue number. If there is no such issue, the harvest creates it. An article with no volume and issue information at all is not placed in an issue and stays a draft.
- If the journal record is published, the harvest publishes the issue. The issues that the harvest creates have no publication date. The harvest publishes them anyway, because this step is not held back by the issue date rule.
- An article is published if it passes the catalogue's publish checks. Otherwise it stays a draft. An article left as a draft is tried again in the next harvests, even if it did not change on DergiPark. An article that an editor took off the site, and an issue that was published once and withdrawn, are not published again. For articles left as drafts, see Articles harvested from DergiPark stay as drafts.
- The installation's editor approval rule does not apply to this publishing, because the content is already published on DergiPark. The details of the rule are in Four-Eyes Principle.
Display on the public site
- The article page names the DergiPark page as the original address. The note This record comes from the journal's DergiPark archive appears on the page with a link to the original page.
- The page does not write Google Scholar tags. This way, search engines do not see two originals of the same article.
- The record is left out of the sitemap and OAI-PMH.
- The record's DOI is registered by DergiPark. JournTech does not send these records to Crossref. The details are in Automatic DOI Registration.
If you delete the DergiPark address in the record's External address field, the record counts as your own record and is included in the sitemap and OAI-PMH. If the article changes on DergiPark, the next harvest writes this address again.
Updated records
Each harvest reads all of the journal's records on DergiPark. Articles whose OAI-PMH record has not changed are skipped. The catalogue record of a changed article is rewritten with the information on DergiPark. Manual changes in the following fields are lost in the process.
- The title, abstract and keywords in each language
- The authors and their institutions
- The type-specific details, including dates added by hand, funding and declarations
- The persistent identifiers, which are replaced by the DOI on DergiPark
- The access status, the publisher, the language of the work, the publication year and the publication date
- External address
The record's categories, files and featured setting are kept. Deleted and retracted articles are never updated. Records that are no longer on DergiPark stay in the catalogue and are only counted. The details are in Deleting a DergiPark Article.
Concept
DergiPark PDF Copies
When the DergiPark harvest copies the article PDFs, how it requests again the PDFs that DergiPark did not give at the time, and which PDFs it does not request again.
The harvest copies the articles' PDFs only if the Copy the PDFs too option is on. While the option is off, the article page links to the original page on DergiPark (Türkiye's national journal platform), and the PDF is read on DergiPark.
Conditions for copying
- A licence must be selected in the journal record. The copied PDFs are published under the journal's licence, and the article becomes open access.
- Every PDF goes through the virus scan like other uploads and does not open before the scan has finished.
- If the article already has a current full text in the catalogue, the harvest does not take a new copy.
- PDFs are requested from DergiPark one at a time and at longer intervals than pages. The details are in DergiPark Request Intervals.
If you turned the option on after the first harvest, the earlier articles open under the journal's licence at the next harvest. The details are in The PDFs of DergiPark articles do not show on the site.
PDFs to try again
If DergiPark does not give a PDF at the time, the harvest marks the PDF to be tried again later. This happens with a 429 or 5xx response and when DergiPark does not answer at all. The result line says that the PDF could not be downloaded for now and will be tried again shortly. The PDFs to try again count shows the number of these PDFs.
- When the run finishes, a new attempt is set up for 20 minutes later.
- For PDFs that still cannot be received, the attempts continue at the same interval. Each PDF is tried at most 5 times.
- A PDF that is copied later drops off the run's problem list.
- The weekly harvest also requests again the missing copies of articles that have not changed on DergiPark.
- When a harvest job passes 20 minutes, it leaves the remaining PDFs to the next attempt without waiting. In that case, the PDF does not lose an attempt.
- If Copy the PDFs too is turned off, the waiting attempts are not made.
PDFs not requested again
A file that is not found on DergiPark (404), is not a PDF or is larger than 100 MB is not requested again. A PDF that could not be received in 5 attempts is not requested again either. The last warning stays in the result line. You can upload the full text of such an article by hand as described in Files and Access.
Concept
DergiPark Request Intervals
At what intervals JournTech sends requests to DergiPark, how it waits while DergiPark is busy and how long-running harvest jobs are split up.
JournTech sends requests to DergiPark (Türkiye's national journal platform) one at a time and with pauses in between. This way, the journal's archive is taken without straining DergiPark. That is why the first harvest of a large archive can take a long time.
DergiPark's rules
The harvest never requests the sign-in and search addresses that DergiPark's robots.txt file forbids. The record list is read from DergiPark's OAI-PMH address in pages of 100 records, and each page is a separate background job.
Waiting between requests
The harvest waits 1 second before each request and 6 seconds before each PDF. The wait is longer for PDFs, because DergiPark limits downloads more strictly than pages.
When DergiPark is busy
If DergiPark answers with 429 (too many requests) or 503, the harvest waits and makes the same request again.
- The waiting time that the response gives (Retry-After) is used.
- If the response gives no time, the wait grows to 30, 60 and 120 seconds.
- The wait never exceeds 5 minutes.
- After such a response, the wait between requests doubles for the rest of that job and can grow up to eight times its normal length.
If there is still no response after the waits, the page of the record list is retried later in the job queue. An article page is read again in the next harvest. A PDF is marked to be tried again later. The details are in DergiPark PDF Copies.
Long-running jobs
Once a job passes 20 minutes, it stops waiting for DergiPark and leaves the remaining PDFs to the next attempt. A run that lasts longer than half a day counts as stuck and is closed as failed.
Only one harvest job runs at a time. When the harvests of two journals are under way at the same time, their pages are taken in turn. Short jobs such as e-mails and virus scans do not wait for the harvest.
Redirects
For a journal without a Turkish interface, DergiPark redirects Turkish addresses to the English page. The harvest follows redirects only within DergiPark and over https, at most three times. The page that answers becomes the original address of the article record.
Troubleshooting
The Find on DergiPark button cannot find the journal
If the Find on DergiPark button shows a warning under the address field, correcting the address, checking the short name or waiting a little and trying again, depending on the warning.
If the Find on DergiPark button cannot read the address or cannot find the journal on DergiPark (Türkiye's national journal platform), a warning appears under the DergiPark address or short name field. Follow one of the sections below, depending on the warning.
The address belongs to another site
The warning "This is not a dergipark.org.tr address." appears. Only dergipark.org.tr addresses go in this field. Enter the journal's address on DergiPark or its short name.
The address names no journal
The warning "The address names no journal. Enter the journal address in the form …/pub/shortname." appears. The address must contain /pub/ and the journal's short name. The address
of the submission form or of a PDF download page does not work. Open the journal's home page on DergiPark and copy its
address.
The short name is invalid
The warning "Enter the journal's short name on DergiPark (letters, digits, - or _)." appears. A short name consists of letters, digits, hyphens or underscores and contains no spaces.
DergiPark has no such journal
The warning "DergiPark has no journal with this name." appears. DergiPark shows no journal with this name, or the journal has moved away from DergiPark. Compare the spelling of the short name with the journal's address on DergiPark. For a journal that changed its name, DergiPark redirects to the new short name, and the search writes the new name in the field itself.
DergiPark does not respond
The warning "DergiPark did not answer." appears. DergiPark did not respond at the time or gave an unexpected response. Try again a few minutes later. If the problem continues, ask your system administrator whether the server can reach dergipark.org.tr.
Too many attempts
The search can be run at most 20 times a minute from the same IP address. Once the limit is passed, the warning "Too many attempts. Please wait a moment and try again." appears above the field. Wait a minute and try again.
Even if the search cannot find the journal, you can enter the journal's DergiPark journal number by hand in the DergiPark journal number field if you know it. The steps are in Finding a Journal on DergiPark.
Troubleshooting
The Harvest from DergiPark card is missing
If the journal's Profile tab has no Harvest from DergiPark card, saving the submission method and the DergiPark address or going to the right tab.
The Harvest from DergiPark card appears on the journal's Profile tab, below the profile form. The card appears only for journals whose submission method is saved as Managed on DergiPark and whose address on DergiPark (Türkiye's national journal platform) has been entered. Check the causes below in order.
The profile is not saved
The card looks at the saved profile. Selecting an option in the Submissions list or pressing Find on DergiPark is not enough.
- In the Submissions list, select Managed on DergiPark.
- Fill in the DergiPark address or short name field.
- Press Save.
After saving, the card opens below the profile form. The details of finding the address are in Finding a Journal on DergiPark.
You are on another tab
The card is only on the Profile tab. It does not appear on the Issues tab or on the other tabs.
The journal management screen does not open
The journal management screen needs permission to manage the journal. This permission is in the Catalogue editor role and in the Editor-in-chief role granted for the journal. If you do not have the permission, contact your system administrator.
Troubleshooting
The DergiPark harvest cannot be turned on
If the switches or the Save button on the Harvest from DergiPark card do not work, checking the publishing permission, the editorial board's consent and the journal record's licence.
The switches and the Save button on the Harvest from DergiPark card depend on your permissions, on the confirmation of the editorial board's consent and on the licence of the journal record. Check the causes below in order.
No publishing permission
If the card says "Switching the harvest on needs catalogue publishing rights (catalogue editor or system administrator).", you do not have permission to turn the harvest on. Because the harvested articles are published in the catalogue, the switch is turned on by someone with the catalogue publishing permission. The journal's editor with the Editor-in-chief role sees the card but cannot turn the harvest on. Ask a catalogue editor or a system administrator for help.
Changing the settings while the harvest is on needs this permission too. An editor without it can only turn the harvest off.
The Save button is disabled
When you turn the harvest on for the first time, a box appears that confirms the editorial board's consent. The Save button does not work until the box is ticked. The button is also disabled when no setting has changed.
The PDF copy switch is disabled
If the switch has the text "Set open access and a licence in the journal's record first; PDFs are published under it." under it, the journal record has no licence. Because the copied PDFs are published under the journal's licence, a licence must be selected first.
- On the journal management screen, press Record details.
- In the Access and licence section, set the Access status field to Open access.
- In the Licence field, select the journal's licence.
- Press Save changes.
- Go back to journal management and turn on the Copy the PDFs too switch.
No address saved
If saving shows the warning "Enter the journal's DergiPark address first.", the journal's address on DergiPark (Türkiye's national journal platform) is not saved. Save the address as described in Finding a Journal on DergiPark.
Troubleshooting
The PDFs of DergiPark articles do not show on the site
If the pages of articles harvested from DergiPark have no PDF, checking the copy setting, the article's access status, the waiting attempts and the virus scan.
The PDF of an article harvested from DergiPark (Türkiye's national journal platform) appears on the site only if the harvest copied the PDF and the article is open access. The page of an article whose PDF was not copied links to the original page on DergiPark. Check the causes below in order.
PDF copying is off
If the Copy the PDFs too option is off, the harvest does not copy PDFs. Turn the option on as described in Harvesting from DergiPark. The option needs a licence in the journal record.
The option was turned on after the first harvest
If copying was turned on later, the earlier articles open at the next harvest. The harvest also copies the PDFs of articles that have not changed on DergiPark, sets their access status to Open access and, if their licence field is empty, enters the journal's licence. If you do not want to wait for the harvest, press Harvest now.
The PDF will be tried again
If the result line has a PDFs to try again count, DergiPark did not give these PDFs at the time. The harvest requests them again 20 minutes later and again after that if needed. The details are in DergiPark PDF Copies.
The PDF will not be requested again
If the result line says that the PDF could not be downloaded, the file may not have been found on DergiPark, may not be a PDF or may be too large. The harvest does not request this PDF again. Upload the full text by hand on the article's Files tab. The steps are in Files and Access.
The virus scan is running
Every copied PDF goes through the virus scan and does not appear on the site before the scan has finished. The scan status of the file is shown on the article's Files tab.
Troubleshooting
The DergiPark harvest shows as failed
If a harvest run ended with the Failed status or its results have problem lines, waiting, checking the address or restarting the harvest, depending on the cause.
If a run cannot get the record list from DergiPark (Türkiye's national journal platform) or stops halfway, it ends with the Failed status. A problem with a single article does not stop the run. It only appears in the result line. Follow one of the sections below, depending on the reason that the problem line gives.
DergiPark does not respond
If the line says "DergiPark could not be reached." or that DergiPark is not responding at the moment, DergiPark did not give the record list despite several attempts. Restart the harvest after a while with the Harvest now button. If you do not start it by hand, the system tries again a week later.
DergiPark gave a response that cannot be read
If the line says "DergiPark sent an answer that cannot be read." or that DergiPark gave an OAI error or an unexpected response, the record list could not be read. Try again after a while. If the problem continues, tell your system administrator.
The journal or the address is gone
If the line says "The journal or its DergiPark address is gone.", the journal record was deleted or the DergiPark address in the profile was removed. Save the address again as described in Finding a Journal on DergiPark.
The harvest stopped without finishing
If the line says "The harvest stopped without finishing.", the run took longer than half a day and the system closed it as failed. Start a new run with the Harvest now button. The new run reads the whole list from the start, but it skips the records that were taken in earlier runs and have not changed.
Problem lines in a finished run
A run with the Done status can also list problems with individual articles.
- If an article page could not be read or has moved to another address, the article is taken with its other information from DergiPark, and the page is read again in the next harvest. What the page gave an article taken before is not removed.
- The warning "This DergiPark article belongs to another journal here." says that the same DergiPark article is linked to another journal in the catalogue. Check whether the same DergiPark address is saved in the profiles of two journals.
- The warning "The record has no title." says that the record received has no title in any language. Such a record is not added to the catalogue.
- The warning "The record could not be added to the catalogue." says that the catalogue refused the record. The rest of the warning gives the reason.
For PDF problems, see DergiPark PDF Copies.
Alert to the system administrators
Every run that ends as failed sends an operations alert to the system administrators. At most one alert per hour goes out for the same journal. The alert links to the journal's Profile tab. The details of the alerts are in Operations Alerts.
Troubleshooting
The Harvest now button does not start a harvest
If the Harvest now button is missing, disabled or shows a warning when pressed, checking the harvest setting, a run in progress and the hourly limit on attempts.
The Harvest now button starts a new harvest run in the background. If the button does not work, check the causes below in order.
The button is missing
The button appears only after the harvest has been turned on and saved. Turn on the Harvest the published issues from DergiPark switch and press Save. If the switch does not turn on, see The DergiPark harvest cannot be turned on.
A run is already in progress
If the button says Harvest running…, a run of the journal is in progress. Only one run goes at a time for a journal, and the button becomes active again when the run finishes. If someone else started a run at the same time, the warning "A harvest of this journal is already running." appears. The results arrive in the card's table by themselves.
A run that lasts longer than half a day counts as stuck and is closed as failed in the system's regular check. After that, the button works again.
Too many attempts
At most 6 harvests an hour can be started by hand from the same IP address. The limit is shared by all journals. Once the limit is passed, the warning "Too many attempts. Please wait a moment and try again." appears. Wait a while and try again.
The harvest was turned off or the address removed
If the warning "Turn on the DergiPark harvest first." appears when you press the button, the harvest has been turned off in the meantime. The warning "Enter the journal's DergiPark address first." says that the journal's address on DergiPark (Türkiye's national journal platform) has been removed. Refresh the page and check the settings.
Feature
Reports
Following publication, submission and process indicators and downloading reports as CSV files.
Reports are on the Administration → Reports screen. The screen shows the submission flow, publications, access counts, searches on the public site and in the help, and overdue work on separate tabs.
Personal data is masked in downloaded CSV files. Downloading without masking requires a separate permission, which only the System administrator role has. Every download is written to the audit log.
Screens and settings
Reports Screen
The indicators and filters on the submission flow, publications, access, search, help and overdue tabs, and the CSV downloads with masked personal data.
The Administration → Reports screen shows publication, submission, access and search indicators on tabs. The screen is open to people whose report permission covers the whole platform. An Editor-in-chief whose role was granted for a single journal does not see this screen.
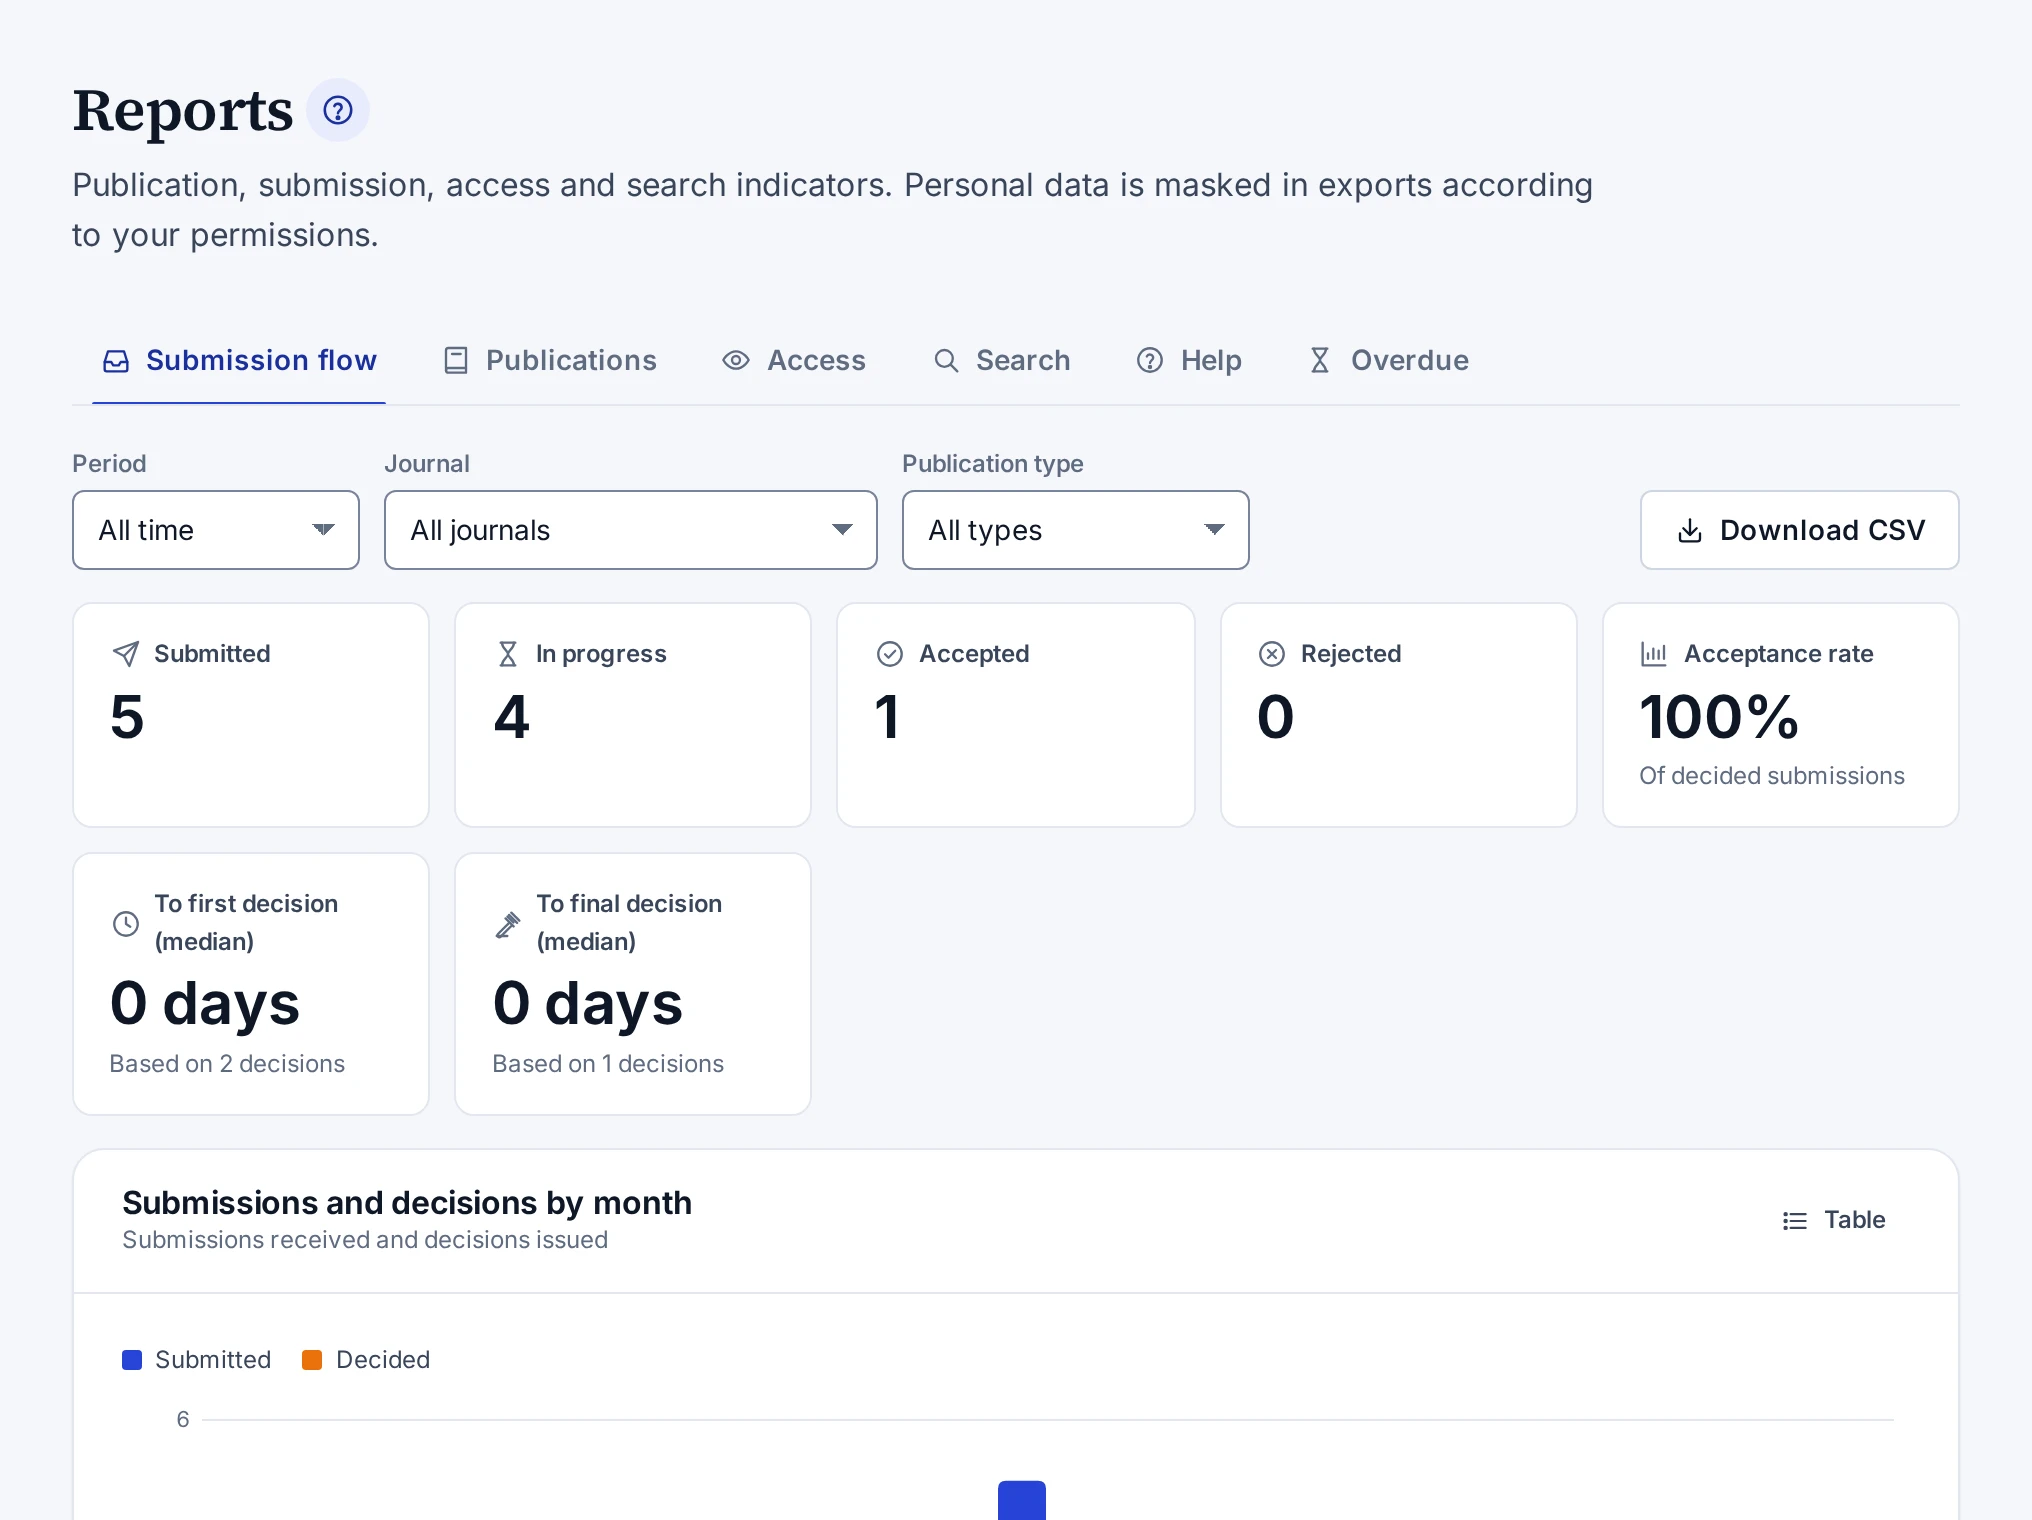
Tabs
| Tab | What it shows |
|---|---|
| Submission flow | Submitted, in-progress, accepted and rejected submissions, the acceptance rate, the median time to the first and to the final decision, and the breakdown by month, status, type and journal |
| Publications | Published works, works without a category, and the breakdown by type, access status, publication year, language and category |
| Access | View and download counts, a daily series and the most accessed publications |
| Search | The number of searches on the public site, searches without results and the most frequent searches |
| Help | Searches made in the help centre, words without results, the readers' answers and notes on topics, and topics that are due for review |
| Overdue | Overdue reviewer invitations, review reports and revisions, stalled submissions and late production tasks |
The acceptance rate is calculated from the submissions that received a decision. Access counts leave out bots, and IP addresses are not stored. Searches and help queries are counted without keeping user or IP details. The panel's global search does not count as a help search. The Table button of some charts shows the same data as a table.
The Stalled submissions list shows submissions that are submitted, in screening or have a submitted revision and have not been acted on for more than 14 days. Submissions you are an author of do not appear on the Overdue tab.
Filters
| Filter | Tabs where it appears |
|---|---|
| Period | Submission flow, Access, Search and Help |
| Publication year range | Publications |
| Journal | Submission flow and Overdue |
| Publication type | Submission flow, Publications and Access |
The Period list has the options All time, Last 30 days, Last 90 days, This year and Custom range. The filters stay in the address bar.
CSV download
| Tab | Button |
|---|---|
| Submission flow | Download CSV |
| Overdue | Overdue items (CSV) |
| Publications | Download CSV and People (CSV) |
| Access | Download CSV |
The downloaded file follows the filters on the screen. The Unit manager and System administrator roles can download reports. Personal data in the files is masked. Only the System administrator role has the permission to download unmasked data. The Personal data is masked note under the button shows that the file will be masked. Names and e-mail addresses on the Overdue tab are masked on the screen by the same rule.
Every download is written to the audit log. An attempt to open a report without permission is written to the audit log too.