

JournTech
Registered Researcher Guide
This guide was made from the help pages on 9 November 2026. The help centre has the latest version.
Help Press Ctrl+P to print it or save it as a PDF.
Role
Registered Researcher
The basic role of every account. You manage your profile, your submissions and the publications you saved.
Everyone who creates an account starts with this role. You do not need a separate role to submit as an author.
In the panel you see the Author & reviewer → My submissions screen and the Saved publications page in the user menu. For your first submission, start with Making a Submission.
Getting started
Using the Help Pages
Opening the help pages from the panel and the public site, searching them and filtering them by your role.
The help pages are part of JournTech and describe the features of the installed version. You reach them in three ways.
Help in the panel
The help button next to the title of a panel screen shows that screen's help page in a side panel that opens on the right. When you are not in a text field, the ? key opens the same panel. To turn this shortcut off, switch off The ? key opens the help at the foot of the panel. The choice is kept in this browser.
While the side panel is open, you can keep using the screen, and a half-finished form is not lost. A topic link in the panel opens another topic in the same panel, and the arrow at the top left returns to the previous topic. The Open as a full page link opens the topic as a full page in a new tab. The Esc key closes the panel.
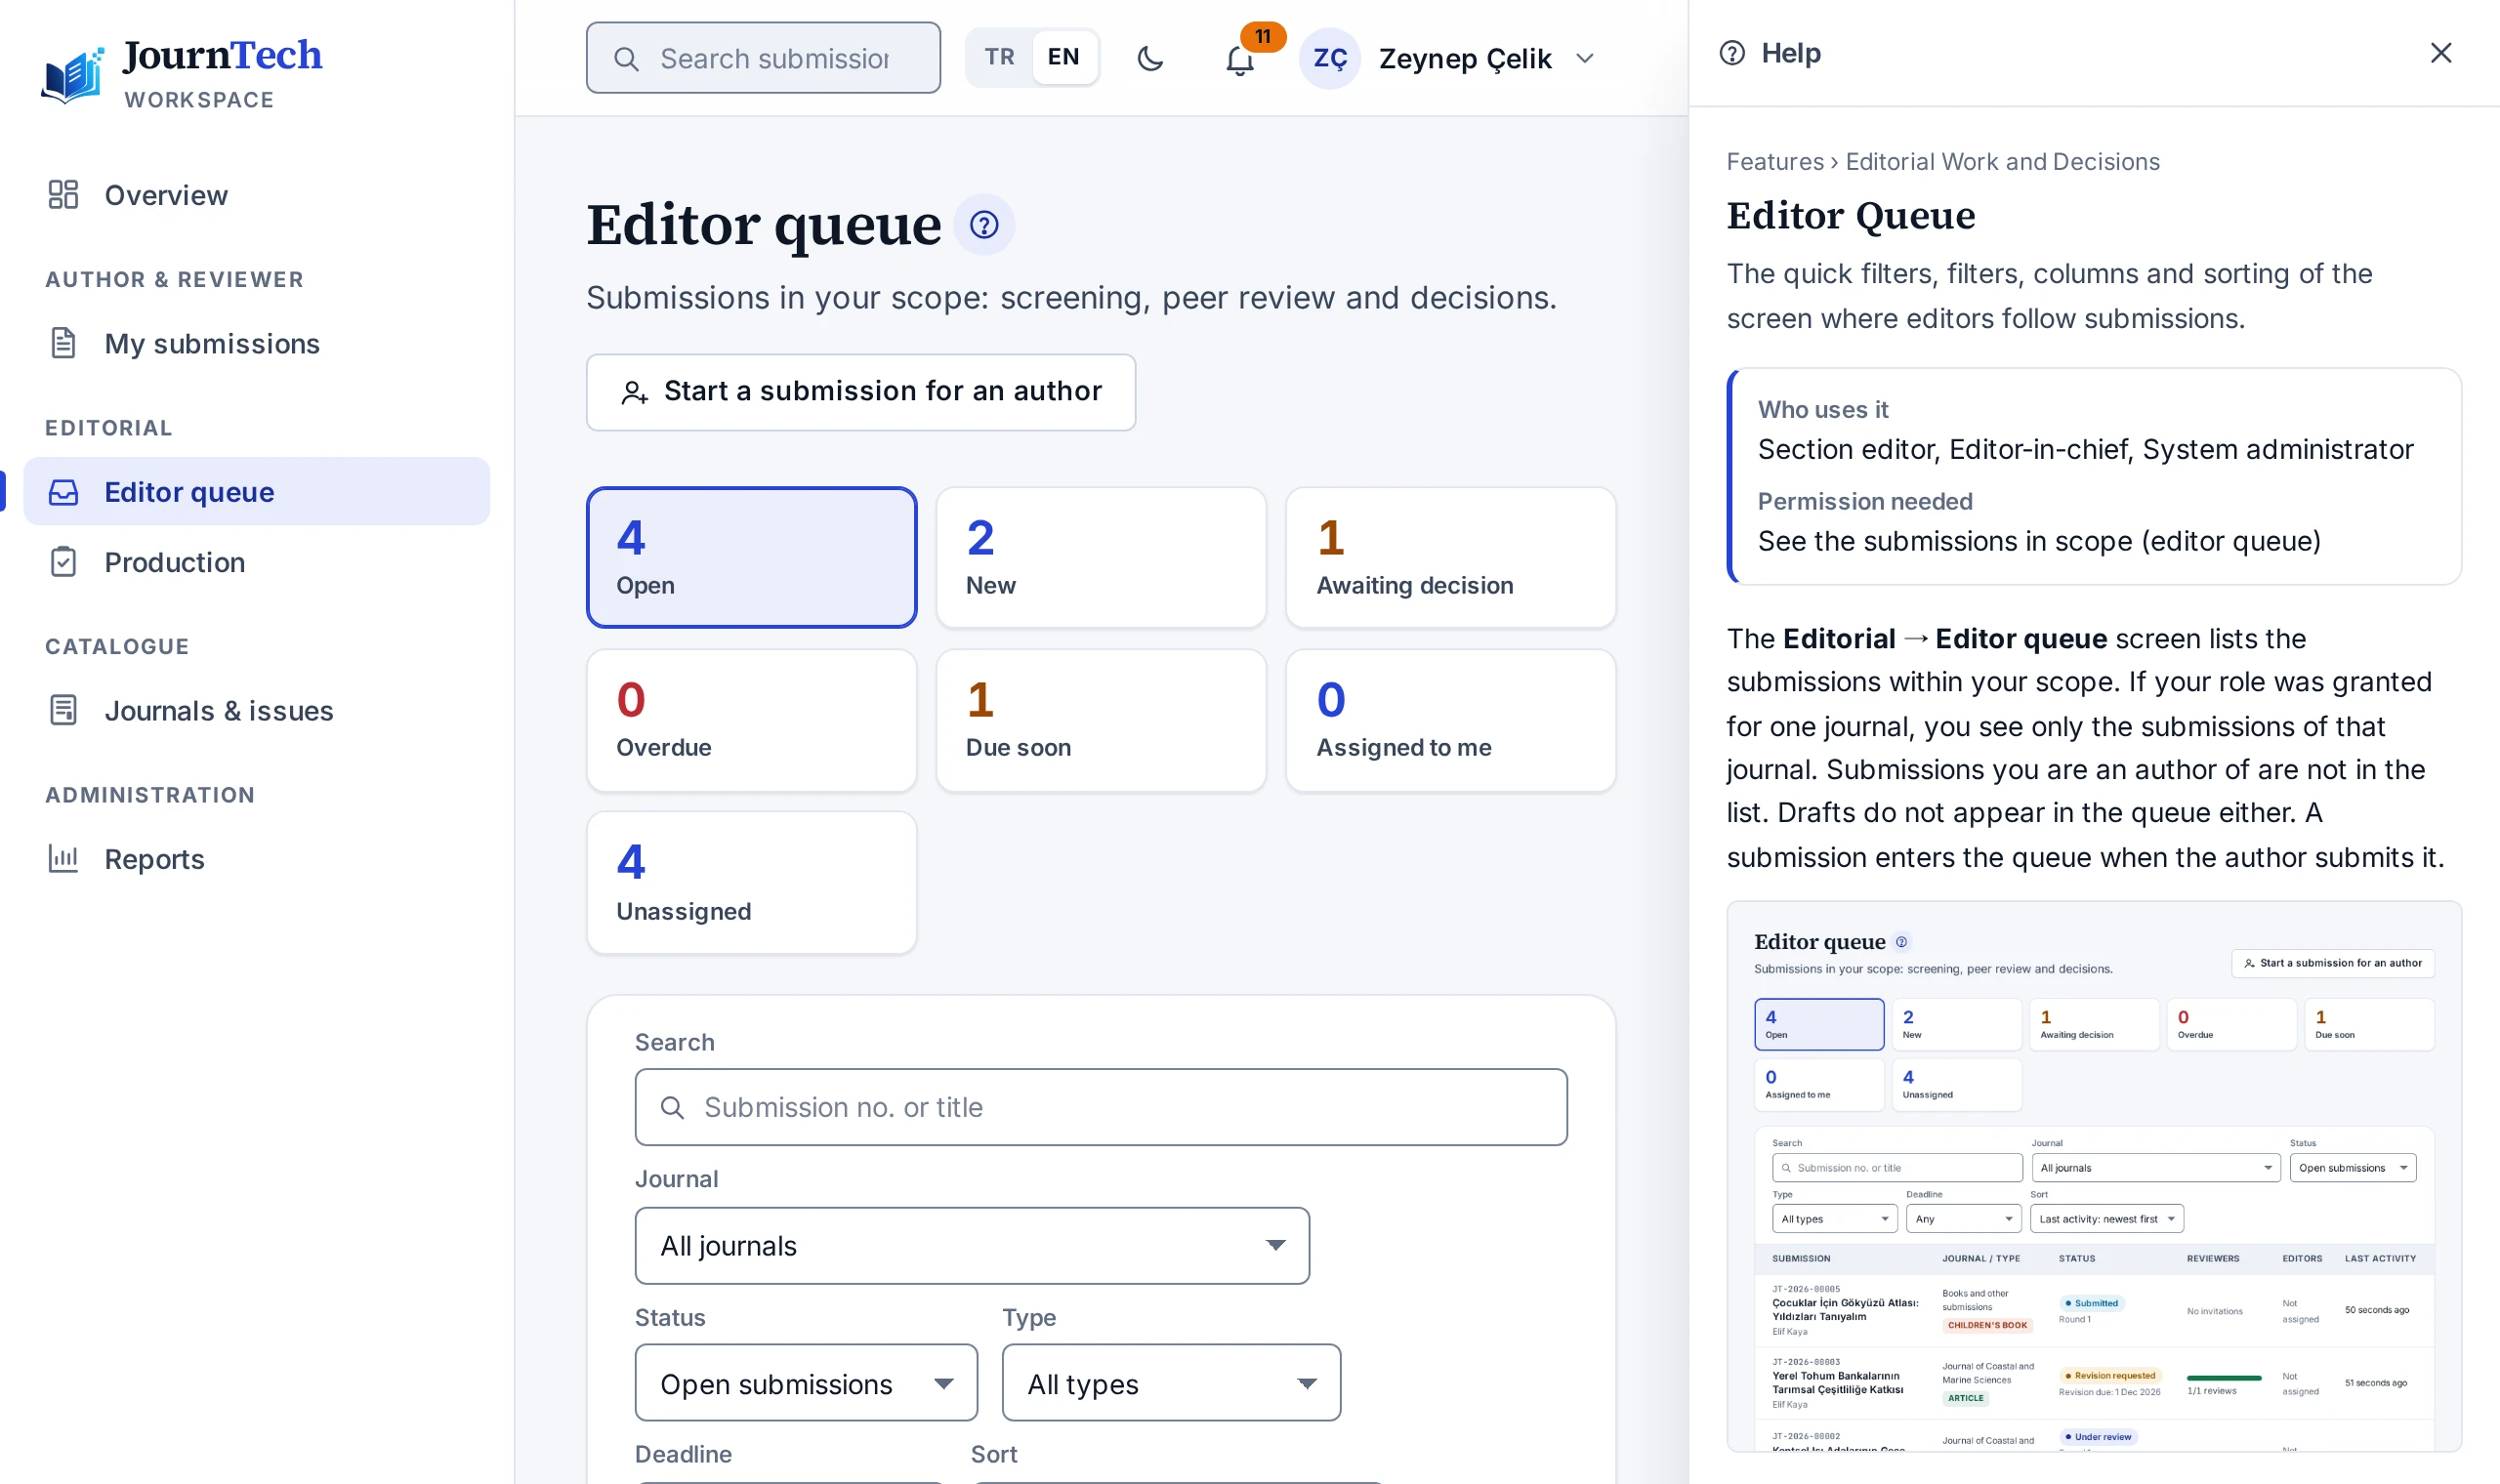
Help centre
The Help link in the user menu and the Help link in the footer of the public site open the help centre. In the help centre you find topics by your role, by feature or in the tree on the left.
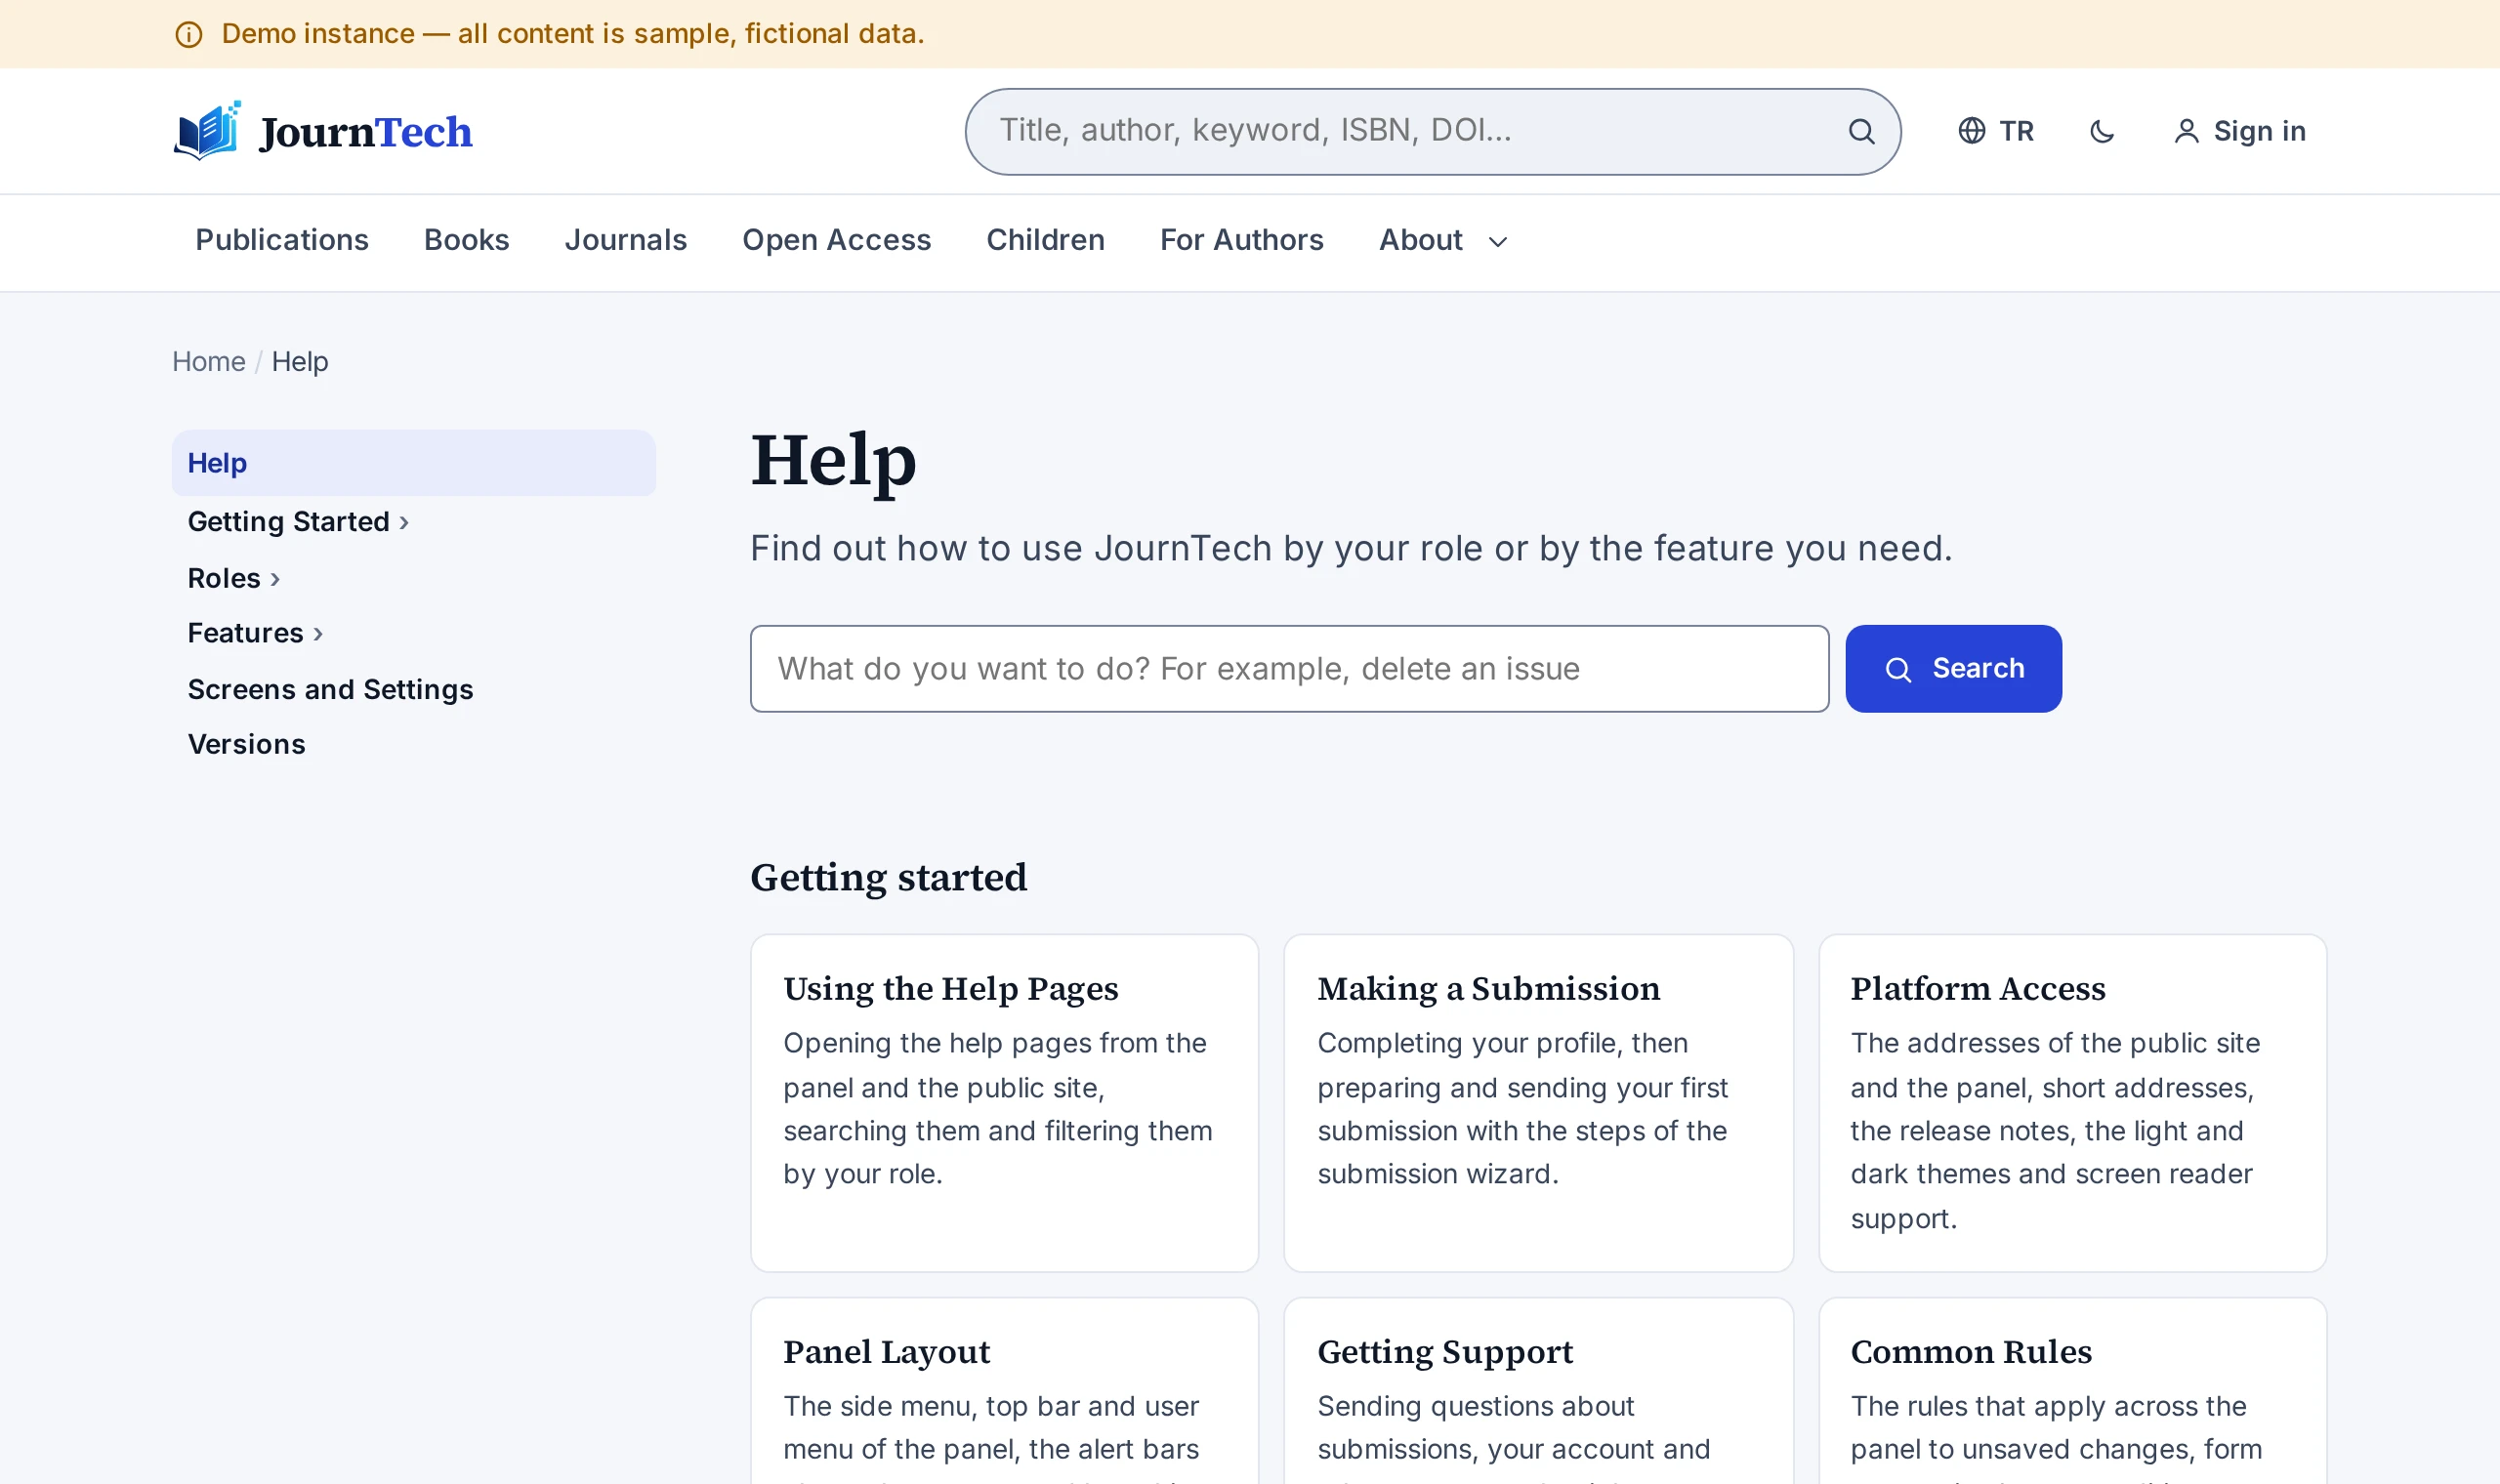
Searching the help
The help centre's search box ignores Turkish characters and upper and lower case, and the beginning of a word is enough. For example, typing "delete issue" finds the topic "Deleting a Journal Issue". You can narrow the results by role, feature and topic type. The search box in the panel's top bar also shows help topics under a separate heading. This box appears for all roles other than Registered researcher and Reviewer and is described in Panel Search.
The help pages do not appear in search engines. The system administrator can open the help to signed-in users only. In that case a visitor who opens a help page is taken to the sign-in page and returns to the same page after signing in.
Getting started
Making a Submission
Completing your profile, then preparing and sending your first submission with the steps of the submission wizard.
The submission wizard takes you from the type of work to sending it in seven steps and saves your draft at every step. Types other than articles have no journal step, and your submission goes to the publisher's editors.
Before you start
On the My profile → Profile tab, enter your full name, academic title, ORCID iD and institution, and save them. The wizard adds you as the first author and the corresponding author with these details. If your e-mail address is not verified, the submission screens do not open.
The journals' open calls for papers are listed on the Calls page of the public site. The details are in Finding Calls for Papers.
Choosing the type and journal
- On the Author & reviewer → My submissions screen, press New submission. The Submit your work button on the public site also opens the wizard.
- In the Type step, select the type: Article, Book, Book chapter, Proceedings paper, Thesis or Children's book. Then fill in the Main language of the work field.
- If you are submitting an article, select the journal in the Journal step and read the Author guidelines section. Only journals that accept submissions through JournTech appear in the list.
- Press Create the draft and continue. From then on, your changes are saved automatically.
If you want to take a break, press Save and exit. You continue your draft with the Continue button in the My submissions list. You can have at most 20 unfinished drafts at a time.
Metadata, authors and declarations
- In the Metadata step, enter the title, the abstract and the keywords. The abstract is required for every type, can be at most 5000 characters long and must not contain author names or institutions. Keywords are also required for an article. You can enter at most 20 keywords. Type each one and press Enter. The fields in the Type-specific details section depend on the type. The details in the other language are optional.
- In the Authors step, add the authors with Add author in the order in which they will appear in the publication. Mark one author as Corresponding author. The corresponding author's e-mail address is required. For each author you can also add an ORCID iD, an institution and Contributor roles (CRediT). A submission can have at most 50 authors.
- In the Declarations step, read each declaration, tick I have read and accept this and answer the questions. If ethics approval is required, enter the name of the committee and the approval number. You upload the approval document in the Files step.
The declarations you confirm in the Declarations step are:
- Ethics approval
- Conflict of interest
- Use of AI
- Copyright and permissions
- Originality
- Author approval and personal data
Uploading files
In the Files step you upload PDF, DOCX or ODT files. An anonymous manuscript is required for every submission.
| File | Required | Who sees it |
|---|---|---|
| Anonymous manuscript | Yes | Editors and reviewers |
| Title page | No | Editors only |
| Cover letter | No | Editors only |
| Declaration document | If ethics approval is required | Editors only |
| Supplementary file | No | Editors, and reviewers too if Visible to reviewers (anonymous supplement) is ticked |
Before you upload the anonymous manuscript, check the following:
- The title page and the author details are not in the text.
- Acknowledgements and funding details have been moved to the title page.
- Self-citations that identify you are masked, for example "Author, 2024".
- Your name does not appear in the file name.
Author details in the file properties are removed automatically during the upload. So are the names of whoever wrote the comments and tracked changes, and the Exif data of pictures. If you see the warning "Author metadata could not be removed" next to a file, export the file again and upload it.
After the virus scan, the text of anonymous files is searched for the authors' names, e-mail addresses and ORCID iDs. If one of them is found, the warning "The text of the file names an author" appears under the file with whose details appear on which page or in which part. Take these details out of the text and upload the file again. The warning does not stop you from sending the submission, but reviewers see the file as it is. A PDF of scanned pages has no readable text, so it cannot be searched. When you send the submission, the files are checked again against the final list of authors.
For the anonymous manuscript, the title page and the cover letter, a newly uploaded file replaces the previous one, and the old file is kept in the history.
Every file goes through a virus scan, and the submission cannot be sent before the scan has finished.
Checking and submitting
- The Review & submit step lists what is missing, step by step. The Fix button next to each step takes you to that step.
- When nothing is missing, press Submit and confirm.
If the text of an anonymous file names an author, this step also shows the warning "An anonymous file names an author". It gives the file's name and the people found. The warning does not stop you from sending the submission.
The moment you submit, your submission gets a number (for example JT-2026-00012) and a timestamp. The metadata, authors, declarations and files are locked. The editors are notified, and you receive a "Submission received" e-mail.
After submitting
You follow the status of your submission in the My submissions list. The details are in Tracking a Submission. You write to the editors on the submission's Messages tab. If you notice a mistake after submitting, write to the editor on this tab too. You can change the details and the files only when the editor asks for missing documents or during a revision.
An editor who has received your documents can open a draft on your behalf. How you send that draft is described in Submitting a Draft Started on Your Behalf.
Screens and settings
Platform Access
The addresses of the public site and the panel, short addresses, the release notes, the light and dark themes and screen reader support.
JournTech has two parts. The public site shows the catalogue, the open-access files and the institutional pages to everyone. The panel is where all work is done after you sign in.
Addresses
| Address | What it opens |
|---|---|
/ |
The Turkish home page of the public site |
/en |
The English version of the public site |
/panel |
The panel |
An installation can give the home page an address of its own (e.g. /demo, in English /en/demo). / and /en
then lead to it. The institution can also send these two addresses to another site on its web server.
The Sign in link at the top of the public site also takes you to the panel. Once you have signed in, this link is called My account.
File addresses (/dosya/…) have no language of their own. If a file cannot be opened, the error page appears in the
language of the page you came from. If you came from another site, the page is in your browser's language.
Short addresses
Add one of these shortcuts to the public site's address to open a panel screen directly:
| Short address | Screen it opens |
|---|---|
/en/login |
The sign-in screen |
/en/register |
The registration form |
/en/forgot-password |
Asking for a password reset link |
/en/profile |
My profile |
/en/my-submissions |
My submissions |
/en/submit |
The submission wizard |
/en/saved |
Saved publications |
The Turkish short addresses (/giris, /kayit, /sifremi-unuttum, /profil, /basvurularim, /basvuru/yeni and
/kaydettiklerim) open the same screens.
If you open a panel screen without signing in, the panel first shows the sign-in screen. After you sign in, you return to the screen you wanted to open.
If the panel cannot reach the server while it opens, or the server answers with an error, it does not go to the sign-in screen and does not sign you out. The screen shows "Something went wrong", the cause and the Try again button. Press the button once your connection or the server is back. The panel then opens the screen you wanted.
Release notes
The Release notes link (/en/release-notes) in the footer of the public site lists what is new in each version.
You find which help topics changed in the Versions section.
Light and dark themes
The moon icon at the top of the public site and the panel switches to the dark theme. In the dark theme a sun icon appears in the same place and switches back to the light theme. The button also works without signing in.
Your choice is remembered in this browser and is shared by the public site and the panel. Until you make a choice, the theme follows the setting of your computer or phone.
Keyboard
The panel can also be used with the keyboard alone. The first time you press Tab on a page, the Skip to content link appears. It skips the menu and moves to the content of the page. The arrow keys, Home and End move between tabs. When a dialog opens, the focus moves into it. Esc closes the dialog, and the focus returns to the button that opened it.
Screen readers
On the public site's publication lists and search, choosing a filter or a sort order does not change the list at once. When your choices are done, press Apply filters or Sort. The page reloads after these buttons and when you change the view or the page. The focus moves to the number of results, and the screen reader reads out the new number of results.
In the panel, when a list changes page or a filter returns no results, the number of records or the empty-result message is announced.
The fields of the panel tell the screen reader whether they are required or optional, and read out their errors. File upload areas are read with the name of the file they take (such as “Anonymous manuscript”). The sign-in, registration and password screens also declare the interface language you chose, so the screen reader reads them with the rules of that language.
Screens and settings
Panel Layout
The side menu, top bar and user menu of the panel, the alert bars above the screens and how this help writes menu paths.
The panel consists of a menu on the left, a toolbar at the top and the screen you work on in the middle. The menu shows only the sections you have permission for. When the panel opens, the Overview screen summarises the work waiting for you.
Side menu
The Overview screen is at the very top of the menu. The other screens are grouped under these headings:
| Heading | Screens in it |
|---|---|
| Author & reviewer | My submissions, and Reviewing if you are in the reviewer pool or have a reviewer invitation |
| Editorial | Editor queue, Production, ISBN & legal deposit |
| Catalogue | Publications, Data quality, DOAB readiness, Journals & issues, People & institutions, Categories, File library, Bulk import, Copyright and correction reports |
| Institutional content | Pages & policies, News & events, Menus, Banners, Institutional documents, Newsletter subscribers, Contact messages |
| Administration | Reports, Users & roles, E-mail templates, Audit log, Data requests (KVKK), Site settings, System health |
The Back to the public site link at the bottom of the menu opens the public site. On narrow screens you open the menu with the menu button at the left of the top bar.
Top bar
The top bar has these tools:
- The panel search box searches by submission number, title, publication or person name. The box appears for all roles other than Registered researcher and Reviewer. The details are in Panel Search.
- The TR and EN buttons change the language of the interface.
- The moon or sun icon switches between the dark and the light theme.
- The bell opens your latest notifications. The number of unread notifications appears on the bell.
- The button with your name opens the user menu.
User menu
| Link | What it does |
|---|---|
| My profile | Opens your identity details, your preferences and your requests under KVKK (Türkiye's Personal Data Protection Law). |
| Security | Opens the tab for your password, two-factor authentication and active sessions. |
| Notifications | Lists all your notifications. |
| Saved publications | Lists the publications you saved on the public site. |
| Help | Opens the help centre. |
| Back to the public site | Opens the home page of the public site. |
| Sign out | Signs you out. |
Alert bars
A bar appears at the top of the screens when needed:
- If your e-mail address is not verified, the bar asks you to open the verification link. The Resend the link button sends a new link.
- If your role requires two-factor authentication, the Turn it on button opens the tab where you set it up.
- If a new internal announcement for your roles has been published, the Read button opens it on the Overview screen. The cross button closes the bar, and a bar you have closed does not appear again in this browser.
Menu paths in this help
This help writes menu paths with an arrow. For example, the path Editorial → Editor queue means that you open the Editor queue screen under the Editorial heading of the side menu.
The help button next to the title of each screen opens that screen's help page. The details are in Using the Help Pages.
Screens and settings
Overview
The announcements, the work waiting for you in your roles, the latest notifications and the shortcuts on the screen that opens with the panel.
The Overview screen opens when you enter the panel and summarises the work waiting for you, based on your roles. Each box shows a number, and pressing most boxes opens the related list.
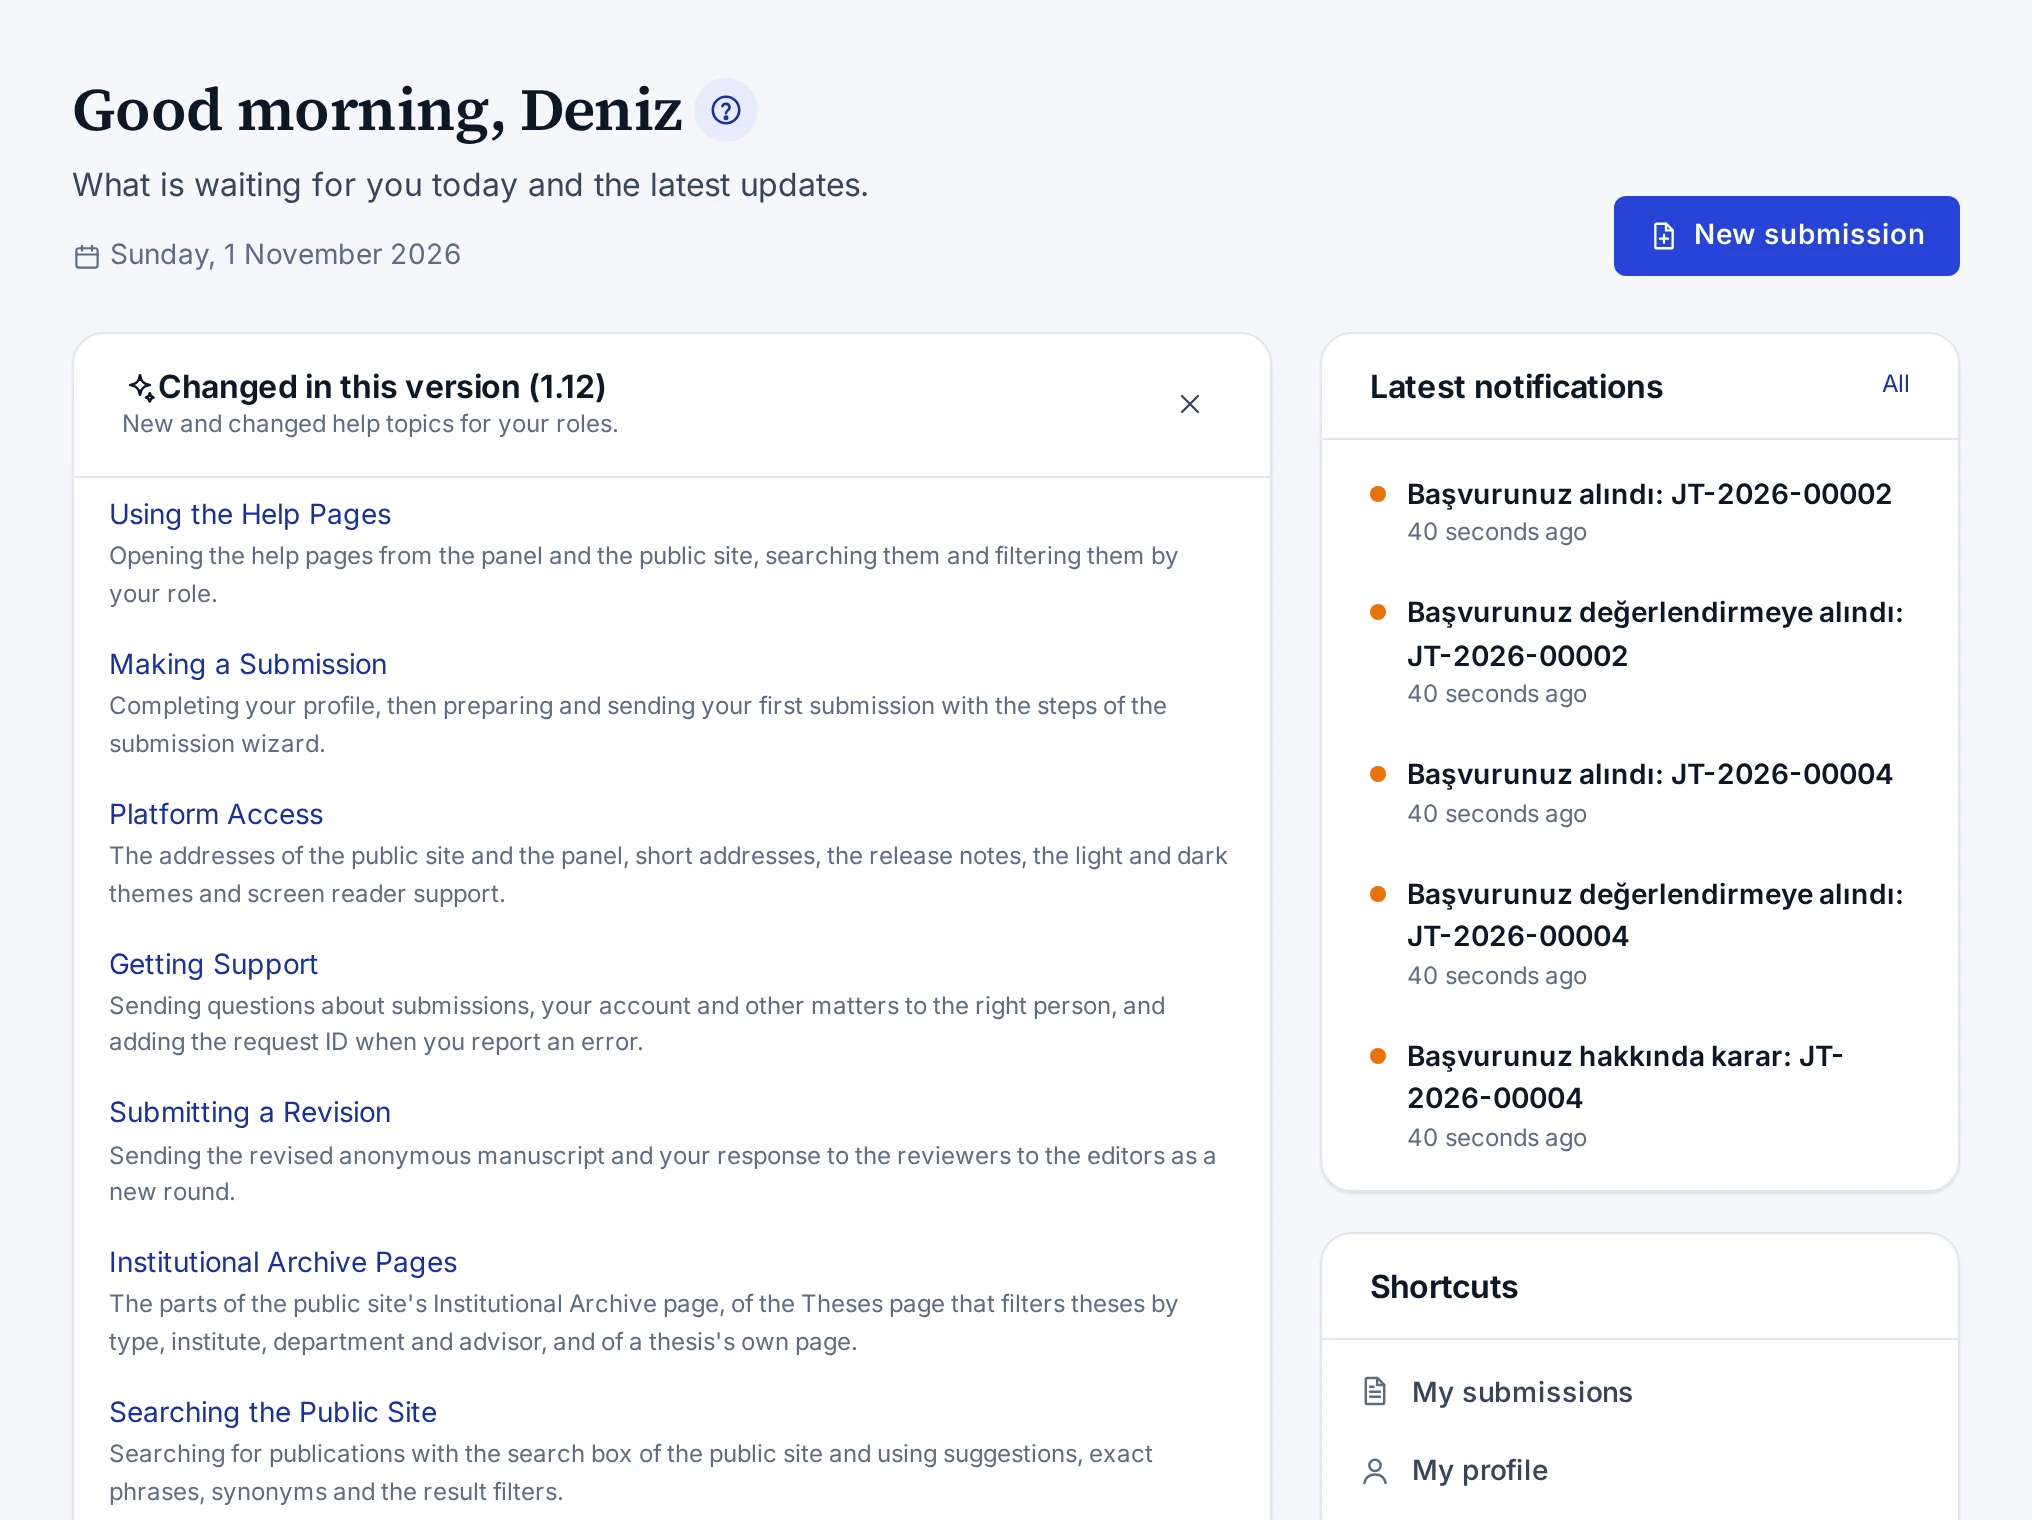
Top of the screen
The header shows a greeting for the time of day, today's date and your roles other than Registered researcher. If new submissions are open, the New submission button opens the submission wizard.
Changed in this version
When the installation moves to a new version, the Changed in this version card lists the new and changed help topics that concern your roles. Pressing a topic opens it in the help panel. Once you close the card with the cross button, it does not appear again in this browser for the same version.
Announcements
Internal announcements for your roles are listed under the Announcements heading. The latest three announcements are shown, and the All announcements link opens all of them. You read the full text of a long announcement with the Show more link.
The newest announcement published in the last 30 days also appears as a bar at the top of the screens. The Read button in the bar opens the announcement on this screen.
Pending work
Each section appears only if you have the related role or work. The All link at the top of a section opens that section's screen. A box you can press opens the related list with that box's filter. For example, the Overdue box shows only the overdue submissions in the editor queue.
| Section | Boxes |
|---|---|
| Editorial | Awaiting screening, Awaiting decision, No editor assigned, Overdue, Assigned to me |
| Production | Jobs in progress, Ready to release, My open tasks, Overdue tasks |
| Reviewing | Invitations to answer, Reviews in progress, Overdue reviews, Completed |
| My submissions | The number of your submissions, Waiting for you, and the counts of up to three statuses |
| ISBN & legal deposit | Obligations that are overdue or due within 14 days |
| Catalogue | Draft publications, Awaiting publication, Published works |
| Institutional content | Draft pages, Pages in review |
| Administration | System health, Failed background jobs, Pending e-mails, Open data requests, Unverified accounts |
The My submissions section appears once your e-mail address is verified. The Waiting for you box counts your submissions that wait for a revision or for missing documents. If you have no submissions yet and new submissions are open, the section has a button that opens the wizard.
Latest notifications and shortcuts
The Latest notifications card on the right shows your last five notifications. The card's All link opens the Notifications screen.
The Shortcuts card has the links My submissions, My profile, Security and Back to the public site. If you have permission to see reports, a Reports link is added.
How-to
Getting Support
Sending questions about submissions, your account and other matters to the right person, and adding the request ID when you report an error.
Whom you contact depends on what your question is about. You send questions about submissions to the editors. For account problems you contact your institution's system administrator. For other questions you use the contact form of the public site.
Questions about your submission
Write every question about your submission to the editors on the submission's Messages tab. The steps are in Messaging the Editors.
Account, role and access problems
For problems with your account, your roles or access to a screen, contact your institution's system administrator. If a screen says "You do not have access to this page", you do not have the permission that screen requires. Only the system administrator grants roles.
General questions, copyright and corrections
- On the public site, open the Contact page (
/en/contact). - From the Type of message list, select General question, Copyright report or Correction request.
- If you are writing about a publication, enter its link in the Related publication (link or slug) field.
- Enter your name, your e-mail address, the subject and your message.
- Tick the consent box about the privacy notice and press Send.
When you send the form, the page shows the outcome above the form and the focus moves to that message. If a field is missing or not valid, the message lists its name. Click the name to go to the field.
Users with the Catalogue editor role settle copyright reports and correction requests. Users with the Content editor role handle the other messages. If the system administrator has turned the form off, a note appears on the page in place of the form.
Request ID
If an error screen shows a Request ID, add this ID to your report. With it, the system administrator finds the problem in the logs quickly.
Concept
Common Rules
The rules that apply across the panel to unsaved changes, form errors, simultaneous editing, confirmation dialogs, reasons and file uploads.
Every screen of the panel follows the same rules for saving, errors, confirmations and file uploads. These rules prevent data loss through carelessness and leave a trace of important actions in the audit log.
Unsaved changes
If you try to leave a page while a form has changes you have not saved, the panel warns you. The warning appears when you click a link or the browser's back button, search from the top bar, open a notification or sign out. When several forms on the screen have unsaved changes, the panel asks once. The Stay on the page button keeps you on the form. The Discard changes button discards the changes and leaves the page.
On the journal management, site settings, profile and editor's submission screens, moving to another tab does not discard unsaved changes. The changes stay until you save them or leave the screen.
The submission wizard saves your draft automatically. The draft is also saved when you move from the wizard to another screen.
Form errors
When you save a form that has fields to correct, an error notice appears at the bottom right. The notice lists the fields to correct by name. The page scrolls to the first field with an error, and the red text below the field says what is missing or wrong. In a form inside a dialog, the error appears inside the dialog.
Error messages appear in the language of the panel. An error the panel does not recognise is shown with the message "The action could not be completed" and an error code. When you report such an error, include the code. If a help topic explains the error, the notice shows a What can I do link that opens the topic in the help panel.
Notices close by themselves after a while. While the mouse pointer or the keyboard focus is on a notice, none of them closes. A notice with a What can I do link stays on the screen until you close it.
Simultaneous editing
If someone else changed the record while you were editing it, the save stops and the Someone else changed this record dialog opens. This way two people do not overwrite each other's changes. What to do is described in The “Someone else changed this record” warning.
Confirmation dialogs and reasons
For actions that cannot be undone, a confirmation dialog opens and states the result of the action. Issuing a decision, retracting a record and anonymising an account are examples of these actions. Most of them ask for a reason and are written to the audit log.
When the dialog closes, the keyboard focus returns to the button that opened it. If the action removed that button as well, the focus moves to the first field or button in the same section. Selecting text in a field of the dialog and releasing the mouse outside the dialog does not close it.
Unpublishing, archiving or deleting catalogue records and institutional content requires a reason. Withdrawing a submission and cancelling a reviewer invitation also cannot be done without a reason. A reason must be at least 5 characters long, and the system checks this again when it saves.
File uploads
Every uploaded file goes through a virus scan. While the scan runs, the file's status is Scanning, and nobody can open the file before the scan has finished. A file that fails the scan is not opened to anyone. Remove such a file and upload it again.
The allowed file types and the size limit are shown below the upload area. In a default installation the size limit is 100 MB.
Troubleshooting
The “Someone else changed this record” warning
Moving to the latest version without losing your changes when the “Someone else changed this record” dialog opens as you save.
This dialog means that another user saved the same record while you were editing it. The system stops your save so that two people do not overwrite each other's changes. Your unsaved changes are still on the page.
- Copy the long texts you want to keep and paste them somewhere else.
- Press Reload. The page shows the latest version of the record.
- Read the latest version and enter your changes again if needed.
- Press Save.
The Stay on the page button closes the dialog and leaves you on the same page. You can then copy your changes, but you cannot save them without reloading the page.
Feature
Account and Security
Creating an account, passwords, two-factor authentication, sessions, your profile and notifications.
Everyone who creates an account enters the panel with the Registered researcher role. You can create your account yourself or activate it with an invitation sent by an administrator. If the system administrator has turned it on, you can also sign in with ORCID or your institution account instead of a password.
You manage your profile, your password, two-factor authentication and your active sessions on the Profile and Security tabs of the My profile page. Your requests under KVKK (Türkiye's Personal Data Protection Law) are on the Privacy & KVKK tab.
Notifications about submissions, reviewing and the publishing process appear at the bell in the top bar and on the Notifications page. System e-mails carry no submission, report or message content and only link to the panel. The publications you saved on the public site are listed on the Saved publications page in the user menu.
How-to
Creating an Account
Creating your own account from the public site, verifying your e-mail address, and what to do while registration is closed.
Every registered user can submit works for publication and join the reviewer pool. You create your account at the
/en/register address of the public site or with the Register link on the sign-in screen.
- Enter your name in the Full name field. This name appears on submissions and in correspondence.
- Fill in the E-mail address and Password fields. The password must be at least 10 characters long, must not be easy to guess and must not contain your e-mail address.
- Read the privacy notice under KVKK (Türkiye's Personal Data Protection Law) and tick the consent box. If you want to receive the newsletter, tick the box below it as well.
- Press Create account.
- Open the verification link sent to your e-mail. The link is valid for 48 hours.
When you open the link, the message "Your e-mail address is verified" appears and your account becomes active. Everyone who creates an account enters the panel with the Registered researcher role. The system administrator grants the other roles.
Before verification
You can sign in and complete your profile before you verify your address. However, you cannot make a submission with an unverified account. The Resend the link button in the bar at the top of the panel sends a new link. If the link does not arrive, see The verification or password e-mail did not arrive.
If this installation does not send e-mail, the screen after registration says so. In that case an administrator verifies your account.
If registration is closed
If the system administrator has closed the registration of new accounts, the message "Registration is closed at the moment. Try again later or contact the publisher." appears in place of the form. In that case an administrator creates the account and sends you an invitation. How you accept the invitation is described in Accepting an Account Invitation.
How-to
Accepting an Account Invitation
Activating the account that a system administrator or a reviewer invitation created for you by setting a password with the link in the e-mail.
When a system administrator creates an account for you, or an editor invites you as a reviewer while you have no account, an invitation link arrives in your e-mail. The link works once and is valid for 14 days by default.
- Open the link in the e-mail. The Accept your invitation screen opens.
- Enter a password in the New password field. The password must be at least 10 characters long, must not be easy to guess and must not contain your e-mail address.
- Enter the same password in the Password (again) field.
- Press Set password and continue.
- After the message "Your account is ready", press Sign in and sign in with your new password.
The invitation link also verifies your e-mail address. You do not need to wait for a separate verification link.
Accepting the invitation with ORCID
In an installation where sign-in with ORCID is turned on, the screen also shows the Accept with ORCID button. This way you do not need to set a password. The button works only for accounts where the administrator entered your ORCID iD in the invitation. The details are in Signing in with ORCID.
If the link does not open or has expired, see The link in the e-mail is invalid or has expired.
How-to
Signing in with a Password
Signing in to the panel with your e-mail address and password, the Remember me option, session length, password rules and locking after failed attempts.
You sign in to the panel with your e-mail address and your password. The Sign in link on the public site or the
/en/login address opens the sign-in screen.
- Fill in the E-mail address and Password fields.
- If you are on your own device and want to stay signed in, tick Remember me.
- Press Sign in.
- If two-factor authentication is on for your account, enter the 6-digit code from your app in the Verification code field and press Verify.
When you have finished, sign out with the Sign out link in the user menu. If the system administrator has turned them on, you can also sign in with ORCID or with your institution account.
Remember me and session length
If Remember me is not ticked, your session ends when you close the browser or after 12 hours at the latest. If you tick it, the session stays open on this device even when you close the browser. In a default installation this period is 14 days, and the session still ends if you do nothing for 3 days. Your choice also applies when you sign in with ORCID or an institution account. Do not tick this box on shared computers.
When your session ends, the panel opens the sign-in screen, and the message "Your session has ended. Sign in again to continue." appears. When you sign in again, you return to the screen you were working on.
Password rules
Your password must be at least 10 characters long. It must not be easy to guess and must not contain your e-mail address. Every screen where you set a password lists these rules below the field.
Failed sign-ins
In a default installation, the account is locked for 15 minutes after 5 failed attempts in a row, and you receive an e-mail. Wrong codes entered in two-factor authentication also count towards this number.
If you have forgotten your password, follow the steps in Resetting Your Password. If you cannot sign in, see I cannot sign in or my account is locked.
How-to
Resetting Your Password
Asking for a reset link on the sign-in screen when you have forgotten your password, and setting a new password.
If you have forgotten your password, you ask for a reset link on the sign-in screen. The link is valid for 60 minutes and works once.
- On the sign-in screen, press the Forgot your password? link. The
/en/forgot-passwordaddress opens the same screen. - Enter your account's e-mail address and press Send reset link.
- Open the link sent to your e-mail.
- Enter your new password in the New password field.
- Enter the same password in the Password (again) field.
- Press Change password.
- Press Sign in and sign in with your new password.
When your password changes, your sessions on all devices are signed out, and you receive a notification. If you have not verified your e-mail address yet, the reset link verifies it too.
Link rules
- The screen shows the same message even if the address is not registered in the system. This way nobody outside can tell which addresses are registered.
- When you ask for a new link, the previous link becomes invalid.
- Reset and verification e-mails are sent to an address at most three times an hour.
- In an installation where e-mail sending is turned off, the screen says so. In that case the system administrator creates a one-time reset link for you.
If the link does not open, see The link in the e-mail is invalid or has expired.
How-to
Changing Your Password
Changing a password you know on the Security tab of the My profile page and signing out your other sessions.
You change your password on the Password card of the My profile → Security tab.
- Open Security from the user menu.
- Enter your current password in the Current password field.
- Enter your new password in the New password field.
- Enter the same password in the Password (again) field.
- Press Change password.
When your password changes, all your sessions except this one are signed out, and you receive a notification. The new password must follow the rules in Signing in with a Password.
If your account was created with an institution account, it has no password at all, and you cannot change a password with this card. To set a password, follow the steps in Resetting Your Password.
How-to
Using Two-Factor Authentication
Turning on two-factor authentication for your account, keeping the recovery codes, signing in with a code and turning it off.
While two-factor authentication is on, signing in asks for a 6-digit code from the authenticator app on your phone in addition to your password. Apps such as Google Authenticator, Microsoft Authenticator, Aegis or 1Password generate this code. Your e-mail address must be verified before you can set it up.
Turning it on
- Open Security from the user menu.
- On the Two-factor authentication (TOTP) card, press Start set-up.
- Scan the QR code on the screen with the app on your phone. If you cannot scan the code, enter the key in the Set-up key field into the app by hand.
- Enter the 6-digit code that the app shows in the Verification code field.
- Press Verify and turn on.
- Keep the eight recovery codes shown on the screen with the Copy codes or Download as a text file button.
- Press I have saved the codes.
The recovery codes are shown only once, and each of them works once. Keep the codes somewhere safe, such as a password manager.
Signing in with a code
After you enter your password, the Two-factor authentication screen opens. Enter the current code from your app and press Verify. If you cannot access your phone, press the I can't use my phone — use a recovery code link and enter one of your recovery codes. Signing in with ORCID or an institution account also asks for the code.
Turning it off
- On the Two-factor authentication (TOTP) card, press Turn off two-factor authentication.
- In the dialog, enter your password and the current code from your app.
- Press Turn off two-factor authentication in the dialog.
Once you turn it off, your account is protected by your password only.
Roles that require it
If the system administrator has turned on the Mandatory two-factor authentication for privileged roles flag, two-factor authentication is mandatory for these roles:
- System administrator
- Editor-in-chief
- Section editor
- Catalogue editor
- Content editor
- Production coordinator
- Publishing board
If you have one of these roles and have not set it up, an alert bar appears at the top of the screen. The permissions of these roles do not work until the set-up is done. The Turn it on button in the bar opens the tab where you set it up.
If you have lost your phone and your recovery codes, see I cannot access my authenticator app.
How-to
Signing in with ORCID
Linking your account to your ORCID iD, signing in with ORCID instead of a password and removing the link.
If the system administrator has turned on sign-in with ORCID, the sign-in screen shows the Sign in with ORCID button. This option is open only to people whose ORCID iD has been set up for signing in to their account. You cannot create a new account with ORCID.
Your ORCID iD is set up on your account in one of two ways. The system administrator may have set it up, or you link your account by signing in at ORCID. The number you enter in the ORCID iD field of your profile does not enable sign-in on its own.
Linking your account to ORCID
- Sign in with your e-mail address and your password.
- Open Security from the user menu.
- On the Sign in with ORCID card, press Link my ORCID account.
- On the ORCID page that opens, sign in with your ORCID account.
When you return to the panel, the message "Your ORCID iD is linked to your account." appears and you receive an e-mail. The ORCID iD in your profile is marked as verified.
Signing in with ORCID
- On the sign-in screen, press Sign in with ORCID.
- Sign in on the ORCID page.
- If two-factor authentication is on for your account, enter the code from your app.
Your Remember me choice applies to this sign-in too. The first sign-in to an account with ORCID is reported by e-mail.
Removing the link
Press Stop signing in with ORCID on the Sign in with ORCID card and confirm. From then on, nobody can sign in to your account with ORCID. Your ORCID iD stays in your profile as information.
When sign-in does not complete
- If your ORCID iD is not set up for signing in to any account, the sign-in screen says so. If you have an account, sign in with your e-mail address and password and link your ORCID iD, or contact your system administrator.
- An ORCID iD can be open for signing in on one account only. If the iD is linked to another account, the linking does not complete.
- Locked or disabled accounts cannot sign in with ORCID either.
How-to
Signing in with Your Institution Account
Signing in to the panel with the user account of your institution, for example your Microsoft or Google account.
If the system administrator has turned on institutional sign-in, the sign-in screen shows a button for signing in with an institution account. The administrator sets the button's name. If no name was given, the button says Sign in with your institution account.
- On the sign-in screen, press the button for signing in with an institution account.
- On your institution's sign-in page, sign in with your user account. This page can be, for example, a Microsoft or Google page or your institution's own sign-in page.
- If two-factor authentication is on for your account, enter the code from your app.
The system signs you in to the JournTech account whose e-mail address is the same as that of your institution account. Your Remember me choice applies to this sign-in too. The first sign-in to an existing account with an institution account is reported by e-mail.
If you do not have an account
If the administrator has turned this option on, an account is created automatically for your institutional address, and you start with the Registered researcher role. If this option is off, first register with the steps in Creating an Account.
When sign-in does not complete
- If your institution account's e-mail address is not in one of the domains open to institutional sign-in, you cannot sign in.
- If your institution did not send your e-mail address or did not report that the address is verified, you cannot sign in.
- If the account has already been linked to another institution account, the sign-in is refused. In that case contact your system administrator.
- Locked or disabled accounts cannot sign in with an institution account either.
How-to
Managing Active Sessions
Seeing the devices that are signed in to your account and signing out the sessions you do not recognise or no longer use.
The devices signed in to your account are listed in the Active sessions section of the My profile → Security tab. Sign out a session you do not recognise straight away.
- Open Security from the user menu.
- Review the sessions in the Active sessions section.
- Press Sign out on the row of the session you want to end.
- Confirm with Sign out in the dialog.
Each row shows the browser and the operating system, the Last active and Started times and, if available, the Network details. The session you are using now has the This device label and cannot be signed out from the list.
If you have more than one session, Sign out all other sessions signs out all sessions except the one on this device at once. If you saw a session you do not recognise, change your password as well. The steps are in Changing Your Password.
How-to
Changing Your E-mail Address
Changing your account's e-mail address with a confirmation link sent to the new address, and withdrawing a pending request.
You change your e-mail address on the My profile → Profile tab. A confirmation link goes to the new address, and your current address stays valid until you open the link.
- On the My profile page, press the Change link next to the E-mail address field.
- Enter your new address in the New e-mail address field.
- Enter your password in the Your current password field.
- Press Send confirmation link.
- Open the link sent to your new address. The link is valid for 48 hours and works once.
When you open the link, the message "Your new e-mail address is confirmed" appears. From then on you sign in with your new address. Your old address is also told about the change.
Pending request
While the confirmation is pending, the text below the field says that the new address is waiting for confirmation. If you change your mind, press the Withdraw the request link in the same place.
When a change is requested, your current address is informed too. If you did not make this request, change your password.
Link rules
- If the new address is used by another account, the change is not made.
- When the change is complete, the links sent to the old address and not used yet become invalid.
- Confirmation e-mails are sent to an address at most three times an hour.
If the link does not open, see The link in the e-mail is invalid or has expired.
How-to
Managing Your Profile and Privacy
Updating your identity details and preferences on the My profile page, accepting the privacy notice and opening a personal data request.
You manage your profile and your personal data preferences on the My profile page. Your identity details are on the Profile tab. The tasks related to KVKK (Türkiye's Personal Data Protection Law) are done on the Privacy & KVKK tab.
Profile details
- Open My profile from the user menu.
- In the Identity section, enter your name, academic title, ORCID iD, institution and short bio.
- In the Preferences section, select the language in the Interface and e-mail language field and set your newsletter preference.
- Press Save.
Your identity details are used on submissions, reviewer invitations and correspondence. The submission wizard adds you as the first author with these details. The Interface and e-mail language choice sets the language of the panel and of the e-mails sent to you.
The number you enter in the ORCID iD field stays in your profile as information and does not enable sign-in. To sign in with ORCID, link your account with the steps in Signing in with ORCID. The steps for changing your e-mail address are in Changing Your E-mail Address. The Reviewer pool section is described in Joining the Reviewer Pool.
Accepting the privacy notice
The Privacy notice and consent card shows which version of the privacy notice you accepted and when. If the notice has been updated, a marker appears next to the name of the Privacy & KVKK tab and a warning appears on the card.
- Open the Privacy & KVKK tab.
- Read the current notice with the Read the privacy notice link.
- Press I have read the current notice and accept it.
Personal data requests
Under KVKK (Law No. 6698), you can ask for a copy, a correction or the deletion of your data.
- On the Privacy & KVKK tab, go to the Personal data requests card.
- From the Request type list, select A copy of my data, Correction of my data or Deletion of my account and data.
- Describe your request briefly in the Details field. For correction and deletion requests, the description must be at least 5 characters long.
- Press Send request.
Your request appears with its status in the My requests list. The data controller reviews requests with legal retention duties in mind and writes the outcome in the same list. If you already have a request of the same type in progress, you cannot open a new one.
If a deletion request is approved, your account is anonymised and you can no longer sign in. The authorship details in published works and the records that must be kept by law are retained.
How-to
Saving Publications
Adding publications from the public site to your own list with the Save to my list button, opening the list and removing publications from it.
If you have signed in, you can save publications from the public site to your own list. Only you can see the list.
Saving a publication
- While you are signed in on the public site, open a publication's page.
- Press Save to my list. The button's name changes to Saved.
- If you want to see your list, press the My saved publications link in the confirmation message or next to the button.
The Save to my list button appears only while you are signed in. Pressing Saved again removes the publication from your list.
Opening and editing the list
You reach your list with the Saved publications link in the panel's user menu or at the /en/saved address.
- To open a publication, press Open the publication on its row.
- To remove a publication from the list, press Remove from my list.
- If you removed a publication by mistake, press the Undo button that appears in the same place.
Records that have been unpublished are not shown in the list. If they are published again, they come back to the list. All parts of the screen are described in Saved Publications.
Screens and settings
My Profile
The tabs, cards and fields of the My profile page, which brings together your personal details, your security settings and your KVKK preferences.
The My profile page brings together your personal details, your security settings and your preferences under KVKK (Türkiye's Personal Data Protection Law) on three tabs. The My profile or Security link in the user menu opens the page.
Tabs
| Tab | Cards |
|---|---|
| Profile | Identity, Reviewer pool, Preferences |
| Security | Sign in with ORCID, Two-factor authentication (TOTP), Password, Active sessions |
| Privacy & KVKK | Privacy notice and consent, Personal data requests |
The Sign in with ORCID card appears only while sign-in with ORCID is turned on or your account is linked to ORCID.
A marker next to a tab's name shows that something is expected of you. The marker on the Security tab shows that two-factor authentication is mandatory for your role and has not been set up yet. The marker on the Privacy & KVKK tab shows that the privacy notice has been updated.
Identity details
| Field | Description |
|---|---|
| Full name | Required. It must be at least 2 characters long. |
| Academic title | For example Prof. Dr., Doç. Dr. (associate professor) or Arş. Gör. (research assistant) |
| ORCID iD | The 16-digit number. An iD that you linked by signing in at ORCID has the Verified label. |
| Institution | The name of the university, faculty or department |
| E-mail address | Read-only. The Change link next to it opens the dialog for changing it. |
| Short bio | Your fields of expertise and your work, at most 4000 characters |
The Preferences section has the language choice (Interface and e-mail language) and the Send me the newsletter box. The TR or EN button in the top bar changes your account's language too, and this list follows it. Saving the profile changes the language only if you picked another language in the list. The Save button at the bottom of the page saves the changes on the Profile tab. If you move to the Security or Privacy & KVKK tab without saving, the changes are not discarded. A data request you are writing on the Privacy & KVKK tab also stays when you switch tabs. If you try to leave the page without saving, the panel asks first.
Related tasks
Screens and settings
Notifications
Reading system notifications about submissions, reviewing and your account at the bell and on the Notifications screen, marking them as read, and how they relate to e-mails.
The Notifications screen lists the system notifications about your submissions, your reviewing work and your account. The Notifications link in the user menu or the All notifications link below the bell opens the screen.
Bell
The bell in the top bar opens your last six notifications. The number of unread notifications appears on the bell. Pressing a notification marks it as read and opens the related page. The Mark all as read link marks all notifications as read.
Parts of the screen
| Part | What it does |
|---|---|
| All and Unread tabs | Show all notifications or only the unread ones. |
| The subject of the notification | Pressing it opens the text of the notification and marks it as read. |
| Open the related page | Opens the page the notification is about. |
| Mark as read | Marks the notification as read. |
| Mark all as read | Sits at the top of the screen and marks all notifications as read. |
Unread notifications are marked in the list. Each page holds 20 notifications.
Notifications and e-mails
Notifications about submissions, reviewing and the publishing process appear at the bell and on this screen. Most notifications also arrive by e-mail. System e-mails carry no submission, report or message content and only link to the panel. The language of the e-mails follows your Interface and e-mail language choice on the My profile page.
In an installation where e-mail sending is turned off, the system administrators pass on the verification, invitation and password links.
Screens and settings
Saved Publications
The rows and buttons of the screen that lists the publications you set aside with the Save to my list button on the public site.
The Saved publications screen lists the publications you set aside with the Save to my list button on the
public site. Only you can see the list. The Saved publications link in the user menu or the /en/saved address
opens the screen.
Rows and buttons
| Part | What it shows or does |
|---|---|
| Details of the publication | The cover, type, year, open-access label, title, authors, journal and issue, and the date you saved it |
| Open the publication | Opens the publication's page on the public site. |
| Remove from my list | Removes the publication from the list. |
| Undo | Puts a publication you removed back on the list without leaving the screen. |
Each page holds 20 publications. If your list is empty, the Browse the publications button opens the publications on the public site.
Rules
- Records that have been unpublished are not shown in the list. If they are published again, they come back to the list.
- The Undo button stays visible until you reload the screen or move to another page of the list.
The steps for saving a publication are in Saving Publications.
Troubleshooting
I cannot sign in or my account is locked
Why you cannot sign in to the panel or your account was locked after many failed attempts, and what to do.
The error message on the sign-in screen gives the reason. Check the cases below according to the text of the message.
Wrong e-mail address or password
When the message "The e-mail address or password is incorrect." appears, type the address and the password again. Passwords are case-sensitive. If you do not remember your password, set a new one with the steps in Resetting Your Password.
The account is temporarily locked
In a default installation, the account is locked for 15 minutes after 5 failed attempts in a row, and you receive an e-mail. Try again when the time is up. If you did not make the failed attempts yourself, change your password after you sign in.
The account is disabled
The message "This account has been disabled." means that the system administrator has disabled your account. Ask your system administrator to enable the account again.
Too many attempts
The message "Too many attempts. Please wait a moment and try again." shows that too many requests were sent in a short time. Wait for a while and try again.
If your two-factor authentication code is not accepted, see I cannot access my authenticator app.
Troubleshooting
The link in the e-mail is invalid or has expired
Getting a new link when a verification, password reset, e-mail change or invitation link does not open.
The links sent by e-mail work once and for a limited time. When you ask for a new link of the same kind, the previous link becomes invalid. If a link does not open for one of these reasons, the message "This link is invalid, already used or expired." appears on the screen.
| Link | Default validity | Where to ask for a new link |
|---|---|---|
| E-mail verification | 48 hours | The Send a new link button on the screen that opens, or the Resend the link button in the panel |
| Password reset | 60 minutes | The Ask for a new link link on the screen that opens |
| E-mail change | 48 hours | The Change link on the My profile page |
| Account invitation | 14 days | The person who sent the invitation |
- Make sure that you opened the complete link from the e-mail.
- If the link still does not open, ask for a new link in the place the table shows.
- Open the link in the newest e-mail you received.
If you completed an action with a link, the same link does not open a second time. In that case the action has already been done, and you can sign in directly.
Troubleshooting
The verification or password e-mail did not arrive
What to check if the account verification or password reset e-mail did not arrive, and how to ask for a new e-mail.
Verification and password reset e-mails can fail to arrive for several reasons. Check the following cases in order.
The address was mistyped
Check the address you entered in the reset form. For security reasons, the screen shows the same message even if the address is not registered. Enter the address correctly and ask again.
If you mistyped your address when you registered, sign in with that address and enter the correct one with the steps in Changing Your E-mail Address. The confirmation link sent to the new address also verifies your account.
Too many requests in a short time
Reset and verification e-mails are sent to an address at most three times an hour. When this limit has been reached, a new request looks successful on the screen, but no e-mail is sent. Wait an hour and ask again.
This installation does not send e-mail
In an installation where e-mail sending is turned off, the registration and reset screens say so. In that case the system administrators pass on the verification, invitation and password links. Contact your system administrator.
Asking for a new link
- For verification, press Resend the link in the bar at the top of the panel.
- For a password, ask again with the Forgot your password? link on the sign-in screen.
When you ask for a new link, the previous link becomes invalid. Open the link in the newest e-mail you received.
Troubleshooting
I cannot access my authenticator app
Signing in with a recovery code or asking for a reset if you lost your phone or your two-factor authentication code is not accepted.
If you cannot access your authenticator app, you sign in with one of the recovery codes you kept during the set-up.
- On the sign-in screen, enter your e-mail address and your password.
- On the Two-factor authentication screen, press the I can't use my phone — use a recovery code link.
- Enter one of your recovery codes in the Recovery code field.
- Press Verify.
Each recovery code works once. After you sign in, set up two-factor authentication again on your new phone. The steps are in Using Two-Factor Authentication.
If the code is not accepted
When the message "The code is not valid. Enter the current code from your app." appears, enter the code that the app shows at that moment. Wrong codes count as failed sign-in attempts, and repeated wrong attempts lock the account for a while.
If you have no recovery codes either
Contact your system administrator. After confirming your identity in another way, the administrator resets your two-factor authentication. This signs out all your sessions and sends you a notification. You then sign in with your password only and turn two-factor authentication on again.
Feature
Submissions
Preparing, sending and following submissions of articles, books, chapters, proceedings papers, theses and children's books.
Every registered user can make a submission, and no separate role is needed for it. Submissions of articles, book proposals, book chapters, proceedings papers, theses and children's books are prepared with the same wizard. Articles go to the journal you choose. The other types reach the publisher's editors.
The wizard saves the draft at every step and lists what is missing before you submit. A submission gets a number when it is sent, and its content is locked. From then on, correspondence with the editors, missing documents, revisions and proofs run from the submission's own page. You follow your submissions on the Author & reviewer → My submissions screen.
For your first submission, start with Making a Submission. Submission Statuses explains which stage your submission is at.
How-to
Tracking a Submission
Following the status of your submission, the decisions and the reviewer comments shared with you on the My submissions screen and the submission page.
You follow your submissions on the Author & reviewer → My submissions screen. Each row shows the submission's status and the next thing expected of you.
- Open the Author & reviewer → My submissions screen.
- To see the submissions that need something from you, switch to the Action needed tab.
- Press the button on the submission's row. Depending on the status, the button is called Open, Continue, Complete or Revise.
- On the submission's page, read the note below the title. The note says which stage the submission is at and what you need to do.
The meaning of the statuses is in Submission Statuses. Submission Page describes every part of a submission's page.
Decisions and reviewer comments
When a decision is issued in a round, the editor's decision letter appears on the Decisions & reviews tab. If the editor shared the comments for the author from the reviewers' reports, they appear on the same tab under the Reviews heading. You download a reviewer's shared attachment with the Reviewer attachment button.
Reviewers are shown with numbers, such as Reviewer 1 and Reviewer 2. In journals that practise open peer review, the reviewer's name is shown too. The parts of a reviewer's report that are not shown to you are described in Submission Rules.
Notifications
When the status of your submission changes, you get a notification in the panel and, in most cases, an e-mail as well. The e-mails do not carry the submission's content. They give only the submission number and a link to the panel. All your notifications are on the Notifications screen.
How-to
Messaging the Editors
Writing to the editors about a submission you sent on its Messages tab and reading their replies.
The correspondence about your submission runs on the submission's Messages tab. Messaging opens once the submission has been sent and is not available in a draft.
- Open the submission on the Author & reviewer → My submissions screen.
- Switch to the Messages tab. The earlier messages are listed in date order.
- In the form at the bottom of the tab, fill in the Subject field if you wish.
- Write your message in the Message field.
- Press Send.
Your message goes to the editors responsible for the submission, and the editors are notified. A message an editor writes to you also appears on the same tab, and you are notified. Notification e-mails do not carry the text of the message.
If you move to another tab before you send the message, what you wrote stays in the box until you come back. If you try to leave the screen without sending it, the panel asks first.
When to write to the editors
- If you noticed a mistake in the submission after sending it, write to the editor. You can change the details and the files yourself only when missing documents are requested and during a revision.
- If you need more time for a revision, write before the deadline.
- If the editor asked for missing documents, the text of the request is on this tab.
The internal notes that the editors write among themselves are never shown to you.
How-to
Supplying Missing Documents
Completing your submission in the wizard and sending the corrections when the editor asks for missing documents or corrections.
If the editor finds something missing during screening, your submission moves to the Documents missing status, and the process stops until you send the corrections. You read what the editor wants on the submission's Messages tab.
- Open the submission on the Author & reviewer → My submissions screen.
- Read the editor's request on the Messages tab.
- Press Complete missing items at the top of the page. The Complete button in the list also opens the wizard.
- Go to the step concerned and make the correction. Your changes are saved automatically.
- In the Review & submit step, check that nothing is missing.
- Press Send the corrections and confirm.
When you send the corrections, the submission returns to the Submitted status and keeps its number. The editors are notified, and you receive a notification in the panel too.
Changes you can make
When missing documents are requested, you can change the metadata, the authors, the declarations and the files. The type, the journal and the main language of the work do not change. A new anonymous manuscript, title page or cover letter that you upload replaces the previous one, and the old file is kept in the history.
If you did not understand what is missing, write to the editor on the same tab. The steps are in Messaging the Editors.
How-to
Submitting a Revision
Sending the revised anonymous manuscript and your response to the reviewers to the editors as a new round.
When the editor issues a revision decision, your submission moves to the Revision requested status. The Submit the revision section opens at the top of the submission's page, and you send your revision from there.
- On the Decisions & reviews tab, read the decision letter and the reviewer comments shared with you.
- In the Submit the revision section, upload the Revised anonymous manuscript file. If its text contains an author's name, e-mail address or ORCID iD, the warning "The text of the file names an author" appears under the file. Take these details out of the text and upload the file again.
- In the Response to the reviewers field, write how you responded to each reviewer comment. The text must be at least 20 characters long. Instead, you can also upload your response as a file in the Response file (optional) field.
- If you need to change the title or the abstract, press Update title / abstract and make the correction in the wizard.
- When the virus scan of the files has finished, press Submit the revision and confirm.
The revision goes to the editors as a new review round, and your submission moves to the Revision submitted status. The files and your response in this round cannot be changed later. The author list and the declarations do not change in a revision either.
Title, abstract and required fields
When you submit the revision, the information the first submission required is checked again. The title, the abstract, the keywords and the required fields of the work's type cannot be empty. If you cleared a field in the wizard to rewrite it, fill it in before you submit. While a field is missing, the Submit the revision section names it and the revision is not sent.
Response text
Do not reveal your identity in your response or in the revised manuscript, because the reviewers see these files. Your response text is kept as a draft in this browser until you send it.
Deadline and reminder
The revision deadline is shown at the top of the section. You receive one reminder e-mail and panel notification before the deadline. With the default setting, the reminder goes out 3 days before the deadline.
If you need more time, write to the editors on the Messages tab before the deadline. What happens when the deadline passes is described in The revision deadline has passed.
How-to
Checking Proofs
Opening the proof of your accepted work that the production team shared and sending your corrections from the submission page.
When your submission is accepted, production starts and the Production tab opens on the submission's page. When the production team shares a proof, you receive an e-mail and a panel notification.
- Open the submission on the Author & reviewer → My submissions screen.
- Switch to the Production tab. The newest proof is at the top.
- Press Open proof on the proof's card. The proof opens in a new tab.
- Enter your corrections in the Correction / comment field, giving the page and the line for each.
- Press Send comment.
Your comment goes to the person assigned to the job. If nobody is assigned to the job, everyone who manages production is notified. The production team's replies and notes appear on the same card.
Parts of the tab
The note at the top of the tab shows the job's stage in the Production status line. Each proof card shows the version number, the date it was shared, the production team's note and the correspondence. The download button on the right of the card downloads the proof's file.
Once the job has been published or cancelled, comments can no longer be written on the proofs, and a note in place of the comment field on the card says so. If something needs correcting, send the editors a message. When your work is published, the View publication button appears on the submission's page and opens the publication's page on the public site.
How-to
Withdrawing a Submission
Withdrawing a submission you sent, with a reason, before the final decision, and what happens when you do.
You can withdraw a submission you sent until the final decision is issued. A submission that has been accepted, rejected or already withdrawn cannot be withdrawn.
- Open the submission on the Author & reviewer → My submissions screen.
- Open the Actions menu at the top right of the page.
- Press Withdraw submission.
- Enter a reason of at least 5 characters in the Reason (sent to the editors) field.
- Press Withdraw submission in the dialog.
Effects of withdrawing
- The review stops and the open reviewer invitations are closed.
- The editors are notified.
- The editors see your reason in the submission's timeline. The reason is not put in e-mails and is not shown to the reviewers.
- A withdrawn submission cannot be reopened. To send the work again, you need to start a new submission.
A draft that has not been sent cannot be withdrawn. To delete a draft, follow the steps in Deleting and Restoring Drafts.
How-to
Deleting and Restoring Drafts
Deleting a submission draft you have not sent and restoring a deleted draft together with its files.
Only drafts that have not been sent can be deleted. A draft you delete is not lost and can be restored from the Deleted drafts tab. If you change your mind about a submission you have sent, you withdraw it.
Deleting a draft
- Open the draft's page. If you are in the wizard, press the Go to the submission page link above the title.
- From the Actions menu at the top right of the page, press Delete draft.
- Press Delete draft in the dialog.
The draft and the files you uploaded are removed from your list.
Restoring a deleted draft
- On the Author & reviewer → My submissions screen, switch to the Deleted drafts tab. The tab appears only while you have a deleted draft.
- Press Restore on the draft's row.
The draft comes back with its files, and you continue where you left off.
Draft limit
You can have at most 20 unfinished drafts at a time. This limit also applies when you restore a draft. If you have reached the limit, first complete or delete some of your drafts.
How-to
Submitting a Draft Started on Your Behalf
Checking a submission draft that an editor started on your behalf, confirming the declarations and sending it.
If you gave your documents to an editor or a system administrator, that person can open a submission draft on your behalf. The draft appears in your My submissions list, and you get the panel notification "A submission draft was started on your behalf". The draft's page shows who started it.
You own the draft. The submission does not reach the editorial office until you send it.
- Open the link in the notification, or open the draft in the Author & reviewer → My submissions list.
- Check the metadata, the authors and the files in the wizard's steps. Correct them if needed.
- In the Declarations step, read and confirm each declaration yourself.
- In the Review & submit step, press Submit and confirm.
The person who started the draft can keep editing the metadata, the authors and the files until you send it. Only you confirm the declarations.
If you do not want the draft, you can delete it. The steps are in Deleting and Restoring Drafts. All the wizard's steps are described in Making a Submission.
Screens and settings
My Submissions
The tabs, rows and buttons of the screen that lists all the submissions and drafts of an author.
The Author & reviewer → My submissions screen lists all the submissions and drafts you have made. Only your own submissions appear. Each page holds 20 submissions.
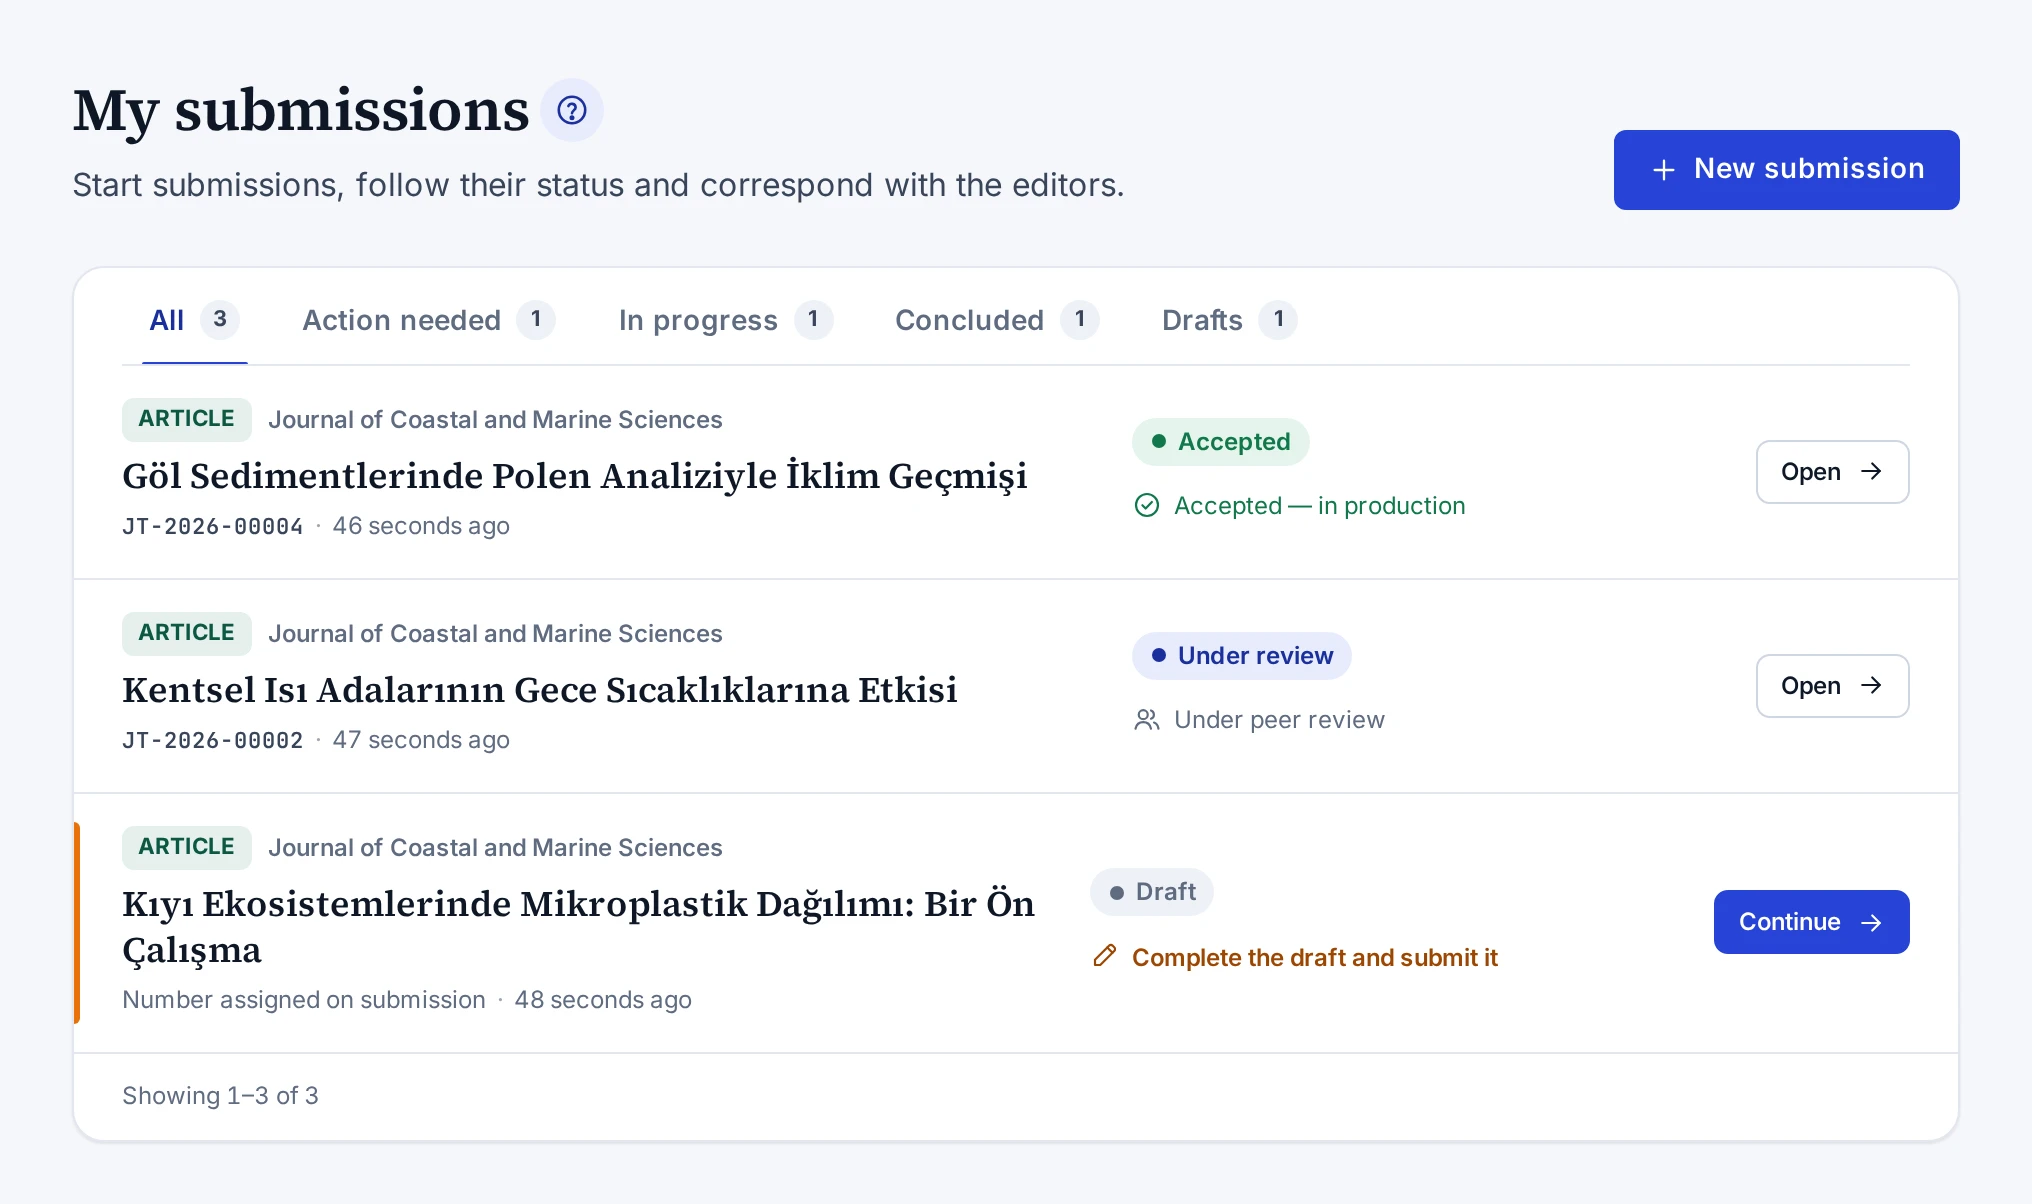
Tabs
| Tab | Submissions it shows |
|---|---|
| All | All your submissions |
| Action needed | Drafts, and submissions with missing documents or a requested revision |
| In progress | Submissions whose process is still running |
| Concluded | Accepted, rejected and withdrawn submissions |
| Drafts | Drafts that have not been sent |
| Deleted drafts | Drafts you deleted. The tab appears only while you have a deleted draft. |
The numbers next to the tabs count your submissions in each group.
Rows
| Part | What it shows |
|---|---|
| Top line | The type label and the journal. For types without a journal, Publisher appears in place of the journal. |
| Title | The submission's title. A draft without a title shows Untitled draft. |
| Bottom line | The submission number, the round if there is more than one, and the time of the last activity |
| Status | The status label and the next thing expected of you |
| Button | Continue, Complete, Revise or Open, depending on the status |
A draft shows "Number assigned on submission" in place of a number. A coloured line appears on the left of a row that needs something from you. The meaning of the statuses is in Submission Statuses.
Buttons
The New submission button opens the submission wizard. The button is disabled if your e-mail address is not verified or new submissions are closed. The reasons are in The New submission button is disabled or submissions are not accepted.
The button of a row opens the wizard for a draft and for a submission with missing documents. For the other statuses it opens the submission's page. The Restore button on the Deleted drafts tab brings a deleted draft back.
Related tasks
Screens and settings
Submission Page
The parts and buttons of the page that shows the status, decisions, messages, files, timeline and proofs of a submission.
A submission's page shows all its details and its steps in the process. You open the page from the My submissions list, and the My submissions link above the title takes you back to the list.
Top of the page
The header shows the type label, the status, the submission number, the journal, the submission date and the round if there is more than one. These buttons appear depending on the status:
| Button | When it appears | What it does |
|---|---|---|
| Continue the draft | Draft | Opens the wizard. |
| Complete missing items | Documents missing | Opens the wizard at the final check step. |
| View publication | After the work is published | Opens the publication's page on the public site in a new tab. |
| Actions | In a draft and while the process runs | Offers Withdraw submission or Delete draft. |
The note below the title states the submission's stage and what is expected of you. When a revision is requested, the Submit the revision section opens in place of the note.
Tabs
| Tab | What it contains |
|---|---|
| Overview | The title, abstract, keywords, type-specific details, authors and declarations. If you entered details in two languages, language tabs appear too. |
| Decisions & reviews | The decision letter of each round, your response to the reviewers and the reviewer comments shared with you |
| Messages | Your correspondence with the editors. It is closed in a draft. |
| Files | The files uploaded in each round, whether each file is Anonymous or Identified, its scan status and a download button |
| Timeline | The actions on the submission in date order. Only the actions open to you are shown. |
| Production | After acceptance, the status of production and the proofs |
The numbers next to the tab names count the decisions, messages, current files and proofs. A file that has been replaced by a newer one has the Replaced by a newer file label.
Related tasks
Screens and settings
Submission Wizard
The parts of the wizard screen where new submissions and drafts are prepared step by step, how it saves and when it opens.
The submission wizard is the screen where you prepare a new submission and your unsent drafts step by step. When you start a new submission, the header says New submission. When you open a draft, the header shows the draft's title. The steps are described in detail in Making a Submission.
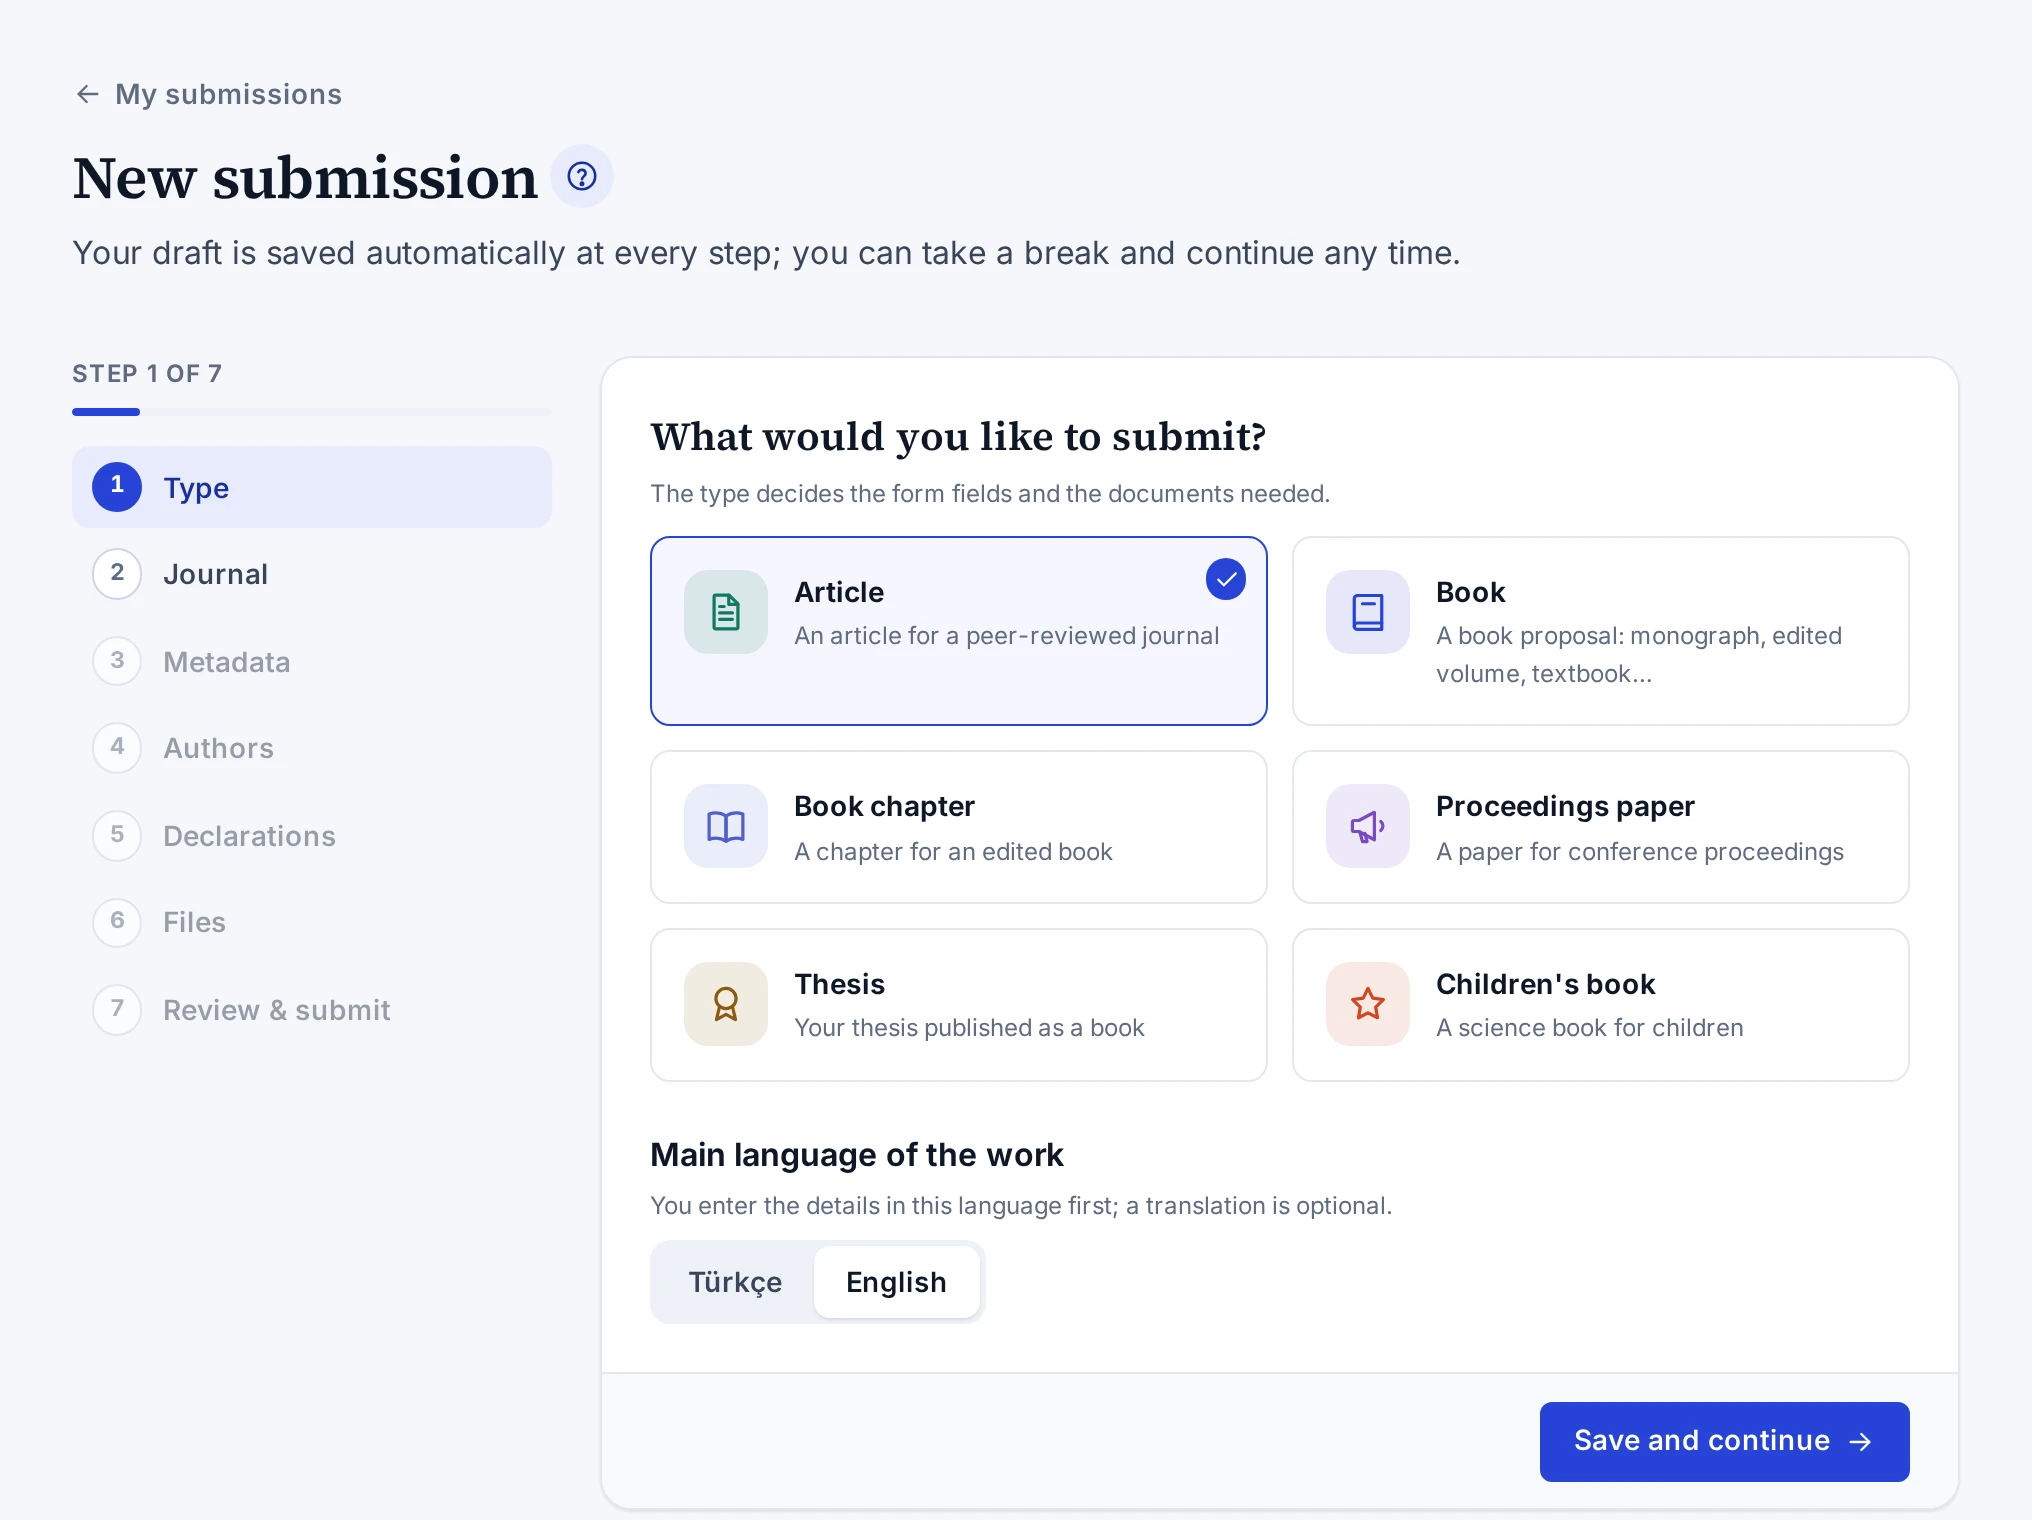
Parts of the screen
| Part | What it shows |
|---|---|
| Step list | The steps and the state of each step. A step with missing details is marked, and pressing a step opens it. |
| Save status | Next to the header, the time the draft was last saved, or unsaved changes |
| Bottom bar | The Previous step, Save and exit and Save and continue buttons |
The steps are, in order, Type, Journal, Metadata, Authors, Declarations, Files and Review & submit. Types other than articles have no Journal step.
Saving
Once the draft has been created, your changes are saved automatically. The type, the journal and the main language are saved when you leave their steps. Save and continue, Previous step, the step list and Save and exit work the same way here. If you chose a type that needs a journal, the panel opens the journal step first.
When you move from the wizard to another screen, the panel saves the draft first. If a change could not be saved, it asks before leaving. The browser also warns when you close the tab.
If saving fails because of the connection or the server, "Could not save — will retry" appears next to the header. The panel sends the changes again after a few seconds and waits a little longer before each new attempt. If the server does not accept a field, the reason appears next to the header and under the step. When you correct the field, the draft is saved again.
If you press Save and exit while there are changes that could not be saved, the panel asks before leaving. Stay on the page keeps you in the wizard. Discard changes leaves the unsaved changes behind and opens the submission's page.
When the wizard opens
| Situation | What you do in the wizard |
|---|---|
| New submission | Choose the type and the journal, then all the steps |
| Draft | All the steps and the submission |
| Documents missing | Corrections and Send the corrections (Supplying Missing Documents) |
| Revision requested | The metadata only. The revision is sent from the submission's page (Submitting a Revision). |
If you open the wizard for a submission that has already been sent, the message "This submission was sent and can no longer be edited." appears. The Go to the submission page button opens the submission's page.
If your e-mail address is not verified, the wizard does not open. While new submissions are closed, you cannot start a new submission, but you can complete and send your existing drafts.
Concept
Submission Statuses
The statuses a submission passes through from draft to outcome, what is expected of you in each, and which status each decision leads to.
Every submission has a status, and the status appears in the My submissions list and on the submission's page. The status changes with the actions of the editors and with your own.
| Status | Meaning | What is expected of you |
|---|---|---|
| Draft | You have not sent the submission yet. | Complete the draft and submit it. |
| Submitted | The submission has reached the editors. | Wait for the editors' screening. |
| Screening | The editors are checking the format. | Wait. |
| Documents missing | The editor has asked you for something missing or something to correct. | Supply what is missing and send it again. |
| Under review | Your submission is in peer review. | Wait. |
| Revision requested | The editor has asked for a revision. The deadline is shown on the submission's page. | Submit the revision. |
| Revision submitted | Your revision is with the editors. | Wait. |
| Accepted | Your submission has been accepted and production has started. | Check the proofs. |
| Rejected | Your submission has not been accepted. | Read the decision letter. |
| Withdrawn | You withdrew the submission. | Nothing is expected. |
Submissions in the Draft, Documents missing and Revision requested statuses are gathered on the Action needed tab of the list.
Decisions
The editor's decision appears with a label on the Decisions & reviews tab and moves the submission to this status:
| Decision | New status of the submission |
|---|---|
| Accept | Accepted |
| Minor revision | Revision requested |
| Major revision | Revision requested |
| Reject | Rejected |
| Desk reject | Rejected |
The Desk reject decision is issued without sending the submission to reviewers. The Accepted, Rejected and Withdrawn statuses conclude the process and appear on the Concluded tab of the list.
Concept
Submission Rules
The rules the system applies to submissions on visibility, locking, reviewer anonymity, conflicts of interest and file security.
The system applies the following rules itself, so that the submission process stays fair and traceable.
Who sees what
You see only your own submissions. Reviewers see only the anonymous files. The title page, the cover letter and the declaration document are open to the editors only.
The reviewers' identities are not shown to you. In journals that practise open peer review, the reviewer's name is shown. Of a reviewer's report, you see only the comments for the author that the editor shared, and the reviewer's attachment if there is one. Scores, recommendations and confidential comments to the editor are not shared.
Locking of the submitted version
The version you submitted cannot be changed, and changes are made only when the editor asks for them. This is what you can change in each status:
| Status | What you can change |
|---|---|
| Draft | Everything, including the type, the journal and the main language of the work |
| Documents missing | The metadata, authors, declarations and files |
| Revision requested | A new anonymous manuscript, the response to the reviewers, the title and the abstract |
The type, the journal and the main language of the work can be changed only in a draft. In a revision, the author list and the declarations do not change. A file that belongs to a submitted version cannot be removed.
Conflict of interest
You cannot act as an editor or a reviewer on a submission you are an author of. Your own submissions do not appear in the editor queue.
File security
Every file goes through a virus scan, and nobody can open it before the scan has finished. A file that fails the scan is not opened to anyone. Remove such a file and upload it again.
Troubleshooting
I noticed a mistake in a submission I sent
What to do when you notice a mistake in the details or the files of a submission you sent.
The moment you submit, the submission's details, authors, declarations and files are locked. For this reason you cannot make the correction yourself.
- Open the submission's Messages tab.
- Describe the mistake and the correct version clearly and send your message to the editors. The steps are in Messaging the Editors.
If the editor decides that a correction is needed, they ask you for missing documents. The submission then becomes editable again, and you make the correction with the steps in Supplying Missing Documents. When a revision is requested, you also upload a new anonymous manuscript and update the title and the abstract.
What you can change in each status is described in Submission Rules.
Troubleshooting
The New submission button is disabled or submissions are not accepted
Why you cannot press the New submission button or see the warning “New submissions are not accepted at the moment”, and what to do.
The New submission button is disabled if your e-mail address is not verified or new submissions are closed. The note that appears when you point at the button gives the reason. If you have reached the draft limit, the button works, but the wizard does not create a new draft.
Your e-mail address is not verified
You cannot make a submission with an unverified account. Press Resend the link in the bar at the top of the screen and open the link sent to your e-mail. If the link does not arrive, see The verification or password e-mail did not arrive.
New submissions are temporarily closed
The warning "New submissions are not accepted at the moment." means that the system administrator has temporarily closed new submissions. Your ongoing submissions are not affected. You can complete and send your existing drafts and answer requests for missing documents and revisions. To find out when submissions will open, use the ways in Getting Support.
You have reached the draft limit
You can have at most 20 unfinished drafts at a time. If you have reached the limit, first complete or delete some of your drafts. The steps are in Deleting and Restoring Drafts.
Troubleshooting
My journal is not in the list
Why the journal you want to submit to is missing from the submission wizard's journal step, and how to submit to it.
The wizard's Journal step lists only the journals that accept submissions through the JournTech panel. Some journals manage their submissions on DergiPark (Türkiye's national journal platform) or on another platform.
- On the public site, open the journal's page.
- Read the note at the top of the page about where the journal takes its submissions.
- If the journal is managed on DergiPark, press Submit on DergiPark. The button takes you to the submission form on DergiPark, where you sign in with your DergiPark account.
- If the journal uses another platform, press Go to the journal platform.
The message "No journal is accepting submissions at the moment." in the list means that no journal accepts submissions through the panel at the moment.
If the journal stopped accepting submissions after you started your draft with it, the final check step tells you so. In that case select another journal in the Journal step. You can change the journal only in a draft.
Submissions of books, book chapters, proceedings papers, theses and children's books have no journal to select. These submissions go to the publisher's editors.
If you manage the journal, check its settings with the steps in The journal does not appear in the submission wizard.
Troubleshooting
The revision deadline has passed
What happens to your submission when the revision deadline passes, and how you send the revision.
Even when the deadline has passed, your submission does not close automatically and stays in the Revision requested status. The submission appears as overdue on the editors' screen.
- Write to the editors on the submission's Messages tab and tell them when you will send the revision.
- When your revision is ready, send it with the steps in Submitting a Revision. The Submit the revision section stays open after the deadline as well.
If you know in advance that you will need more time, write before the deadline. You receive a reminder before the deadline. No new reminder is sent after the deadline has passed.
Troubleshooting
A file stays in the Scanning status
What to do if a file you uploaded waits in the Scanning status or fails the scan.
Every uploaded file goes through a virus scan. While the scan runs, the file's status is Scanning, and the submission cannot be sent before the scan has finished. The scan usually takes a short time.
- Wait a little. The wizard and the revision section refresh the file's status automatically.
- If the status does not change, reload the page.
- When the status is Available, continue with the submission.
The file failed the scan
If the status has become Failed or Quarantined, the file is not opened to anyone and the submission cannot be sent with this file.
- Press the bin button on the file's row and confirm with Remove file.
- Upload the file again.
If the same file fails again, use one of the ways in Getting Support.
How-to
Joining the Reviewer Pool
Joining the reviewer pool from your profile and setting the expertise keywords that editors use to find you.
Users in the reviewer pool are suggested when editors search for reviewers. Every registered user can join the pool from their profile. Accepting invitations is always up to you.
- Open the My profile page from the user menu and go to the Profile tab.
- On the Reviewer pool card, tick the I would like to join the reviewer pool box.
- Type your areas of expertise in the Expertise keywords field. Type each one and press Enter. You can enter up to 30 keywords.
- Press Save.
Being found in the pool
When editors look for a reviewer, they search by name, e-mail, institution or expertise. The candidates are ranked by the number of their expertise keywords that match the keywords of the submission. The editor also sees the number of ongoing, completed and declined invitations of each candidate.
To appear in the pool, your account must be active and your e-mail address verified. The authors of a submission do not appear in the candidate list of that submission.
Reviewer role
The Reviewer role adds you to the pool even without ticking this box. Reviewers who were invited by e-mail address and whose account was created with the invitation start with this role. If you do not have the reviewer role, a note reminding you to join the pool and a Go to my profile link appear at the bottom of the Reviewing screen.
Screens and settings
Institutional Archive Pages
The parts of the public site's Institutional Archive page, of the Theses page that filters theses by type, institute, department and advisor, and of a thesis's own page.
The Institutional Archive brings together the theses written at the institution on the public site. The site shows
the Institutional Archive page at /kurumsal-arsiv and the Theses page at /kurumsal-arsiv/tezler. On the English
site the addresses are /en/institutional-archive and /en/institutional-archive/theses. The pages show published
theses only.
The Institutional Archive page
The page shows how many theses are published, the thesis types and the institutes. When you click a type or an institute, the Theses page opens with the theses of that type or institute. The theses added last are listed at the bottom of the page. When the theses are harvested from the institution's open repository, the page also shows the repository's name and link.
The Theses page
The search box at the top of the page searches the theses' titles, authors, advisors, abstracts and keywords. The Filters section narrows the theses down by these details.
| Filter | What it narrows down by |
|---|---|
| Thesis type | Master's, doctoral, proficiency in art and medical specialty |
| Institute | The graduate school or faculty that published the thesis |
| Department / programme | The department or programme of the thesis |
| Advisor | Text in the advisor's name |
| Year, language and access | The thesis's year, language and access status |
When your choices are done, press Apply filters. The list reloads after this button or after Enter in the advisor field. If you choose several values in one filter, the theses that match any of them are listed. The filters you chose show above the results, and you can remove each one there. In the advisor filter, Turkish letters and upper or lower case make no difference.
Theses are also found by the site's general search. In the search results you can pick theses with the publication type filter.
A thesis's page
Next to the title, the authors and the abstract, a thesis's page shows these details.
- The thesis type, the university, the institute and the department. The type, the institute and the department link to the Theses page filtered by that value.
- The advisors, the year, the language and the keywords
- The access status, and for an embargoed thesis the date its embargo ends
- The persistent identifier (handle), and for a thesis harvested from the repository a link to its record there
The full text of an open-access thesis opens from the page. When the full text is in the institution's repository, the button opens the file there in a new tab. An embargoed or restricted thesis shows only its bibliographic details, and the full text does not open.
Feature
Public Site and Search
Searching for publications on the public site and using suggestions, exact phrase search and advanced search.
The public site shows the catalogue, the open-access files and the institutional pages to everyone. Its English
version is under /en. The search box at the top of the site searches all published records.
The search ignores Turkish characters and upper and lower case. As you type, title, keyword and author suggestions appear. Words you put in quotation marks are searched next to each other and in the same order. On the Advanced search page you can choose a field, add conditions with AND, OR and NOT, and give a year range.
If the system administrator has turned them on, the view and download counts of publications and the lists of the most read publications also appear. If you have signed in, you add publications to your own list with the Save to my list button. The open calls for papers of the journals are on the Calls page.
How-to
Searching the Public Site
Searching for publications with the search box of the public site and using suggestions, exact phrases, synonyms and the result filters.
The search box at the top of the public site searches publications. On narrow screens the box is inside the menu. The search finds only published records.
- Type the words you are looking for in the search box.
- Select one of the suggestions or press Enter.
- In the Filters section of the results page, choose the publication type, access status, category, language and year you want.
- Press Apply filters. The list reloads when you press this button.
Clicking a name in the author list narrows the results to that author's publications at once. To change the sort order, choose an order in the list above the results and press Sort.
Fields searched
The box searches the title, subtitle, authors, the advisors of theses, keywords, abstract and the ISBN, ISSN or DOI. Turkish characters and
upper and lower case do not matter. For example, typing istanbul also finds the word İSTANBUL. Accented and
special letters of other languages do not matter either. For example, typing lodz finds "Łódź" and typing
memmedov finds "Məmmədov". You can search titles and names written in the Arabic, Cyrillic or Greek alphabet by
typing in the same alphabet. Typing the beginning of each word is enough. For example, typing migra also finds
the word "migration".
If there is no exact match, the site shows similar titles and says so above the results. If there are no results at all, a spelling suggestion and popular topics appear. Spelling suggestions come from the words of the site's publications, and this list of words is renewed every hour.
Suggestions
When you type at least two letters, publication titles, keywords and author names are suggested below the box. You select a suggestion with the up and down arrows and open it with Enter or by clicking it. The Esc key closes the list. Pressing Enter without selecting a suggestion starts the search.
Exact phrase
If you put words in quotation marks, only publications that contain these words next to each other and in the same
order are found. For example, in the search "open access policy" the words in quotation marks must be written in
full. You can combine quotation marks with plain words, field selection and filters. A quotation mark that is not
closed is ignored.
Synonyms
The synonyms that the system administrator has defined are added to the search automatically. For example, makale, yazı and article (Turkish and English words for an article) can be in the same group. The results page says which synonyms were also searched. Publications that contain the word you searched for come first. Phrases in quotation marks and searches for authors and identifiers are not extended with synonyms.
To choose fields and add conditions with AND, OR and NOT, see Using Advanced Search.
How-to
Using Advanced Search
Choosing the field to search, adding conditions with AND, OR and NOT, and giving a year range on the Advanced search page of the public site.
The Advanced search page (/en/search) lets you limit the search to one field and add up to three more
conditions.
- From the Search in list, select All fields, Title, Author, Keyword, Abstract or ISBN / ISSN / DOI.
- Enter the words you are looking for in the Search terms field.
- If you need more conditions, open the More conditions and year range section.
- On each extra row, select the operator and the field, then enter the terms.
- If needed, fill in the From year and To year fields.
- Press Search.
Fields
The Author field searches at the start of the words of authors' names. For example, a search for er finds the
authors Erdem Kaya and Kader Er, and does not find Mert Yıldız. If you type the given name and the family name in
quotes, the two are searched next to each other. For theses this field also searches the advisors' names. The Keyword field searches only the keywords of publications.
Author names and identifiers are outside this field.
Operators
The conditions are combined in order:
| Operator | Meaning |
|---|---|
| AND | Requires both conditions. |
| OR | Accepts either of the conditions. |
| NOT | Leaves out the publications that meet that condition. |
For example, select the Title field on the first row and type migration. On an extra row, select the NOT
operator and the Author field and type an author's name. The search finds the publications with migration in the
title, except those of that author.
You can also use filters and sorting on the results page. The rules of word search are in Searching the Public Site.
How-to
Finding Calls for Papers
Finding the open calls for papers and chapters of journals and book projects on the Calls page of the public site and on journal pages.
The open calls of journals and book projects are listed on the Calls page (/en/calls) of the public site. Each
journal's page also shows that journal's open calls.
- On the public site, open the Calls page.
- Check the submission deadline in the Open calls list. The call with the nearest deadline is at the top.
- Press a call's title and read its details.
- If the call belongs to a journal, press the journal's name and read on the journal's page how to submit.
Calls without a submission deadline show No deadline. Calls whose deadline has passed move to the Closed calls list.
To send your submission through the panel, follow the steps in Making a Submission.