

JournTech
Content Editor Guide
This guide was made from the help pages on 9 November 2026. The help centre has the latest version.
Help Press Ctrl+P to print it or save it as a PDF.
Role
Content Editor
Manages the institutional pages, policies, news, menus, banners, documents, newsletter subscribers and contact messages.
The content editor writes and publishes the institutional content of the public site. The Turkish and English texts are written on the language tabs of the same item.
In the panel you see the Institutional content section and the File library screen.
Permissions of this role
- Edit pages, menus, banners, news, events and documents
- Publish institutional content
- Manage newsletter subscribers
- Handle contact messages and copyright reports
- Upload, replace and archive files in the file library
Screens and settings
Panel Search
Searching submissions, publications, people, users, pages and help topics at once with the search box in the panel's top bar.
The search box in the top bar searches many parts of the panel at once. When you type in the box and press Enter, the
Search screen opens and the results are grouped into sections. Turkish characters and upper and
lower case make no difference. For example, typing ışık also finds the title Işık Kirliliği.
The box appears for all roles other than Registered researcher and Reviewer. Which sections you see depends on your permissions.
Result sections
| Section | Permission needed to see it | Screen that opens all results |
|---|---|---|
| Submissions | See the submissions in scope (editor queue) | Editor queue |
| Publications | See unpublished catalogue records | Publications |
| People | Create and edit persons and institutions | People & institutions |
| Users | See user accounts | Users & roles |
| Pages | Edit pages, menus, banners, news, events and documents | Pages & policies |
| Help | No permission needed | The help centre's search |
Each section shows at most six results. If there are more, the See all link at the top of the section opens the search in that screen's list. Submission and publication results also show the type and the status.
When you press a help result, the topic opens in the help panel next to the screen, and you do not leave the screen you are working on.
When there are no results
Check the spelling or try a shorter phrase. If you are searching by submission number, type the whole number, for example JT-2026-00012.
Concept
Four-Eyes Principle
The rule that the person who prepares a piece of work does not approve it, and the three places where JournTech applies it.
Under the four-eyes principle, the person who prepares a piece of work does not approve that same work. At least two people see each publishing decision, so fewer records are published and fewer requests are approved by mistake. JournTech applies this principle in three places.
Catalogue records
If the Catalogue records are published after an editor's approval switch on the Site settings → Workflow tab is on, a record is published only from review. The person who sent the record for review cannot publish it, and another catalogue editor publishes it. The audit log records the person who publishes as the approver.
The switch is off by default. While it is off, the person who sent the record for review can also publish it.
Releasing an accepted submission from production into the catalogue is outside this rule, because that step is already an editorial decision. Harvesting from DergiPark (Türkiye's national journal platform) and bulk import are not affected by the rule either.
Institutional content
If the Institutional content is published after review switch on the same tab is on, pages, policies and guides are published or scheduled only from review. The person who sent the content for review cannot publish it. Another editor with the publish permission publishes it.
ISBN requests
For ISBN requests the rule always applies, and no setting switches it off. A person who prepared the request, edited it after the last approval, took it back to draft or sent it for approval cannot approve the same request. The system administrator role does not carry the approval permission. An administrator who serves on the publishing board is given the Publishing board role as well.
Feature
File Library
Seeing all uploaded files, their virus scan status and the places where each file is used.
The Catalogue → File library screen lists the uploaded files, their virus scan status and the places where each file is used. Publication files, covers, images of institutional content, documents and the site logo appear here.
Every file goes through a virus scan, and nobody can open it before the scan has finished. The library shows only the files you have permission to see. The final files of a work in production do not appear in the library until the work is released and linked to its record.
A publication's files are added on the Files tab of its record. The file's access, embargo and licence are also set there. The steps are in Files and Access.
How-to
Uploading Files to the Library
Uploading a publication file, cover, institutional content or branding file to the file library, and the file types each upload purpose accepts.
The file library also accepts files that are not linked to a record. You add a publication's full text and cover on the record's own Files tab instead. The steps are in Files and Access.
- On the Catalogue → File library screen, press Upload file.
- Select the purpose of the file from the Upload purpose list.
- Drag the files onto the upload area or select them from your computer. You can select several files.
After the upload every file goes through a virus scan. Nobody can open the file before the scan finishes. The list refreshes by itself while the scan runs.
Files accepted for each purpose
| Purpose | Accepted file | Permission needed |
|---|---|---|
| Publication file | PDF, EPUB, DOCX, ODT, ZIP or an image | Catalogue edit |
| Cover image | JPG, PNG or WEBP, at most 10 MB | Catalogue edit |
| Institutional content | PDF or an image | Institutional content edit |
| Branding | JPG, PNG or WEBP, at most 10 MB | Institutional content edit or site settings |
The list shows only the purposes you have permission to upload for. The upload area shows the largest file size allowed. If the system administrator switched off the File uploads feature, files cannot be uploaded.
Using an uploaded file
A file that is not linked anywhere appears in the list as Not used. A document in the library can, for example, be made a journal's author template. Files linked to a record cannot be templates. The places where a file is used are described in File Library Screen.
Screens and settings
File Library Screen
The search box, filters and columns of the screen that lists uploaded files, the file details window and the places where a file is used.
The Catalogue → File library screen lists uploaded files with the newest upload at the top. Here you follow each file's scan status and the places where it is used.
Button at the top
Upload file opens the upload area. The steps are in Uploading Files to the Library.
Search and filters
| Filter | Options |
|---|---|
| Search box | File name or SHA-256 value |
| Purpose | Publication file, Cover image, Institutional content, Branding |
| Scan | Scanning, Available, Quarantined, Failed |
The purpose list contains only the purposes you have permission to see.
Columns
| Column | What it shows |
|---|---|
| File | File name, file type and size |
| Purpose | Upload purpose |
| Scan | Status of the virus scan |
| Used by | The first place where the file is used and the number of other places |
| Uploaded | Upload time |
The button at the end of the row downloads the file. If you have permission to open the place where the file is used, the place appears as a link.
File details
When you press a file's name, the File details window opens. The window shows the file's type, size, purpose, scan status and its detail, the scan time, whether its metadata was removed, the dimensions of images, the SHA-256 value, all places where it is used and the File id. Use in a deleted record or in an earlier version is marked separately.
Places of use
A file can be used in these places:
- Publication
- Issue cover
- Journal author template
- Institutional document
- Banner
- News / event cover
- Image in a news text
- Image in a page text
- Site logo
- Dark theme logo
- Default share image
- Tab icon
- Bulk import
Rules of the screen
- Publication files and covers need the permission to see unpublished catalogue records.
- Institutional content and branding files need the file library or the institutional content permission. The person who manages the site settings also sees branding files.
- The final files of a work in production do not appear in the list until the work is released and linked to its record. Open them from the production job.
- Submission and review files never appear on this screen.
Troubleshooting
A file stays in scanning or quarantine
What to do when an uploaded file does not leave the Scanning status or shows as Quarantined or Failed, and why this happens.
Every uploaded file goes through a virus scan and is not served to anyone before the scan finishes. The scan status appears in the file library and on the record's Files tab. For a banner image, a news cover image, the site logo and the article template, the field itself shows the status. If the file does not pass the scan, the field also says what to do.
The file stays in Scanning
The Scanning status shows that the scan is running. The page refreshes by itself, and when the scan finishes the status becomes Available.
If the virus scanner cannot be reached, the scan job is tried again for about an hour. If the scanner is not back by then, the scan is queued again by itself within 15 minutes. The file is scanned once the scanner works again. If the status still does not change for a long time after that, ask the system administrator to look at the background jobs on the System health screen. The details are in Monitoring System Health.
The file is Quarantined
A file with the Quarantined status did not pass the security scan and is not served anywhere. There are two reasons:
- The scan found malware in the file.
- The content of the file does not match its extension. For example, its name ends in .pdf but the file is not a PDF.
The Scan detail line in the file details window gives the reason. Upload a clean copy of the file again. A quarantined file cannot be added to a record.
The file shows Failed
A file with the Failed status could not be scanned and is not served anywhere. The scan is not tried again. There are two reasons:
- The file is larger than the virus scanner accepts. The Scan detail line says
too large for the virus scanner. - The file is missing from the file store. This happens when a database is restored without its files or when a file
is deleted from the store by hand. The Scan detail line says
object missing from the file store.
Upload a smaller copy of a file that is too large, or ask the system administrator to raise the scanner's size limit. Upload a missing file again. The fields of a banner image, a news cover image, the site logo and the article template tell these two cases apart too.
Feature
Institutional Content
Managing institutional pages, policies, guides, news, events, menus, banners and documents.
The institutional content of the public site is managed in the Institutional content section. Institutional pages, versioned policies and guides are written on the Pages & policies screen. News, announcements, events and calls are on the News & events screen. The Menus screen edits the top menu and the footer links, and the Banners screen edits the showcase of the home page. PDF documents such as regulations and reports are published on the Institutional documents screen. On the Help notes screen you add notes specific to your institution below help topics. The steps are in Managing Help Notes.
The Turkish and English texts are written on the language tabs of the same item. Content without an English text appears in Turkish on the English site. Pages are saved as drafts, published at once or scheduled for a later date. Every published version of a page is kept, and you can go back to an older version.
If review approval is on in your installation, the person who sent content to review cannot publish it themselves. The steps are in Publishing with Review Approval, and the reason for the rule is in Four-Eyes Principle.
Screens and settings
Pages & Policies
The tabs, filters, columns and row actions of the screen that lists institutional pages, versioned policies and guides.
The Institutional content → Pages & policies screen lists institutional pages, policies and guides. Content such as About us, the boards, the ethics policy and the author guide is created here.
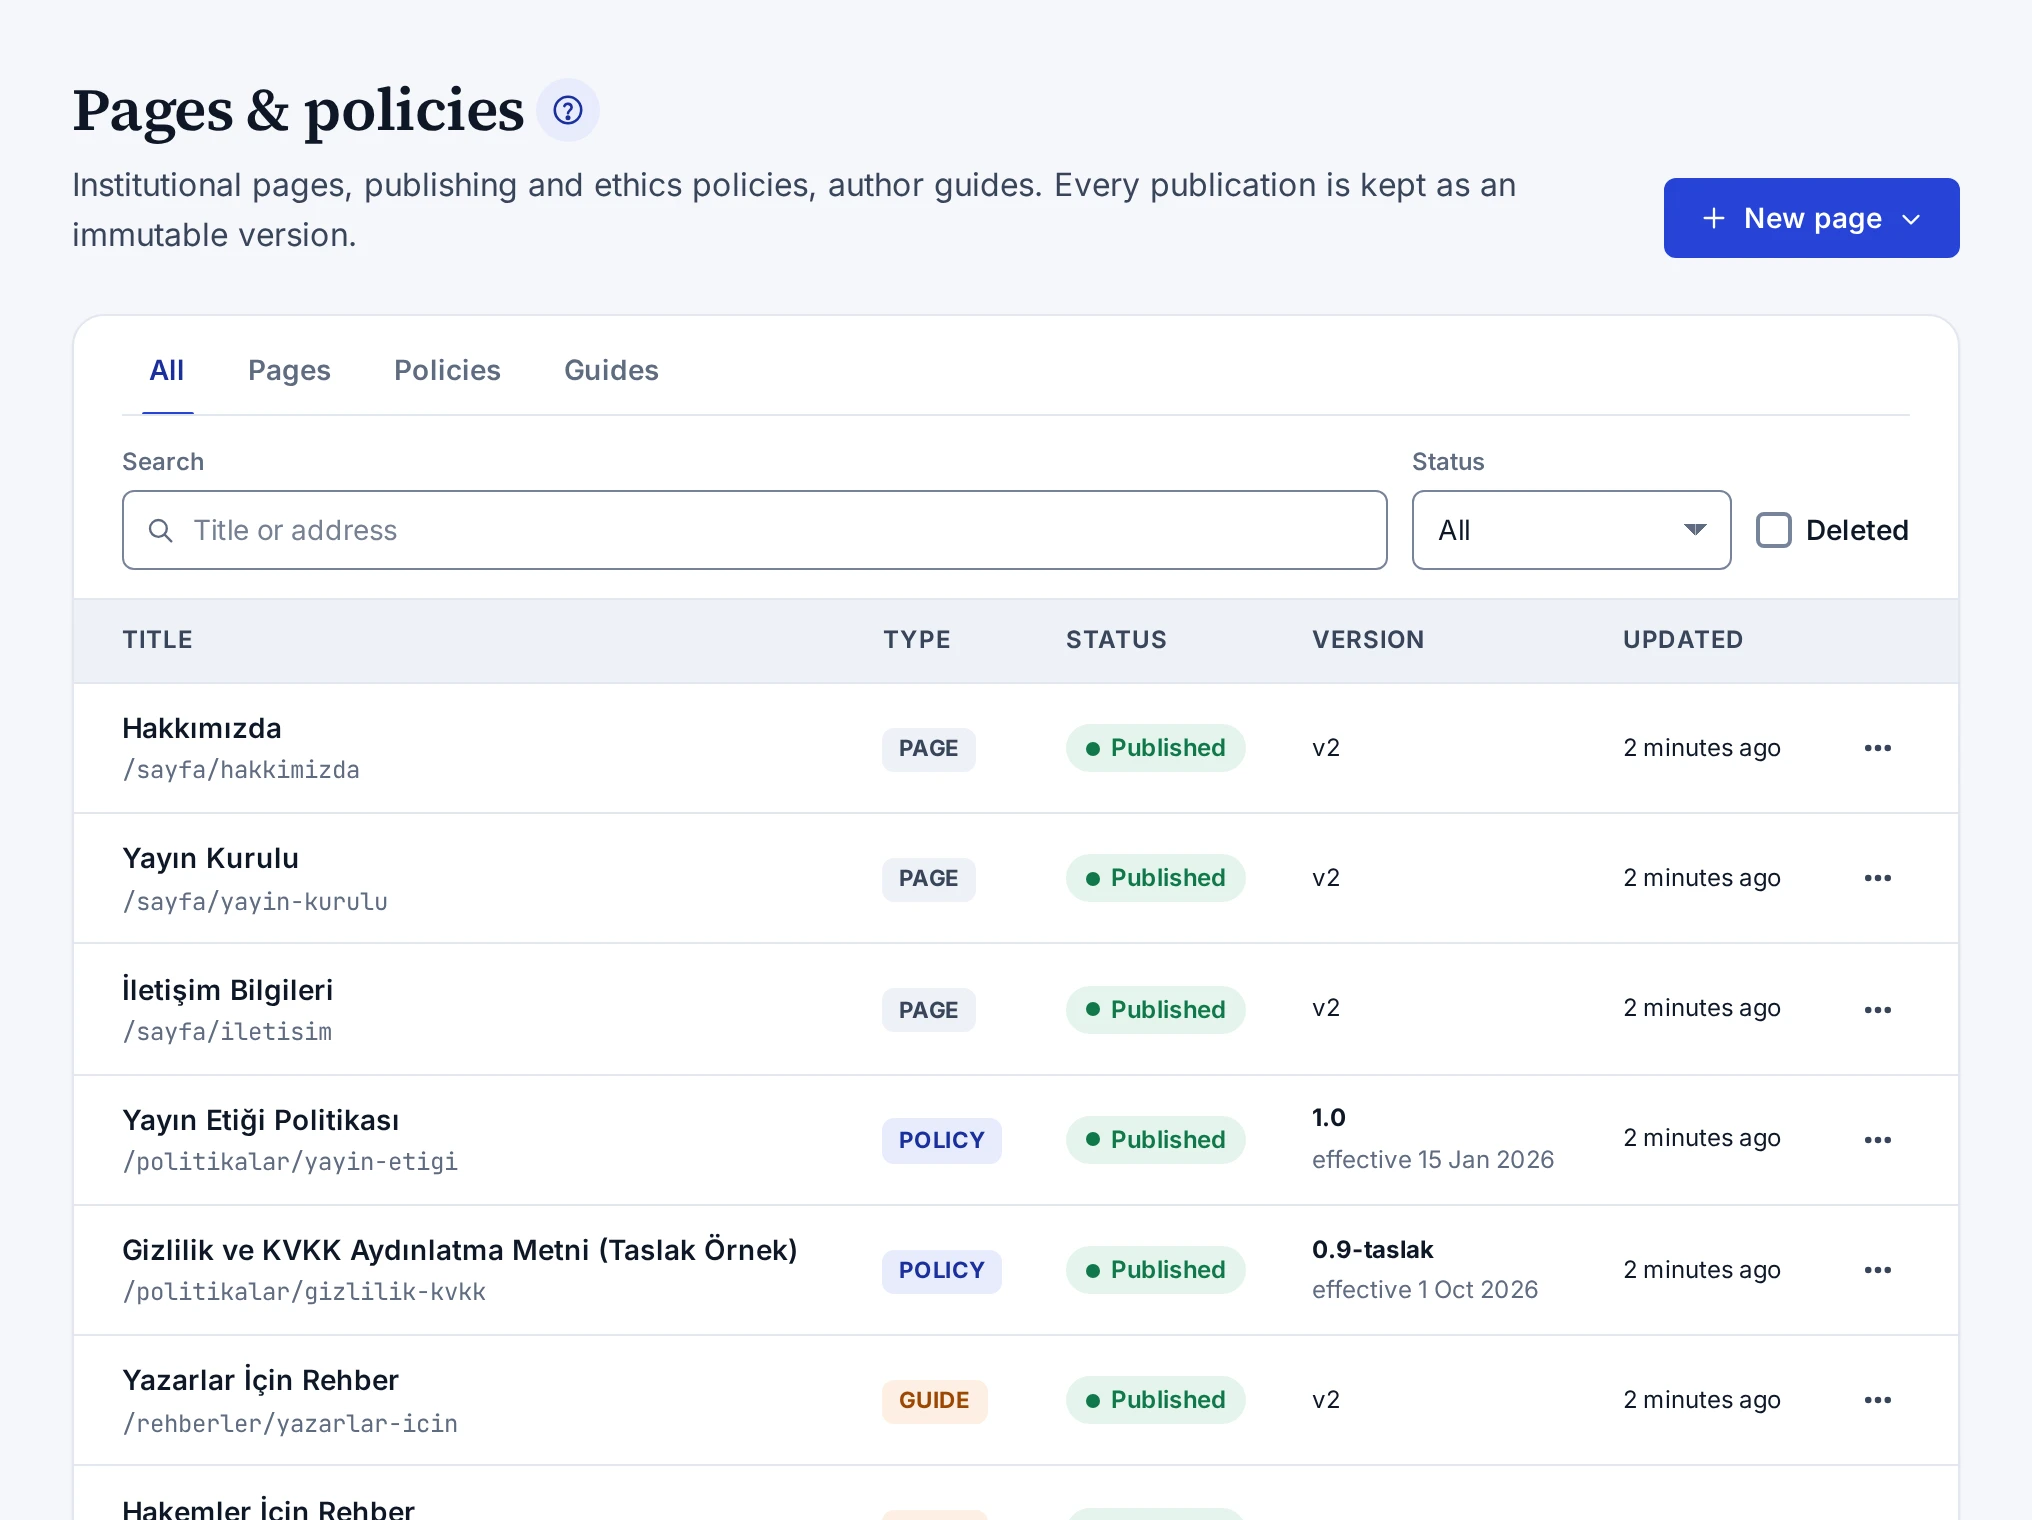
On the public site, pages are published at /sayfa/…, policies at /politikalar/… and guides at /rehberler/…. On
the English site, the addresses are /en/page/…, /en/policies/… and /en/guides/….
Tabs and filters
The All, Pages, Policies and Guides tabs above the list group the content by type. Below the tabs are these filters.
- The Search box searches titles and addresses.
- The Status list filters content by the statuses Draft, In review, Published, Unpublished and Archived.
- The Deleted box shows deleted content.
The filters stay in the address bar. If you share the link, the same list opens.
Columns
| Column | Shows |
|---|---|
| Title | The title and the public address. The missing-translation, unpublished-changes and scheduled-publication badges also appear here. |
| Type | Page, policy or guide |
| Status | The content's status |
| Version | For a policy the version label and effective date, for other types the number of the live version |
| Updated | The time of the last change |
The Unpublished changes badge shows that a published page has a saved change that is not published yet.
Row actions
The Actions menu at the end of the row holds Edit, View on the site for published content, and Delete. Published content cannot be deleted. Unpublish it first. Deleting needs a reason of at least 5 characters. You restore deleted content with Restore in the Deleted view.
New content
The New page menu opens the editor for an Institutional page, a Policy (versioned) or a Guide. The steps are in Creating a Page, and the parts of the editor in Page Editing Screen.
How-to
Creating a Page
Creating an institutional page, a versioned policy or a guide, writing the Turkish and English text, and saving the content.
Institutional pages, policies and guides are written in the same editor. Content you save does not show on the public site until you publish it.
Choosing the type
- On the Institutional content → Pages & policies screen, press New page.
- Select Institutional page, Policy (versioned) or Guide.
You can change the type later in the Page type list on the Page settings card. Once content has been published, its type cannot change.
Text
- On the Content card, check that the Türkçe (Turkish) tab is open.
- Fill in Title. The Turkish title is required and must be at least 2 characters long.
- Optionally enter a Short summary. The summary shows in lists and search results and can be up to 2000 characters long.
- Write the text in Text. The toolbar has buttons for headings, bold, italics, links, lists and quotes.
- To show a different title or description in search engines, open the Search engines section. Fill in SEO title and SEO description. If you leave them empty, the page title and the summary are used.
Page settings
- Address (slug) is the address of the page on the public site. Use lower-case letters, digits and hyphens. If you leave it empty, the address is generated from the title.
- A policy also has the Version label (for example v2.0) and Effective date fields. A policy cannot be published without them. The details are in Policy Versions.
On the public site, pages are published at /sayfa/…, policies at /politikalar/… and guides at /rehberler/…
(/en/page/…, /en/policies/… and /en/guides/… on the English site). The text of the For authors page is the
guide whose address is yazarlar-icin.
English text
The English tab holds the English text of the content. If the English title is empty, Translation missing shows next to the tab's name, and the public site shows the Turkish content on the English page.
- Go to the English tab.
- To start from the Turkish text, press Copy from Turkish.
- Write the title and the text in English. If any field in this language is filled in, the title is required too.
You remove a translation you do not need with Remove this language. When you save, the title and the text in that language are deleted.
Saving
Press Save. The Ctrl+S shortcut saves too. On the first save, the content is created as a draft and the editing screen opens.
Every save adds a new version to the Version history card. Missing or invalid fields are listed by name in the notice at the bottom right. If you leave the screen without saving, the panel warns you.
To publish the content, follow the steps in Publishing and Scheduling.
Screens and settings
Page Editing Screen
The Content, Publication, Page settings and Version history cards of the page, policy and guide editor, and the rules of the screen.
The page editor opens when you create content or press an item in the list. Next to the title you see the content's type, its status, its public address and whether the changes are saved.
Top buttons
- View on the site opens the published page in a new tab.
- Save saves the changes.
- Publish publishes the content. On a published page the button reads Publish changes. The button appears only when there is something to publish and the publishing rules allow it.
Content card
The Content card holds the Türkçe (Turkish) and English tabs, Title, Short summary, Text and the Search engines section. On the English tab, Copy from Turkish appears when there is no content, and Remove this language when there is. If one language leaves empty the fields that the other language has filled in, a note at the top of the card lists them.
Publication card
The Publication card appears after the content is saved for the first time. It shows the live version and its publication date, unpublished changes, a scheduled publication and the review note. Its buttons depend on the content's status.
| Button | What it does |
|---|---|
| Publish | Publishes the content, or the changes to a published page |
| Send for review | Sends the draft to review. With review approval on, it shows as Send the changes to review on a published page. |
| Schedule | Publishes the last saved state at the time you choose |
| Cancel schedule | Removes the schedule |
| More actions | Opens Return to draft, Unpublish, Archive and Delete page |
If you do not have the publish permission, the card says so and tells you to send the content to review.
Page settings card
The Page settings card holds the Page type and Address (slug) fields. For a policy, the Version label and Effective date fields appear too.
Version history card
The Version history card lists every save and every publication as a version. The last six versions are shown, and Show more opens the rest. Versions carry these badges.
| Badge | Meaning |
|---|---|
| Live | The version shown on the site |
| Published | A version that was published before |
| Saved | An unpublished save |
The View and Restore buttons on a row open the version or copy it into the working copy. The details are in Viewing and Restoring Page Versions.
Rules of the screen
- The Turkish title is required and must be at least 2 characters long.
- Archived and deleted content opens read-only.
- While there are unsaved changes, the Restore buttons on the Version history card are disabled.
- While a status action such as publishing or a restore runs, the Save button is disabled. What you type while a save or an action runs is not lost. It stays on the screen afterwards, waiting to be saved.
- The type of content that has been published once cannot change.
- When the address of a published page changes, the old address redirects to the new one.
- Menu links to content whose address changes move to the new address by themselves.
- If someone else saved the same content while you were editing it, your save is refused and the panel tells you.
The steps are in Creating a Page and Publishing and Scheduling.
How-to
Publishing and Scheduling
Publishing an institutional page, policy or guide at once, putting the changes to a published page online, and scheduling a publication for a later time.
You publish a page from the Publication card on the right of the editor. Published content is stored as a version that cannot be changed.
If review approval is on in your installation, content is published only after review. In that case, follow the steps in Publishing with Review Approval.
Publishing at once
- Open the content on the Institutional content → Pages & policies screen.
- Press Publish. Your unsaved changes are saved first.
- Confirm the dialog.
For a policy, the dialog shows the label and the effective date of the version to be published.
Changing a published page
When you edit and save a published page, the site keeps the old content. The card says that there are unpublished changes.
- Make the change and press Save.
- To put the change online, press Publish changes.
Scheduling
- Press Schedule.
- In Publication time, enter a future time in Istanbul time.
- Press Schedule in the dialog.
The last saved state of the page is published automatically at that time. Changes you save after scheduling are included too. The card shows the publication time. If you change your mind, press the Cancel schedule link on the card.
The system checks scheduled publications once a minute. If the page does not meet the publishing conditions when the time comes, the schedule is removed and this is written to the audit log.
Publishing conditions
- The content must have a title.
- A policy must have a version label and an effective date. The label must not have been published before.
- Archived content cannot be published.
- If a published page has no saved change, there is nothing to publish.
To remove a page from the site, see Unpublishing and Deleting.
How-to
Publishing with Review Approval
Sending institutional content to review, reviewing it, and publishing it or sending it back for corrections in an installation with review approval switched on.
If the system administrator has switched on Institutional content is published after review on the Site settings → Workflow tab, institutional content is published only after review. The person who sends content to review cannot publish it themselves. Another editor with the publish permission publishes it.
The rule covers pages, policies, guides, news, announcements, events, calls and institutional documents. Banners and menus are outside the rule. A journal's own announcements and calls stay with the journal's editors and are not subject to this rule.
Sending content to review
- Write the content and save it.
- Press Send for review on the Publication card of a page or the Publication card of a news item. For an institutional document, the button is in the row's Actions menu.
For saved changes to a published page, the button reads Send the changes to review. While the review is under way, the site keeps the old content. The card says that you sent the content to review and that another editor will publish it.
Reviewing and publishing
The reviewing editor opens the content and takes one of two paths.
- If the content is fine, they press Publish. On a published page the button reads Publish changes. Instead of publishing the page at once, the editor can also schedule it.
- If corrections are needed, they send the content back. On a page this is Return to draft in the More actions menu, and on a published page the same action reads Send the changes back. On a news item and an institutional document, the action is Send back to draft.
For pages and news items, a reason for sending back is optional. For an institutional document, a reason of at least 5 characters is required. Content that is sent back returns to draft. Its author corrects it and sends it to review again.
Published news, events and documents
News items, events and documents have no separate working copy. An edit to a published news item, event or document shows on the site as soon as it is saved. To put a large change through review first, unpublish the content and send it to review.
When the setting is off
The setting is off by default. While it is off, everyone with the publish permission publishes directly. On pages, Send for review stays available as an optional intermediate step.
The reasoning behind the rule is in Four-Eyes Principle.
How-to
Viewing and Restoring Page Versions
Viewing an earlier version of a page, restoring it into the working copy and publishing the restored content again.
Every save and every publication of a page is added to the Version history card as a version. You can view an earlier version or restore it into the working copy.
Viewing a version
- Open the page and scroll down to the Version history card.
- Press View on the version's row.
A dialog shows the version's title, summary and text, with a tab for each language.
Restoring a version
- If the page has unsaved changes, press Save first.
- Press Restore on the version's row.
- Confirm the dialog.
- Check the restored title and text.
- Publish the page to show it on the site.
Restoring creates a new version, and the earlier versions are not deleted. The restored content does not show on the site until you publish it. The publishing steps are in Publishing and Scheduling.
Restoring puts the version's content in place of the working copy. So while there are unsaved changes, the Restore buttons are disabled and the Version history card says what to do. Saving the page does not change the page on the site.
Restoring a policy version
A restored policy version comes back with its own label and effective date. If that label was published before, enter a new label in Version label before publishing. A label that was published before cannot be used again.
You cannot restore a version on an archived page.
How-to
Unpublishing and Deleting
Removing an institutional page, news item or document from the site, archiving it, deleting it and restoring deleted content.
You remove published content from the site in one of three ways. Unpublished content can still be edited, archived content is kept, and deleted content goes to the Deleted view. These actions need a reason of at least 5 characters, and the reason is written to the audit log.
Pages, policies and guides
- Open the page.
- Select the action in the More actions menu on the Publication card.
- Enter the reason and confirm.
The actions work as follows.
- Unpublish removes the page from the site at once. Visitors to its address see a "not found" page, and links to it in menus are hidden. The page can still be edited and published again.
- Archive removes the page from the site and makes it read-only. An archived page cannot be edited or published again.
- Delete page removes the page from the list. A published page cannot be deleted. Unpublish it first.
All three actions keep the page's version history.
News, announcements and events
The More actions menu on the Publication card of the news editor holds Unpublish, Archive and Delete. The Actions menu of the list also offers unpublishing and deleting.
- An unpublished item leaves the site at once and returns to draft. Its card on the home page may stay visible to visitors who are not signed in for up to 30 seconds.
- An archived item leaves the site and can be published again later.
- A published item cannot be deleted. Unpublish it first.
Institutional documents
The Actions menu on a document's row holds Unpublish, Archive and Delete. An unpublished document returns to draft and its file link stops working. A published document cannot be deleted. Unpublish it first.
Banners and menus
Deleting a banner or a menu also needs a reason. To remove a banner from the home page without deleting it, use Take offline. The details are in Adding a Banner and Editing a Menu.
Restoring deleted content
- For pages and news, tick the Deleted box in the list. Press Restore on the row. The content comes back with its previous status.
- For banners and documents, press Deleted at the top of the screen and select Restore. A restored banner comes back switched off, and a restored document comes back archived. To show them on the site, switch the banner on again and publish the document again.
Screens and settings
News & Events
The tabs, filters, columns and row actions of the screen that lists news, announcements, events and calls.
The Institutional content → News & events screen lists news, announcements, events and calls on separate tabs. An item whose publication date is set in the future shows on the site from that time on.
Tabs
| Tab | Items | On the public site |
|---|---|---|
| News | News | /haberler (/en/news) |
| Announcements | Public announcements, and announcements shown in the panel only to selected roles | The public ones under /haberler (/en/news) |
| Events | Events with a start time and a location | /etkinlikler (/en/events) |
| Calls | Calls for papers and chapters with a deadline | /cagrilar (/en/calls) |
On the news, announcement and event tabs, the button at the top of the screen creates an item of that type, for example New news item. The Calls tab also lists the calls that journal editors open from the journal page.
Filters
- The Search box searches titles and addresses.
- The Status list filters items by the statuses Draft, In review, Published and Archived.
- The Featured only box shows featured items.
- The Deleted box shows deleted items.
Columns
| Column | Shows |
|---|---|
| Title | The title and the public address. The Featured, Internal and missing-translation badges also appear here. |
| Category | The item's category |
| Date | For an event the start time and location, for other items the publication date |
| Status | The item's status. A future-dated item shows the date it goes live. |
Row actions
The Actions menu holds Edit, View on the site for a published item, Publish, Unpublish and Delete. A published item cannot be deleted. A deleted item's row shows the Restore button.
The steps are in Adding News, Announcements and Events, and the parts of the editor in News Editing Screen.
How-to
Adding News, Announcements and Events
Preparing a news item, announcement or event, choosing an announcement's audience, featuring an item, and publishing it now or at a later date.
You prepare news, announcements and events on the Institutional content → News & events screen. An item shows on the site when you publish it, not when you save it.
Preparing an item
- On the News & events screen, go to the News, Announcements or Events tab.
- Press the button at the top of the screen, for example New news item.
- On the Türkçe (Turkish) tab, fill in Title, Short summary and Text. The Turkish title is required.
- On the Details card, optionally enter a Category and upload a Cover image.
- To show the item on the home page and at the top of lists, switch on Feature.
- Press Save.
Write the English text on the English tab. The cover image is resized and its EXIF data is removed.
Event details
An event shows the Event details card. Starts is required, and Ends and Location are optional. You enter times in Istanbul time, and the end cannot be before the start.
An announcement's audience
An announcement shows the Audience card.
- If you select no role, the announcement is published for everyone on the public site.
- If you select roles, the announcement does not show on the public site. It shows only in the panel of users with those roles, in the Announcements section of the Overview screen and in the announcement strip at the top of the page.
Calls
The Calls tab lists calls for papers and chapters. You start a new call with the
New call button on this tab. A call's Call details card has
the Deadline field. The public site's /cagrilar page (/en/calls in English) sorts open calls by
deadline. A call whose deadline has passed moves under the Closed calls heading. A journal's editors open the
journal's calls from the journal page, and
Posting Journal Announcements and Calls describes those steps.
Publishing
The Publication card appears after the item is saved for the first time.
- Publish publishes the item at once.
- Publish later makes the time you choose the publication date. The item shows from that moment on. If you choose a past date, the item goes live at once and is sorted by that date in lists.
- On a published item, Change publication date changes the publication date.
An event cannot be published without a start time. An edit to a published item shows on the site as soon as you save it. If review approval is on in your installation, the steps in Publishing with Review Approval apply. To remove an item from the site, see Unpublishing and Deleting.
Screens and settings
News Editing Screen
The Content card, the Publication card, the type-specific cards and the rules of the editor for news, announcements, events and calls.
The news editor opens when you create an item or press an item in the list. The item's type shows above the title, and its status and public address next to it. On an internal announcement, the Internal badge appears instead of the address.
Top buttons
- View on the site opens the published item in a new tab.
- Save saves the changes. The Ctrl+S shortcut saves too.
- Publish publishes the item.
Content card
The Content card holds the Türkçe (Turkish) and English tabs, Title, Short summary and Text. The short summary is shown on cards and in lists.
Publication card
The Publication card appears once the item is saved. It shows the publication date, a scheduled publication or the review note. Its buttons depend on the item's status.
- Send for review sends the item to review and appears only while review approval is on.
- Publish publishes the item at once, and Publish later at the time you choose.
- Change publication date changes the publication date of a published item.
- The More actions menu opens Send back to draft, Unpublish, Archive and Delete.
Cards by type
| Card | Type | Fields |
|---|---|---|
| Event details | Event | Starts (required), Ends, Location |
| Call details | Call | Deadline |
| Audience | Announcement | A list of roles. With no role selected, the announcement is public. |
| Details | All | Category, Feature, Address (slug), Cover image |
Rules of the screen
- The Turkish title is required and must be at least 2 characters long.
- The address consists of lower-case letters, digits and hyphens. If you leave it empty, it is generated from the title.
- The end time cannot be before the start time.
- An audience can be chosen for announcements only.
- A deleted item opens read-only.
- While a status action such as publishing runs, the Save button is disabled. What you type while a save or an action runs is not lost. It stays on the screen afterwards, waiting to be saved.
The steps are in Adding News, Announcements and Events.
Screens and settings
Banners
The screen that lists the banners in the showcase area of the home page, its states and actions, and the fields of the banner dialog.
The Institutional content → Banners screen manages the showcase area of the home page. Banners appear on the home page in the order of the list.
List
Each row shows the banner's image, title, subtitle, button text, link and display window. The badge next to the title gives the banner's state.
| State | Meaning |
|---|---|
| Live | The banner is on and inside its display window, and it shows on the home page |
| Off | The banner is off and does not show on the home page |
| Scheduled | The banner is on, but its display window has not started yet |
| Expired | The banner is on, but its display window has ended |
You change the order by dragging a banner by its handle or with the up and down arrows. The new order is saved at once.
Buttons and row actions
- New banner opens the banner dialog.
- Deleted lists the deleted banners. Restore brings a banner back switched off.
- The row's Actions menu holds Edit, Go live, Take offline and Delete.
Switching a banner on or off and deleting a live banner need the publish permission.
Banner dialog
| Field | Description |
|---|---|
| Title | A Turkish title is required. The English title goes on the English tab. |
| Subtitle | Optional |
| Button text | The text of the button on the banner |
| Link | Where the button leads. It starts with https:// or /. |
| Image | JPG, PNG or WebP. The image is resized and its EXIF data is removed. |
| Display window | The From and To times. When they are empty, the banner shows with no end. |
| Live | A live banner shows on the home page within its display window. |
Rules of the screen
- The end time must be after the start time.
- The image does not show on the home page until it has passed the virus scan. If the image does not pass the scan or cannot be opened, the image field says why and what to do.
- Banners are not subject to the review approval rule.
- While you are signed in, you see a change on the home page at once. Visitors who are not signed in may see the home page as it was up to 30 seconds earlier.
- Deleting needs a reason of at least 5 characters.
- The list and the Deleted list show at most 1,000 banners. If there are more, a note above the list says so.
The steps are in Adding a Banner.
How-to
Adding a Banner
Adding a banner to the home page, giving it a display window, ordering banners, and taking them offline or deleting them.
Banners appear in the showcase area of the home page in the order of the list. Each banner has a title, a button and an image, and optionally a display window.
New banner
- On the Institutional content → Banners screen, press New banner.
- On the Türkçe (Turkish) tab, fill in Title. Optionally enter Subtitle and Button text.
- To show text on the English site too, fill in the English tab.
- In Link, enter the address the button leads to.
- Upload the image in Image.
- To show the banner for a limited time, enter the From and To times under Display window.
- To put the banner online, switch on Live.
- Press Save.
A new banner goes to the end of the list. Change its position by dragging its handle or with the arrows.
Taking a banner offline and deleting it
- Take offline removes the banner from the home page and keeps it in the list. Go live switches it back on.
- Delete asks for a reason and moves the banner to the Deleted list. A restored banner comes back switched off. Switch it on again to show it on the site.
While you are signed in, you see the change on the home page at once. Visitors who are not signed in see it up to 30 seconds later.
Only people with the publish permission can use the Live switch and switch banners on and off. The parts of the screen are described in Banners.
Screens and settings
Institutional Documents
The groups, statuses and actions of the screen that lists PDF documents such as regulations, directives and reports, and the fields of the document dialog.
The Institutional content → Institutional documents screen manages PDF documents such as regulations, directives and
annual reports. Published documents are listed on the public site's Institutional documents page (/belgeler, or
/en/documents in English).
List
Documents are grouped by category on separate cards. Documents without a category are on the Uncategorised card. Each row shows the title, version, document date, file name and size, and the document's status. If the file's virus scan has not finished, the scan status shows too.
You change the order within a card by dragging a document by its handle or with the arrows. The Status list at the top filters documents by the statuses Draft, In review, Published and Archived.
Buttons and row actions
- New document opens the document dialog.
- Deleted lists deleted documents. Restore brings a document back as archived.
- The row's Actions menu holds Edit, Download file, Publish, Unpublish, Archive and Delete. When review approval is on, Send for review and Send back to draft appear too.
Document dialog
| Field | Description |
|---|---|
| Title | The Turkish title is required, the English title is optional. |
| Category | On the documents page, the document is grouped under this heading. Categories used before are offered as suggestions. |
| Version | For example v1.0 |
| Document date | The date of the document |
| PDF file | PDF only, required |
Rules of the screen
- A file cannot be downloaded until it has passed the virus scan.
- A published document cannot be deleted. Unpublish it first.
- Replacing the file of a published document is written to the audit log as a separate action.
- Unpublishing, archiving and deleting need a reason of at least 5 characters.
- The list and the Deleted list show at most 1,000 documents. If there are more, a note above the list says so. You can narrow the list with the Status filter.
The steps are in Publishing an Institutional Document.
How-to
Publishing an Institutional Document
Uploading a PDF document such as a regulation, directive or report, publishing it on the public site and replacing the file of a published document.
Institutional documents are listed by category on the public site's /belgeler page (/en/documents in English).
You add a document as a draft first and then publish it.
Adding and publishing a document
- On the Institutional content → Institutional documents screen, press New document.
- Enter the Turkish title in Title. The English title is optional.
- Optionally fill in Category, Version and Document date.
- Upload the PDF in PDF file.
- Press Save. The document is added to the list as a draft.
- In the Actions menu of the document's row, select Publish and confirm.
The file cannot be downloaded until it has passed the virus scan. If review approval is on in your installation, send the document to review first. The steps are in Publishing with Review Approval.
Replacing the file
- Select Edit on the document's row.
- Upload the new PDF in Replace file.
- Press Save.
The file of a published document changes as soon as you save, and the change is written to the audit log.
To remove a document from the site, see Unpublishing and Deleting.
Concept
Policy Versions
How policies are published with a version label and an effective date, how the public site shows earlier versions, and the cookie policy and privacy notice.
When a policy changes, readers need to see which rule applied when. That is why JournTech keeps policies in versions. Every published version carries its own label and effective date and is never changed afterwards.
Version label and effective date
A policy is published only when Version label and Effective date are filled in. Every published version has its own label, for example v2.0 and v2.1. A label that was published before cannot be used again. When you restore an old version, its label comes back too. In that case, enter a new label before publishing.
Versions on the public site
The public site shows the version of the policy in force, with its version label and effective date. At the bottom of the page is a list of earlier versions, and each earlier version can be read at its own link. Search engines do not index earlier versions.
Cookie policy and privacy notice
The institution's cookie policy and its KVKK privacy notice (the notice required by Türkiye's Personal Data Protection Law) are published as policies too. On a first visit to the public site, a short cookie note appears at the bottom of the page. The note says that the site uses only the cookies it needs to work and to stay secure, and it links to the Policies page. When the visitor presses OK, the note does not appear again in that browser. The site uses only strictly necessary cookies, so there is no consent dialog.
The steps for creating a policy are in Creating a Page.
Concept
Institutional Content Rules
The rules for text cleaning, immutable versions, address redirects, image processing, virus scanning, permissions and the audit log in institutional content.
Institutional content is published on the public site in the institution's name. That is why the system applies the same rules to all of it.
Text cleaning
Content from the text editor is cleaned when it is saved. Harmful tags and scripts are not stored. Text pasted into a page therefore cannot harm the visitors of the site.
Immutable versions
Every published page version is stored so that it cannot be changed. The public site always shows this version, so an unfinished edit never appears on the site. Restoring an old version also creates a new version, and the history is not deleted.
Address redirects
When the address of a published page changes, the old address redirects to the new one. Links that were shared keep working. The redirect is set up for both the Turkish and the English address. An old address that redirects is not given to a new page or news item, because the old links would then open the new content. An address made from the title then gets a number at the end.
Images and files
Uploaded images are resized and their EXIF data is removed. Every file goes through a virus scan. Until the scan is done, a file cannot be downloaded and an image does not show on the site. A file that fails the scan cannot be used in content.
Permissions and the audit log
Publishing, unpublishing and archiving content need the publish permission. A user without it submits the content for approval with Send for review. Publishing actions, deletions of subscribers and messages, and exports are written to the audit log.
If the system administrator has made two-factor authentication mandatory for privileged roles, the Content editor permissions do not work until two-factor authentication is set up. The setup is described in Using Two-Factor Authentication.
Troubleshooting
My change does not show on the site
Causes and fixes when a page, news, banner or menu change you saved does not show on the public site.
The public site shows the published version of a live page. Saving does not put a change online. Check the causes below in order.
The change is not published
On a live page, Save is not enough. If the Publication card says there are unpublished changes, press Publish changes.
The change is in review
If review approval is on in your installation, changes go to review first. The site keeps the old content until another editor publishes them. The steps are in Publishing with Review Approval.
The publication is scheduled
If the card shows a publication time, the page is published automatically at that time. To publish now, press Publish changes. Publishing also removes the schedule.
The news item's publication date is in the future
If a news item's publication date is in the future, the item does not show on the site until then. In the list, the item's status column shows the date it goes live.
A link in the menu
The public site caches menus for up to 20 seconds. Reload the page after a moment. If the link still does not show, see A menu link does not show on the site.
The home page
The public site keeps the publication lists, news, events and banners of the home page in a cache for up to 30 seconds for visitors who are not signed in. While you are signed in, the home page always opens up to date. To see a change in a browser that is not signed in, reload the page after half a minute. Record and news pages show the change at once.
Only on the English site
If you changed only the Turkish text, the English site keeps the old text. For the translation, see A page shows in Turkish on the English site.
Troubleshooting
A policy cannot be published
Causes and fixes related to the version label, the effective date, review approval and archiving when you get an error while publishing a policy.
A policy is published only with a version label and an effective date, and every published version has its own label. When a policy cannot be published, the notice at the bottom right says that the publishing conditions are not met and marks the field at fault.
The version label or effective date is empty
On the Page settings card, fill in Version label (for example v2.1) and Effective date. Save and publish again.
The label was published before
You cannot reuse a label that was published before. If you restored an old version, its label came back with it. Enter a new label in Version label, save and publish again.
Review approval is on
If review approval is on in your installation, a policy is published only after review. If you sent the policy to review yourself, another editor publishes it. The steps are in Publishing with Review Approval.
The policy is archived
An archived policy is read-only and cannot be published again. Create a new policy if you need one.
The rules are described in detail in Policy Versions.
Troubleshooting
A page shows in Turkish on the English site
How to add the translation when a page, news item, banner or document shows in Turkish on the English version of the public site.
When content has no English translation, the public site shows the Turkish text on the English page. In the editor, Translation missing appears next to the English tab, and lists show a missing-translation badge next to the content.
Adding the translation
- Open the content and go to the English tab.
- Optionally press Copy from Turkish to start from the Turkish text.
- Write the title and the text in English and press Save.
- If the page is published, press Publish changes.
For news and events, a change to a published item shows on the site as soon as you save it. You enter the English title of a banner or an institutional document in its own dialog.
The translation is missing some fields
If there is an English title but no summary or text, that field stays empty on the site. The page editor shows a note listing the fields missing in this language. Fill in the missing fields and publish the page again.
Troubleshooting
I cannot find the For authors page in the panel
Where you edit the text of the For authors page of the public site in the panel, and how to create the page if it does not exist.
The text of the For authors page on the public site is a guide whose address is yazarlar-icin. You edit it among
the guides on the Pages & policies screen, not on a separate screen.
- On the Institutional content → Pages & policies screen, go to the Guides tab.
- Open the guide whose address is
yazarlar-icin. - Edit the text, save it and publish it.
If there is no such guide, select Guide in the New page menu and enter
yazarlar-icin in Address (slug). Until the guide is published, the page opens with a built-in text. In every
case, the page also lists the ways to submit to the published journals.
A journal's own author guidelines are in the journal profile and are described in Setting Author Guidelines and Review Criteria.
Troubleshooting
The Publish button is missing in institutional content
Causes and fixes related to the content's status, review approval and permissions when a page, news item or institutional document shows no Publish button.
The Publish button depends on the content's status, your installation's review approval rule and your permissions. Check the causes below in order.
The content is not saved yet
On new content, the publication card appears after the first save. Press Save first.
There is nothing to publish
On a published page with no saved changes, the button is hidden. Once you save a change, the button appears as Publish changes. You change the publication date of a published news item with Change publication date.
The content is archived
An archived page is read-only and cannot be published. An archived news item or document can be published again.
Review approval is on
If review approval is on in your installation, content is published only after review. Press Send for review first.
You sent the content to review
If the card says that another editor will publish the content, you sent it to review yourself. Ask another editor to publish it. The reasoning behind the rule is in Four-Eyes Principle.
You do not have the publish permission
If the card says that you cannot publish, send the content to review. The publish permission belongs to the Content editor and System administrator roles.
How-to
Managing Help Notes
Adding information specific to your institution below help topics, previewing it and removing it.
The help pages are the same in every installation of JournTech. You can add information that is specific to your institution below a topic as a note, for example an internal approval step, a submission calendar or the name of the unit that answers questions. Readers see the note at the end of the topic, under the name of your institution. The note appears both on the help page and in the help side panel.
Users with the "Edit pages, menus, banners, news, events and documents" permission write the notes.
Adding a note
- Open the Institutional content → Help notes screen.
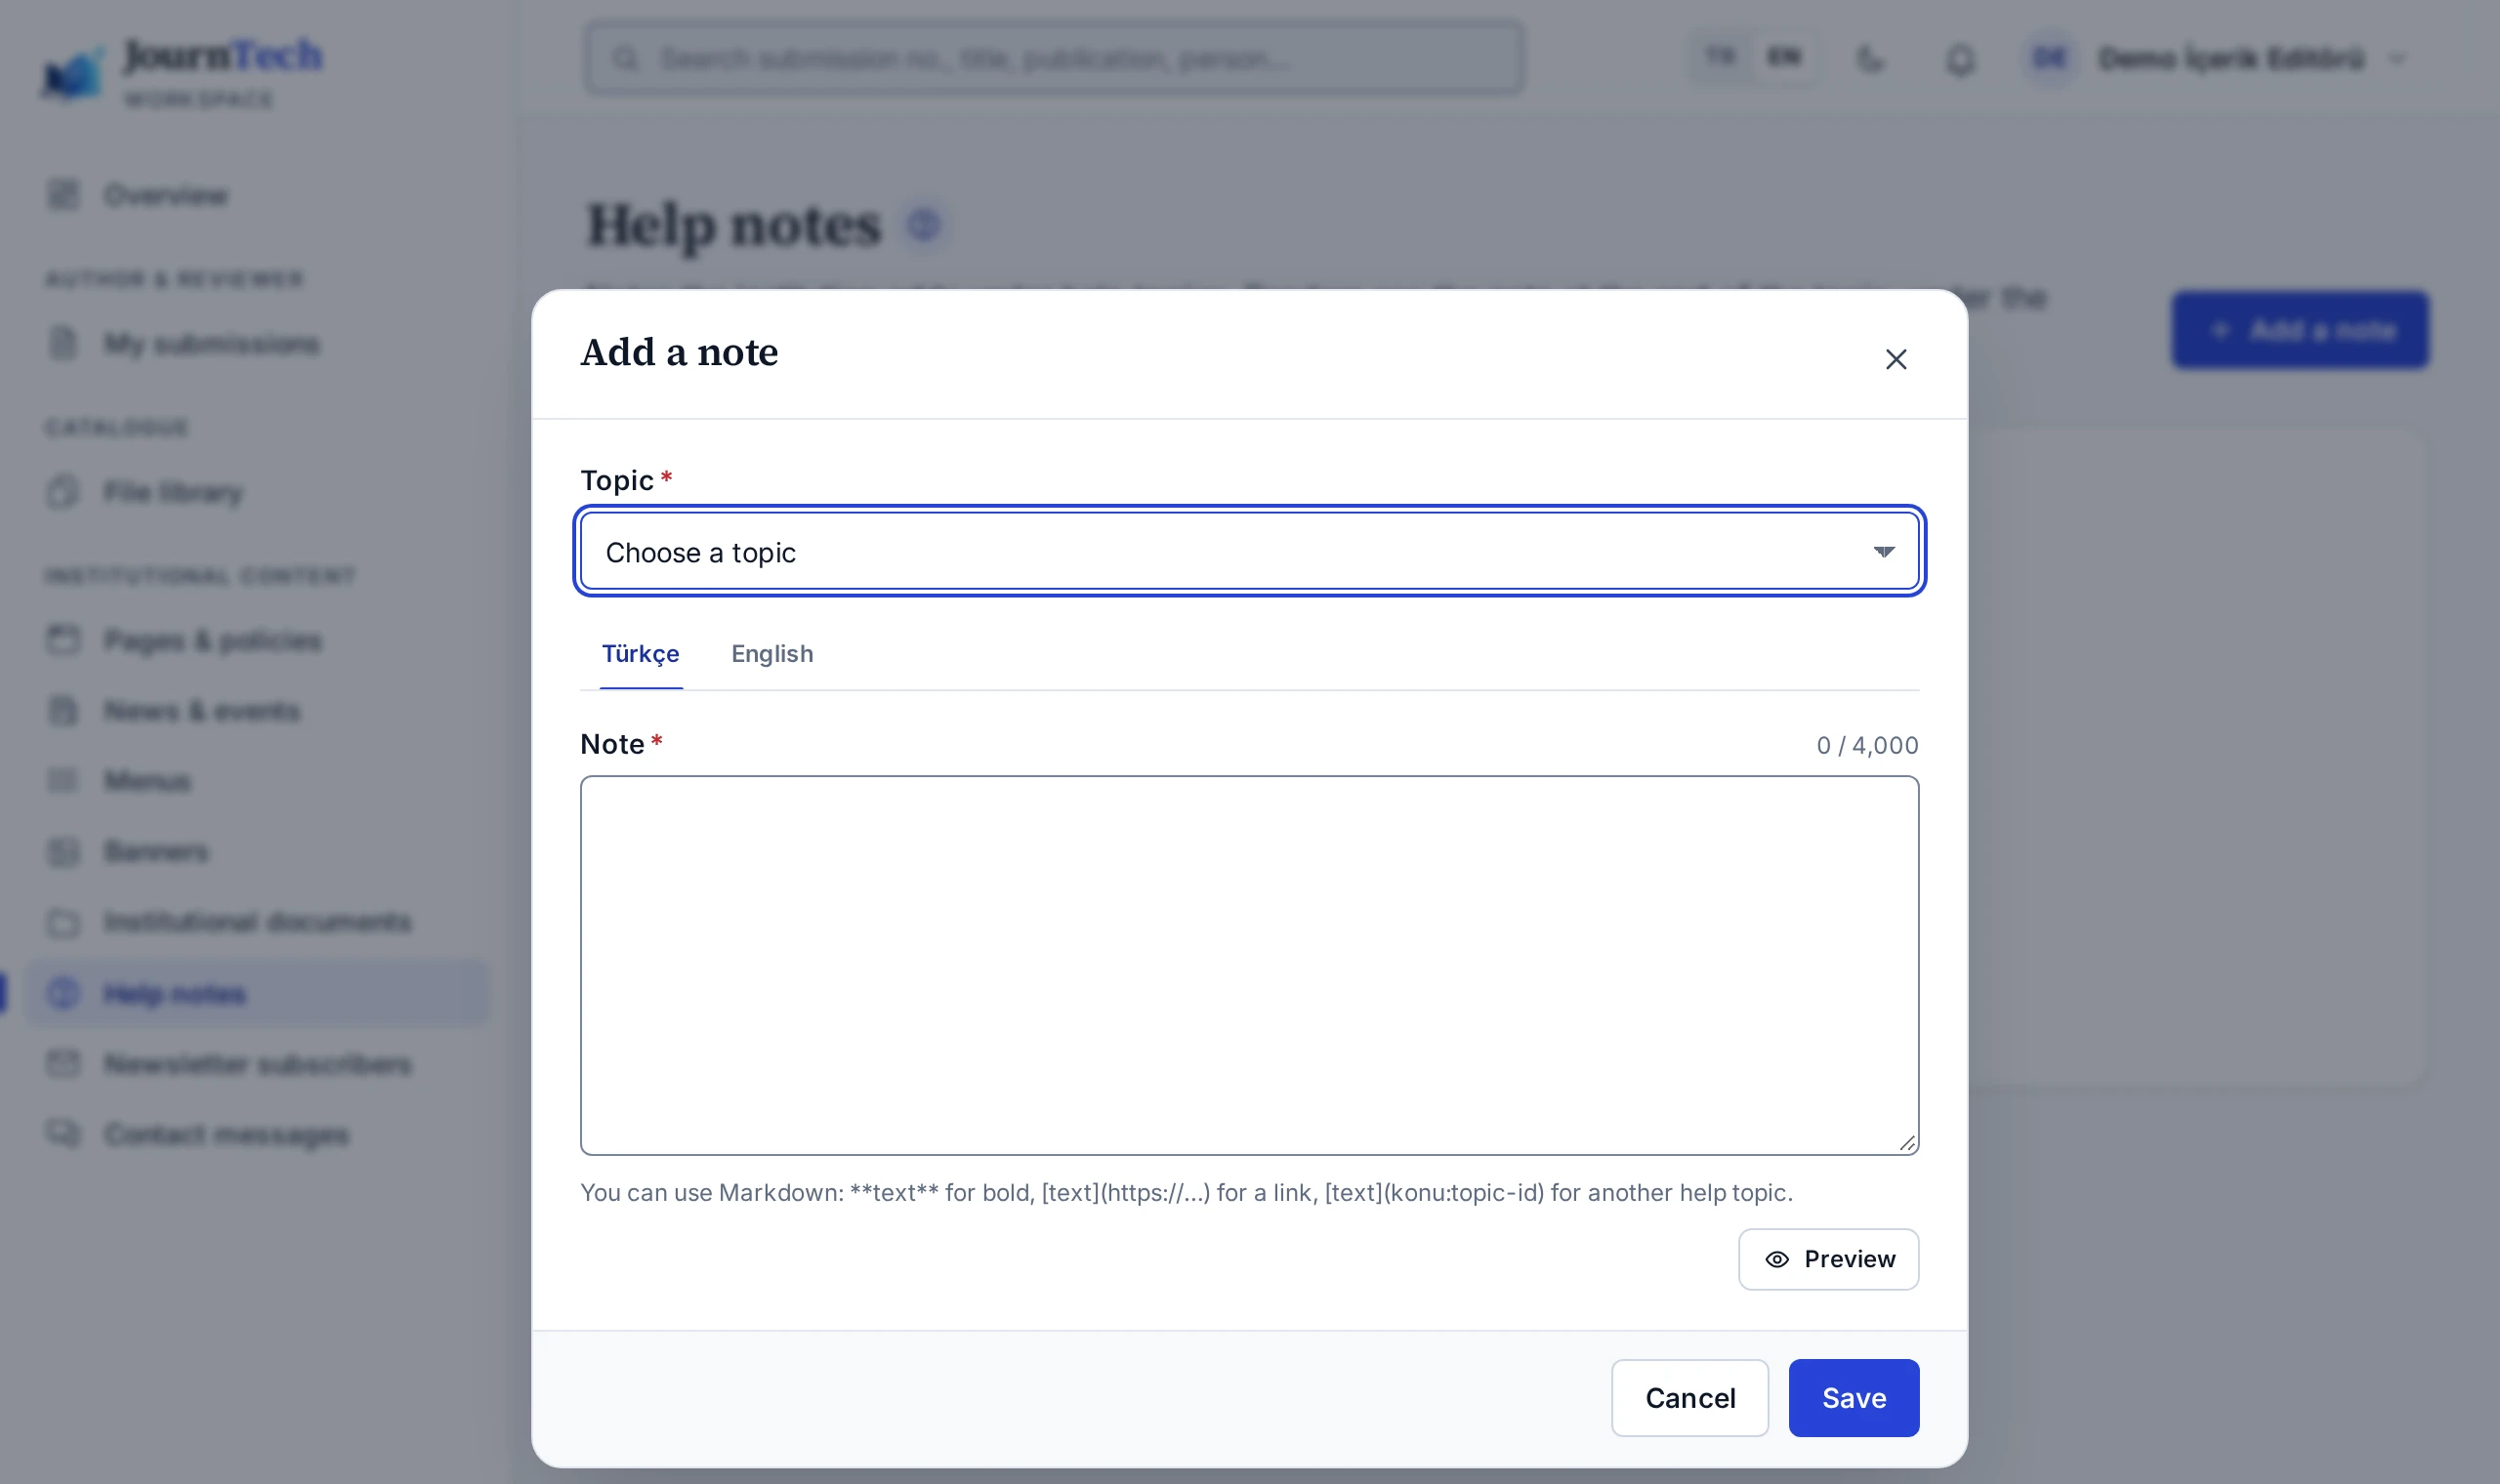
- Press Add a note and select the topic the note is for. If the topic you select already has a note, its text comes into the dialog and you edit it.
- Write the Turkish text. For the English pages, you can also write on the English tab. If there is no English note, the English pages show the Turkish note.
- Check with Preview how the note will look on the page, then press Save.
The Add an institution note to this topic link in the side panel opens the same dialog with that topic selected. When you notice missing information while you read a topic, adding the note from there is quicker.
Text format
Notes are written in Markdown. For bold text use **text**, and for a bullet point use - at the start of a line. A
link to a web page has the form [text](https://…). For a link to another help topic, write [text](konu:topic-id).
The topic ID is the last part of the help page's address. For this page it is yardim-notlari.
HTML is not added to a note. If you write HTML, it appears as plain text. If a link does not open or a shortcode is not recognised, the preview shows it and the note is not saved.
Removing a note
Use Delete the note in the menu on the note's row in the list. The note disappears from the help page and from the side panel at once. Adding, changing and deleting a note are written to the audit log.
If a topic is removed or renamed in a version upgrade, the note stays in the list with the Topic removed marker and does not appear on any page. Move the text to another topic and delete the old note.
Feature
Newsletter and Contact
Managing newsletter subscribers and answering the contact messages that come from the public site.
The Institutional content → Newsletter subscribers screen lists the people who signed up with the newsletter form on the public site. The subscription uses double opt-in and is complete once the person opens the link sent to their e-mail. The panel does not send newsletters. It keeps the subscriber list and gives the confirmed subscribers as a CSV file.
The Institutional content → Contact messages screen collects the general messages, copyright reports and correction requests from the public site's contact form. Opening a message counts as access to personal data and is written to the audit log. You send the reply by e-mail yourself and record the outcome on the screen.
Users with the Catalogue editor role also settle copyright reports and correction requests on the Catalogue → Copyright and correction reports screen. The forms on the public site are turned on and off with the Newsletter sign-up (public site) and Contact form flags on the Site settings → Features tab.
Screens and settings
Newsletter Subscribers
The counters, filters and columns of the newsletter subscribers screen, the CSV export and the rule for deleting a subscriber record.
The Institutional content → Newsletter subscribers screen lists the people who signed up with the newsletter form on the public site. Subscription uses double opt-in. A person signs up with the form and becomes a subscriber on opening the confirmation link sent to their e-mail address. The confirmation link is valid for 7 days.
The panel does not send newsletter e-mails. It keeps the subscriber list and gives you the subscribers as a CSV file.
Counters and filters
The Confirmed, Awaiting confirmation and Unsubscribed boxes at the top show the number of subscribers. Pressing a box narrows the list to that status. The Search box searches the e-mail addresses, and the Status list filters subscribers by status.
Columns
| Column | Shows |
|---|---|
| The subscriber's e-mail address | |
| Language | The language the subscriber chose |
| Status | Awaiting confirmation, Confirmed or Unsubscribed |
| Dates | The dates of sign-up, confirmation and unsubscribing |
| Consent text | The version of the privacy notice the subscriber accepted |
CSV export
Download CSV downloads the subscribers in the status selected in the filter. With no status selected, you get the confirmed subscribers.
- The addresses of confirmed subscribers are written in full, because these people gave explicit consent to the newsletter.
- The addresses of subscribers awaiting confirmation and of those who unsubscribed are masked unless you have the permission to export personal data.
- Every export is written to the audit log.
The permission to export personal data (Export reports with personal data) belongs to the System administrator role only.
Deleting a record
Delete record on a row deletes the subscription and the e-mail address permanently, as KVKK (Türkiye's Personal Data Protection Law) requires. The deletion cannot be undone and is written to the audit log.
The newsletter form is switched on with the Newsletter sign-up (public site) feature flag. The subscribers' unsubscribe link works even while the flag is off. The download steps are in Downloading the Subscriber List.
How-to
Downloading the Subscriber List
Downloading the confirmed subscribers as a CSV file to send a newsletter, and the details the file contains.
The panel does not send newsletter e-mails. To send a newsletter, you download the confirmed subscribers as a CSV file.
- Open the Institutional content → Newsletter subscribers screen.
- Leave the status filter empty, or press the Confirmed box.
- Press Download CSV.
For each subscriber the file holds the e-mail address, the language, the status, the version of the privacy notice they accepted, and the dates of sign-up, confirmation and unsubscribing. The addresses of confirmed subscribers are written in full.
If you select another status before downloading, the addresses of subscribers awaiting confirmation and of those who unsubscribed are masked unless you have the permission to export personal data. Every export is written to the audit log.
To remove a subscriber from the list, see Newsletter Subscribers.
Screens and settings
Contact Messages
The message types, filters and columns of the screen that lists contact form messages and copyright and correction reports, and the message dialog.
The Institutional content → Contact messages screen lists the messages from the contact form of the public site. Messages are grouped by type, and personal data is deleted automatically when the retention period ends.
| Type | Who sees it | Retention period |
|---|---|---|
| General | Content editor | 365 days |
| Copyright report | Content editor and Catalogue editor | 730 days |
| Correction report | Content editor and Catalogue editor | 365 days |
A System administrator sees every type. A Catalogue editor opens the same screen from Catalogue → Copyright and correction reports and sees only copyright and correction reports. The catalog editor records the outcome but cannot delete personal data.
Filters
- The Search box searches the subject, the sender's name and the e-mail address.
- The Type list filters messages by type.
- The Status list filters messages by the statuses New, In progress and Closed.
Columns
| Column | Shows |
|---|---|
| Subject | The subject and the first lines of the message |
| Sender | The sender's name and e-mail address |
| Type | The message type |
| Status | The message status, and a mark when an outcome is recorded |
| Received | When the message arrived |
New messages are highlighted in the list.
Message dialog
Open on a row opens the message. Opening a message is written to the audit log as access to personal data. The dialog shows the sender, type, status, time received and retention date. If the message concerns a publication, the Related publication line shows its address.
The bottom of the dialog holds these fields and buttons.
- New status offers Start handling and Resolve and close.
- Outcome / action taken is required when you close a message.
- Copyright and correction reports also show Reason (written to the audit log).
- Update records the outcome, and Delete personal data deletes the message and the sender's details permanently.
The new-message notification does not include the message text. Its link opens the message directly on this screen. The steps are in Replying to a Contact Message.
How-to
Replying to a Contact Message
Opening a contact message, copyright report or correction report from the public site, replying to it, recording the outcome and deleting the personal data.
You read a contact form message in the panel and send the reply yourself by e-mail. The panel does not send the reply for you.
Resolving a message
- On the Institutional content → Contact messages screen, press Open on the message's row. The link in the notification also opens the message.
- Send the reply from your own e-mail program. The sender's address is shown below the message.
- Under New status, select Start handling or Resolve and close.
- In Outcome / action taken, enter what you did. When you close the message, this field is required and must be at least 3 characters long.
- For a copyright or correction report, you can also fill in Reason (written to the audit log).
- Press Update.
For copyright and correction reports, the outcome is also written to the audit history of the publication concerned. If the message concerns a publication, the Related publication line shows its address. If you have catalogue permissions, the Open publication link takes you to the record.
Deleting the personal data
- Open the message.
- Press Delete personal data at the bottom of the dialog and confirm.
The message and the sender's details are deleted permanently. Only non-personal facts stay in the audit log. A Catalogue editor does not see this button.
If you do not delete them, the personal data is deleted automatically on the retention date shown in the dialog. General messages and correction reports are kept for 365 days, copyright reports for 730 days.